• About
    • Privacy Policy
  • Teaching
    • Member/Student Login
    • Online Programs
  • Shop
  • Member/Student Login
  • Blog
    • Free Quilt Patterns – Scrappy Whirligig Quilt

Bryan House Quilts

Curved Quilt Blocks Beginners Guide

Quilting and Stitching· Tutorial

24 Aug
Beginners Guide to Sewing Curved Quilt Blocks

Curved quilt blocks are easy to sew with my beginners guide. I use the pinning method for curved piecing step-by-step below to show you how.

Key Highlights

  • Curved piecing is a skill you can learn as a beginner.
  • Prepping fabric and accurate cutting are important steps.
  • Glue basting and pinning makes sewing curves much easier.
  • Sew slow and steady for great results.
  • Practice makes perfect!

Sewing Curves in Quilting

I know: Sewing curves looks impossible at first. With the right supplies, tools and know-how, you can sew curves like a pro. You will even like it!

A curved seam is made with two opposite pieces: a concave piece (curved inward) and a convex piece (curved outward). The curves need to meet at the right points on each piece to lay smooth, without puckers.

Slow, steady and patient sewing quickens the learning curve. Practice the piecing technique and never mind the mess ups – it’s a learning process. This beginner’s guide will provide a step-by-step piecing tutorial using the pinning method.

Tools and Sewing Supplies

Gather these tools and supplies beforehand and I’ll show you how to use them. Making accurate fabric cuts is essential.

  • A sewing machine with a quarter-inch foot or walking foot.
  • A rotary cutter & Cutting Mat
  • Glass head pins (very thin) & cute pin bowl
  • Marking pen
  • 50-weight thread in the top spool and bobbin. Thinner thread makes smoother curves.
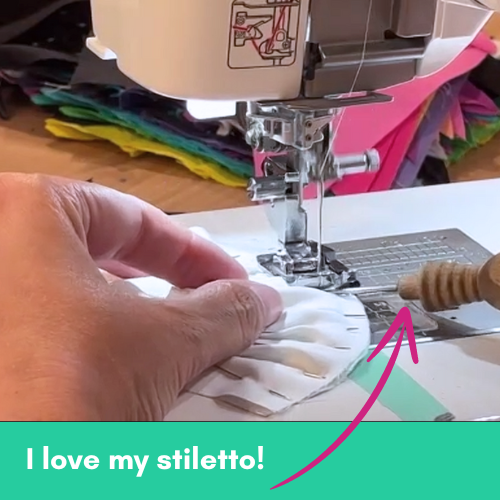
  • Stiletto – the handiest little tool for sewing and quilting, especially small pieces
  • Iron & Pressing Mat
  • Best Press starch
Glass head pins

Stiletto sewing tool

Rulers

Acrylic curved ruler sets take the guesswork out of cutting accurate shapes and blocks. The Classic Curves Ruler and Classic Curves Pro rulers from Color Girl Quilts, Wonder Curve Ruler or Quick Curves Ruler feature multiple sizes versus a set made for one size. Once you master curved quilt blocks, you’ll want to make them in all the sizes!

Most of the Drunkard’s Path rulers feature slots or registration marks to help you align the seams before sewing. I mark these with a pencil.

You can make your own templates from matboard, cardboard or template plastic. Quilt patterns include the templates for tracing, but I’ve found it’s too easy to shave off bits of template as you cut – oh no! Tracing a cardboard template shape onto the fabric and then cutting is better for accuracy.

Free pattern class outshine block

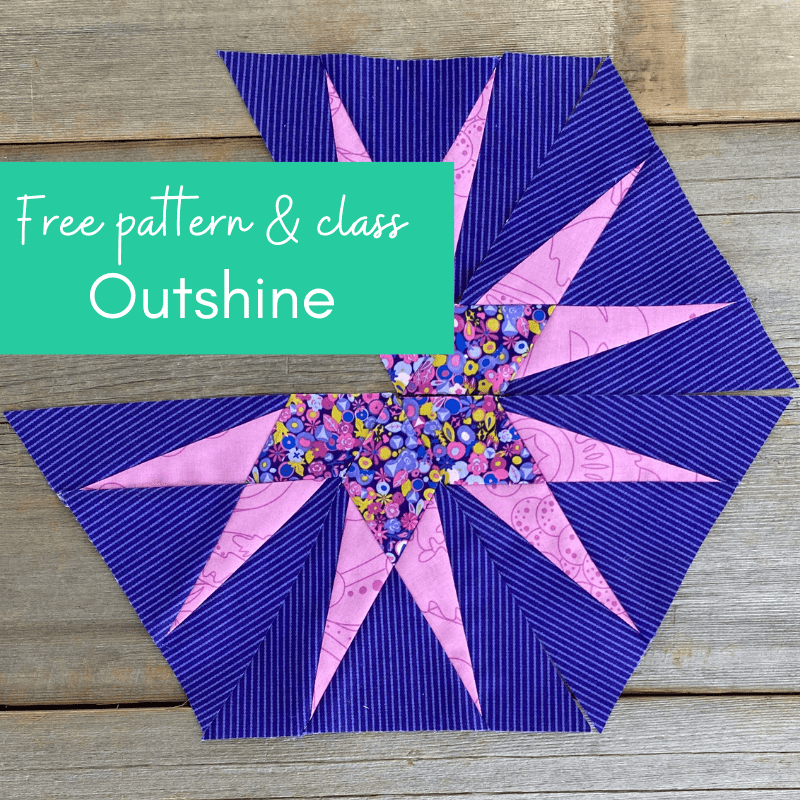
Make a modern triangle in my free class and learn the magic of Freezer Paper Piecing! Download the free pattern and I’ll walk you step-by-step through the technique. Get started here!

Tutorial for Sewing Curved Quilt Pieces

Now that you have the necessary tools and materials, let’s break down the process of piecing curved quilt blocks into manageable steps. Follow along with our quilting tutorial and you’ll be sewing curves like a pro in no time! Remember that practice makes perfect, so don’t be afraid to make mistakes and learn from them.

This guide focuses on the quarter-circle block, a common curved piece also known as the Drunkard’s Path block.This versatile block has been arranged in many ways. When you learn how to make a Drunkard’s Path block, many more quilt patterns will call your name.

Step 1: Prepping the Fabric

Accurate cutting depends on starched fabric and precise tracing for well-aligned curved quilt blocks.

First, prep the entire piece of fabric (quilting cotton for beginners) with Best Press spray starch. Some quilters drench their fabric in starch for curved piecing! I like a medium misting on both sides for stabilizing fabric – I press each side. The goal here is to prevent the bias from stretching while you’re handling the fabric. Handling stresses the fabric out!

Press up and down to set the starch – no sliding and skating over the fabric – which distorts it. I starch and press each side.

Step 2: Tracing

If using a handmade template, trace it carefully onto the fabric using a marking pencil. I use a silver quilter’s pencil on dark fabrics and a blue pencil on light ones. Mark notches with the pencil if your template includes them.

Step 3: Cutting Your Pieces Accurately

  • Align one of the ruler’s straight edges with the straight grain of the fabric (warp). Secure the fabric in place it with weights or clips to prevent shifting. My magnetic cutting board is a dream for this task.
  • Cut the two long straight edges first using a straight edge ruler or the acrylic ruler.
  • Trim the two short edges.
  • Cut the curved edge with scissors or a rotary cutter. The convex edge (the outtie!) is easier to cut with a rotary cutter, but the concave edge is easier with scissors. The rotary cutter tends to nick the ruler edges on an inside curve.
  • Once your pieces are cut, take a moment to double-check their accuracy. If any edges seem slightly off, carefully trim them or recut a new shape.

TIP: Match your templates up with the cut fabric. Do they match? Sometimes they don’t so recut the shape.

Step 4: Pinning Curves Together

Pinning curve pieces together

Pinning has given me the most reliable results. Pinning properly makes the fabrics meet at the right places along the curve. A curved piecing unit consists of two pieces: a concave piece (curved inward) and a convex piece (curved outward).

Find the center point by folding the pieces in half and gently finger pressing a crease down the center. Align the center points of both pieces along the curved edges, right sides together, securing them with a pin.

  • Next, match and pin the edges of the curves at the halfway point between the center pin and each end.
  • My best tip: add another pin that holds the centers in place along the crease near their points.
  • More pinning is better – I use 8 pins for a 4-inch block.
  • Remember, the goal is to ease the fabric together gently, avoiding pulling on the fabric, which distorts the curve.
  • Puckers happen when the fabric is pulled forward instead of easing in.
  • Lay the larger concave curved piece on top of the smaller convex piece.
  • Align the side edges where you start to pin. Keep this edge aligned as you pin – it may shift and throw off the alignment.

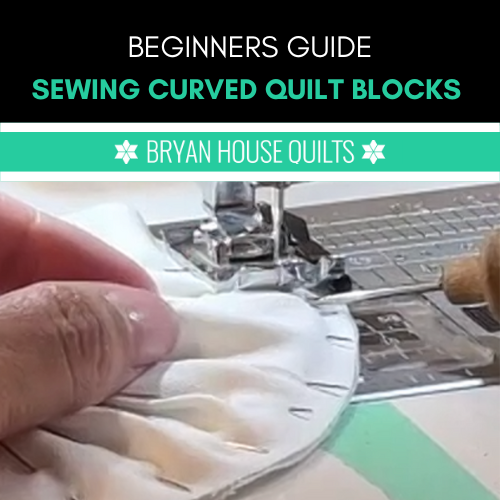
Step 5: Sewing the Curves

With your curves carefully pinned, it’s time to start sewing! Grab your stiletto or Purple Thang to hold the pieces in place when fingers can’t.

Sewing the curve with the extra help from a stiletto tool

One Stitch at a Time – Avoid the Puckers!

The key to curved piecing is joining the pieces at one spot under the needle one stitch at a time. The fabric pieces will never sit straight under the needle. Focus on this spot and let the feed dogs guide the fabric for the next stitch.

  • Set your stitch length to 1.5 to 1.8
  • Lay the pieces with the concave piece on top – you will see if it puckers while stitching.
  • Begin by sewing slowly, gently guiding the fabric so the fabric is stitched evenly along the seam line.
  • Maintain an even quarter-inch seam allowance.
  • Engage the needle down feature on your machine (if available) so your needle stays in the fabric when you stop without shifting fabric.
  • The key to sewing smooth curves lies in easing the fabric together as you sew, avoiding stretching or bunching. A few wonky stitches can throw off the curve!

TIP: Double check your stitching for puckers

Double check for oopsies

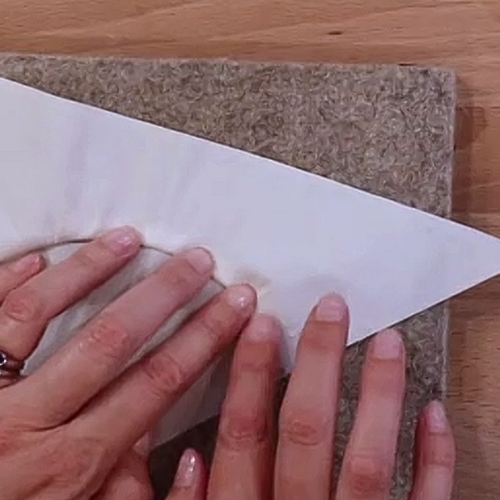
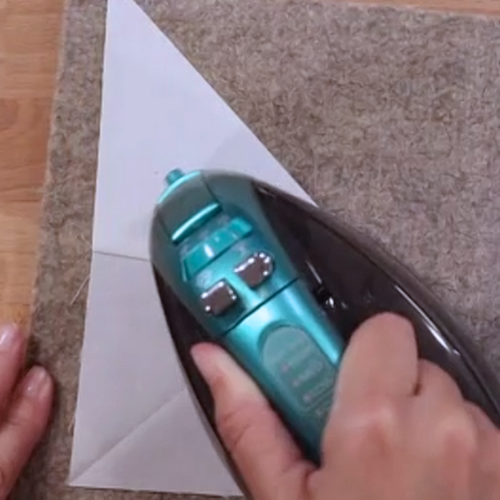
Step 6: Pressing for a Smooth Finish

Pressing is an essential step to achieve a polished look.

  • Set the seam allowance with the tip of the iron on the wrong side.
  • Turn it over to the right side and gently finger press the allowance toward the concave piece.
Setting the seam
Finger pressing
  • Use a dry, hot iron to press the seams towards the concave side of the block. Sometimes, you’ll need to press them under the darker fabric or they may lay better in the opposite direction.
Final press on the right side of the fabric
  • Trimming an ⅛ inch off the seam allowance helps it lay better underneath the curve.

Avoid ironing in circles or back and forth (iron skating!) so the curves won’t distort and stretch. It’s better to gently lift and reposition the iron as you press. This step might seem like a small detail, but it makes a huge difference in how the block looks and behaves! Taking the time to press carefully will result in gently curved seams.

More Quilt Curves Tutorials

While the quarter-circle block is an excellent starting point, a world of curved piecing options is out there. From gentle waves to intricate swirls, experimenting with different blocks allows you to add dynamic visual interest to your quilt design.

No Pins, No Glue Method for Curved Patchwork

I’ve tried this method and for me, it works better with larger blocks (8-inches +). Smaller blocks have tighter curves and less fabric to wrangle into place. Many quilters use this method so give it a try.

Sew Kind of Wonderful offers the Wonder Curve Ruler and a YouTube video lesson making precision cuts and using your finger to align the blocks as you sew.

Glue Basting Lessons from Quilter Blogs and YouTube

Glue basting works well with curved piecing. Amy Smart, Diary of a Quilter, explains the benefits of glue in her post with Cindy Fincher’s video tutorial.

See the Lyns Avenue video with her glue method here.

You have many glue products to choose from like liquid glue and glue sticks. Use a fine tipped applicator to lay down a thin line glue. Roxanne’s Glue Baste and Elmer’s School Glue.among quilters as well as Elmer’s School Glue.

Roxanne's Glue Baste

As you can see, there’s more than one way to try out curved quilt piecing on your next quilting project. Start with the quarter circle block – you’ll find many resources for inspiration, including quilt books, online tutorials, and quilting blogs. Experiment with different methods and discover what works best for your skill level and personal preference.

Beginners Guide to Sewing Curved Quilt Blocks Graphic

frequently asked questions graphic

Frequently Asked Questions About Quilt Curves

What is the Easiest Curved Quilt Block for Beginners?

The quarter circle block, also known as the Drunkard’s Path block, is a great place for beginners venturing into curved quilt patterns. It offers a manageable curve and provides a foundation for tackling more intricate designs. Happy quilting!

How Do I Choose Fabric for Curved Quilting?

Choose fabric that shows off curved piecing like solids, tone-on-tone, small printers and blenders. Choosing fabric is depends on the quilt design and personal preferences.

Can I Sew Curved Blocks Without a Special Foot?

Yes, you can sew beautiful curved piecess using a standard sewing machine foot. The key is to maintain a slow, steady pace while sewing curves, guiding the fabric carefully to sew a smooth seam.

Join our Block of the Month programs any time, start any time, make any project, finish any time, work at your pace and repeat! Click here to learn about all of the goodies in the Club!

Aurora BOM program
more resources

  • Master Freezer Paper Piecing – 12 Easy Tips
  • Choose Easy Analogous Combinations for Quilts
  • Beginners Guide: Using a Walking Foot
  • Modern Quilt Colors: Mixing Brights Right Tutorial
  • Celebrating Quilty Progress
  • Rainbow Quilt Designs: 9 Ways to Make Inspired Rainbow Quilts
  • Hexagon Quilts Roundup
  • Aurora Block of the Month
  • Quilt Coloring Pages: 4 Methods for Successful Color
Previous Post: « Monochromatic Quilt Patterns: How-to Color Guide
Next Post: Curved Blocks are a Hit! »

Reader Interactions

Comments

  1. Mea Cadwell says

    September 5, 2024 at 4:38 pm

    Per my sewing machine doctor: Please don’t sew over pins, even if sewing slowly. Each time your sewing machine needle hits a pin it can put your timing out a miniscule amount that can add up over time. This expense is easily avoidable

    And there are videos online showing what happens if the sewing machine needle breaks a pin which can go flying right into your face or eye.

    If I can prevent just one person from having to go to the hospital by mentioning all this then I’ve done one good thing.

    • rebeccabryan says

      September 6, 2024 at 11:11 am

      Thanks for chiming in! I know this is probably my worst sewing habit. Eep!

Primary Sidebar

Join Me Live for a Free Class

Join the 2026 Block of the Month Program

Get my Modern Triangles Quilt Book

Get my Modern Rainbow Quilts Book

Image shows cover of the book "Modern Rainbow Quilts"

Save your Spot: Free Class

Free pattern class outshine block

Make the Solstice Quilt!

Solstice Block of the Month by Bryan House Quilts

Get Your Invite!

Make Modern Triangles Logo

Make the Sparkler Quilt!

Image Shows Sparkler Quilt Top by Rebecca Bryan

Make the Echo (Echo!) Quilt

Echo BOM now open to join

Make the Wildflower Quilt!

Wildflower Block of the Month by Bryan House Quilts

Make the Stargazer Quilt!

Anne's Stargazer BOM

Make the Rainbow Triangles Quilt!

Rainbow Triangle BOM, modern triangle quilt, Rebecca Bryan

About

Hey there! I’m Rebecca, an author and teacher and freezer paper piecing evangelist. I’m also the founder of the Make Modern Triangles Quilt Club.

Disclosure

Just so you know, my site includes affiliate links from which I (it’s me! Rebecca!) receive payment or compensation. Something to consider as you peruse my website. Thanks!

Latest on Instagram

Fall is in FULL swing. 🙌

... hot drinks. ☕️
... football. 🏈

and crisp breezes and warm cozy meals! 🍁

All of my seasonal favorites! 

Plus, it’s the perfect season for quilting! (duh!) 🙌

If you’re in need of a new hobby to spark your creativity, stay cozy indoors, and make something beautiful, you are in the right place! 

The Make Modern Triangles Club is the place for all kinds of quilters at all skill levels and stages. 

In my programs, you get: 

👉 Printable, PDF patterns
👉 Clear, step-by-step instructions
👉 Video tutorials
👉 Live monthly sew-ins
👉 And an entire community of quilty friends!

If you’re craving a cozy new hobby to keep you busy, now is the perfect time to join! Comment “CLUB” for all the info you need. 💕

.

.
#quiltingcommunity #quiltingforbeginners #quiltingtips #quiltingdaily #quiltersofinstagram #ilovequilting #quiltingstudio #quiltingdaily #quiltingproblems #quiltinggma #quiltblock
When I stepped back from my “Peppermint Twist” When I stepped back from my “Peppermint Twist” version of Dutch Summer, I was practically giddy with quilty joy. 😍 

I’ll never tire of cutting up fabric and sewing it back together. 

Can you imagine what a feeling that must be? To be working all year on making your modern triangles? Watching as your pile grows from a handful to a STACK of beautiful triangles? At some point along the way, you’ll be able to envision what your final quilt will look like as you take your triangles and lay them out on your design surface?! And then... there’s this HUGE moment where you finish all the triangles and then finally get it alllllll finished!??? 🙌

Uh yeah! It’s a great feeling! And we are here to celebrate with you inside the Triangle Chatter Community. 🎉

And it could totally be you for 2026! 

You can get make this pattern with us inside the club, or you can purchase the standalone pattern. 

Comment “DUTCH” for all the details! 💌
.
.
.
#quiltingcommunity #quiltingforbeginners #quiltingtips #quiltingdaily #quiltersofinstagram #ilovequilting #quiltingstudio #quiltingdaily #quiltingproblms #quiltinggma #quiltblock #quiltpattern #quiltersgonnaquilt
Look at all of these beautiful Echo quilts! 😍 Look at all of these beautiful Echo quilts! 😍

This time of year is so special for so many reasons...

👉 Members are finishing their quilts and celebrating their BIG finishes! 
👉 We’ve just released the design for the next BOM and we’re already getting SO excited! 
👉 The change of seasons and coming holidays bring so much fresh inspiration. 
👉 We’re having so much fun in our holiday quilt along. 

There’s just so much good quilty stuff happening here! 

If you’ve ever felt like you wanted more friends who quilt, more people to talk quilty stuff with, and even more people to sew along with, you’re in the right place! 

The Make Modern Triangles Club is a one-of-a-kind community with quilters from all corners of the world at all stages of quilting. 🙌

Whether you’re brand new to quilting or have been at it for years, you’ll find new quilty friends, finish more projects in a community, and most importantly, have FUN! 🎉

I’m so excited to start our next BOM, but for now, we’re celebrating all of the BIG finishes! If you want to join us, you could be celebrating your own big finish by this time next year! 

Comment “DUTCH” for details to join! 💕

.
.
#quiltingdaily #quiltersofinstagram #ilovequilting #quiltingstudio #quiltingdaily #quiltingproblms #quiltinggma
Halloween + Quilting = Magic! 🪄 I’ve been th Halloween + Quilting = Magic! 🪄

I’ve been thinking a lot about Venn diagrams lately (nerd alert 🤓)... and if you take Fall and Triangles and mash them together, you get the cutest intersection ever... a Free Halloween Quilt Pattern + Tutorial! 👻

This project is quick, creative, and totally doable whether you’ve got a fancy fabric cutter or just your rotary cutter and a little Halloween spirit. 🎃

So grab your favorite spooky fabrics, pour a pumpkin-spiced something, and get stitching!

👉 Comment “Halloween” below, and I’ll send you the free pattern + step-by-step tutorial straight from the blog!

.
.
#quiltingcommunity #quiltingforbeginners #quiltingtips #quiltingdaily #quiltersofinstagram #ilovequilting #quiltingstudio #quiltingdaily #quiltingproblms #quiltinggma #quiltblock #quiltpattern #quiltersgonnaquilt
Watercolor to beautiful quilt? That’s what I’m Watercolor to beautiful quilt? That’s what I’m teaching at the Quilters Paradise Summit THIS WEEK! ✨

In my presentation, I’m sharing how I use watercolor paintings to create stunning, quilts ooooozing with color. 🌈

I find color to be so inspiring, but it also can be incredibly challenging. I love using watercolors to guide my colorful quilts, because it takes the pressure off. When I’m watercoloring, I’m just playing with color - if I don’t like it, I can just trash it and start again. 

But when I find something I love, then I can start getting serious with fabrics, time, and thread! 🪡

Anyhoo, I’m super excited to share a peek of my design process with you. It’s super fun! 🤩

If you want to watch my presentation along with the many others coming from amazing quilters, grab your FREE ticket to the summit or purchase the VIP pass! 🎟️

Comment “PARADISE” for details! 💌
.
.
.
#quiltingcommunity #quiltingforbeginners #quiltingtips #quiltingdaily #quiltersofinstagram #ilovequilting #quiltingstudio #quiltingdaily #quiltingproblms #quiltinggma #quiltblock #quiltpattern #quiltersgonnaquilt
Follow on Instagram

Browse by Category

Archives

  • Instagram
  • Facebook
  • Pinterest
  • email
Fall is in FULL swing. 🙌

... hot drinks. ☕️
... football. 🏈

and crisp breezes and warm cozy meals! 🍁

All of my seasonal favorites! 

Plus, it’s the perfect season for quilting! (duh!) 🙌

If you’re in need of a new hobby to spark your creativity, stay cozy indoors, and make something beautiful, you are in the right place! 

The Make Modern Triangles Club is the place for all kinds of quilters at all skill levels and stages. 

In my programs, you get: 

👉 Printable, PDF patterns
👉 Clear, step-by-step instructions
👉 Video tutorials
👉 Live monthly sew-ins
👉 And an entire community of quilty friends!

If you’re craving a cozy new hobby to keep you busy, now is the perfect time to join! Comment “CLUB” for all the info you need. 💕

.

.
#quiltingcommunity #quiltingforbeginners #quiltingtips #quiltingdaily #quiltersofinstagram #ilovequilting #quiltingstudio #quiltingdaily #quiltingproblems #quiltinggma #quiltblock
When I stepped back from my “Peppermint Twist” When I stepped back from my “Peppermint Twist” version of Dutch Summer, I was practically giddy with quilty joy. 😍 

I’ll never tire of cutting up fabric and sewing it back together. 

Can you imagine what a feeling that must be? To be working all year on making your modern triangles? Watching as your pile grows from a handful to a STACK of beautiful triangles? At some point along the way, you’ll be able to envision what your final quilt will look like as you take your triangles and lay them out on your design surface?! And then... there’s this HUGE moment where you finish all the triangles and then finally get it alllllll finished!??? 🙌

Uh yeah! It’s a great feeling! And we are here to celebrate with you inside the Triangle Chatter Community. 🎉

And it could totally be you for 2026! 

You can get make this pattern with us inside the club, or you can purchase the standalone pattern. 

Comment “DUTCH” for all the details! 💌
.
.
.
#quiltingcommunity #quiltingforbeginners #quiltingtips #quiltingdaily #quiltersofinstagram #ilovequilting #quiltingstudio #quiltingdaily #quiltingproblms #quiltinggma #quiltblock #quiltpattern #quiltersgonnaquilt
Look at all of these beautiful Echo quilts! 😍 Look at all of these beautiful Echo quilts! 😍

This time of year is so special for so many reasons...

👉 Members are finishing their quilts and celebrating their BIG finishes! 
👉 We’ve just released the design for the next BOM and we’re already getting SO excited! 
👉 The change of seasons and coming holidays bring so much fresh inspiration. 
👉 We’re having so much fun in our holiday quilt along. 

There’s just so much good quilty stuff happening here! 

If you’ve ever felt like you wanted more friends who quilt, more people to talk quilty stuff with, and even more people to sew along with, you’re in the right place! 

The Make Modern Triangles Club is a one-of-a-kind community with quilters from all corners of the world at all stages of quilting. 🙌

Whether you’re brand new to quilting or have been at it for years, you’ll find new quilty friends, finish more projects in a community, and most importantly, have FUN! 🎉

I’m so excited to start our next BOM, but for now, we’re celebrating all of the BIG finishes! If you want to join us, you could be celebrating your own big finish by this time next year! 

Comment “DUTCH” for details to join! 💕

.
.
#quiltingdaily #quiltersofinstagram #ilovequilting #quiltingstudio #quiltingdaily #quiltingproblms #quiltinggma
Follow on Instagram
© 2025 Bryan House Quilts