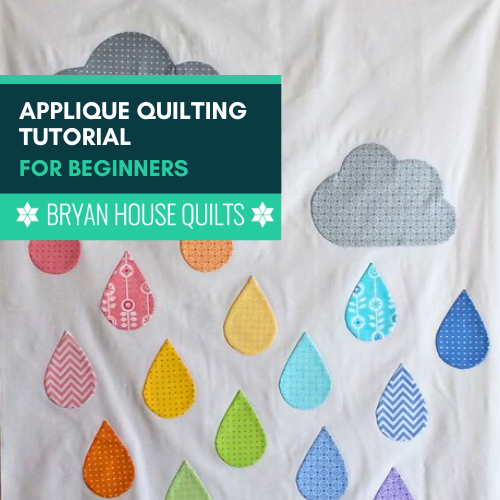
My applique quilting tutorial for beginners shows you a super easy, fast method to make an applique quilt.

Key Highlights in Blog Post
- Appliqué is a popular sewing technique where you to add shapes and patterns to your quilting projects.
- In this applique quilt tutorial, I show you how to use the easy inside out method that provides a clean tidy edge.
- You will learn how to choose fabrics, transfer your design, prepare the appliqué pieces, sew the pieces in place for a finished look.
- See different quilting techniques for attaching the appliqué pieces in creative ways.
What is applique?
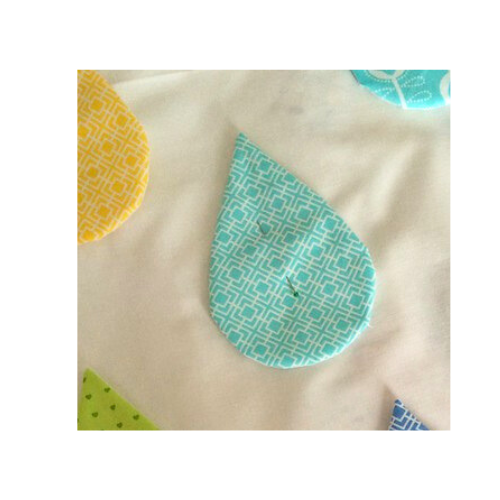
Appliqué is a technique where fabric pieces are sewn onto a larger piece of fabric to create designs and patterns. Some methods use freezer paper with turned under edges, fusible web and raw edges. When I need a quick, easy quilt, Rainbow Rain applique quilt is a cutie with fun textures and details for littles. If you want an easy applique quilt tutorial, this is the one!
Easy Appliqué Quilt Tutorial
If you’re new to appliqué, starting with a simple technique makes it fun, which is why we sew! In this blog post, I use an easy appliqué technique called the inside-out piece method. I also call it the lazy-lady because it’s that easy and fast.
I’ll use my Rainbow Rain quilt and show you how to easily trace, simply sew shapes to the top. The inside-out pieces method is the perfect technique for beginners who want a clean edge around shapes and no frayed edges.
Tools and Notions for this Quilt Applique Tutorial
When working with appliqué, it’s important to have the right tools and notions.
- Lightweight fusible interfacing (not fusible webbing): The interfacing forms the back side of applique piece. It also adds a little bit of stiffness to the piece, which is helpful.
- Safety pins or applique pins: Safety pins are useful for temporarily securing your shapes to the background before stitching.
- Seam ripper: A seam ripper is handy for removing any stitches that need to be corrected or adjusted during the appliqué process.
- Marking pencil
- Frixion pen (optional, depending on technique)
- Starch (optional)
- Matching thread
- Scissors: Sharp scissors are essential for precise cutting
- Sewing machine
Step-by-Step Guide: How to Appliqué Quilt Tutorial
Let’s dive into a step-by-step guide to appliqué quilting tutorial. This guide will walk you through the entire process:
- Choosing fabrics
- Transferring the design
- Cutting and preparing appliqué pieces
- Sewing fabric and fusible interfacing seams
- Turning and finger pressing
- Arranging appliqué pieces on the quilt
- Adhering shapes to the background
- Sewing appliqué pieces to the background
Any simple shapes work with this quilting applique tutorial for other projects. Speed up the cutting process by using the Accu Quilt Go! cutter and easy shapes like GO! Circles die.
By following this guide, you’ll be able to create beautiful appliqué quilts and add a personal touch to your projects. Let’s get started!
Step 1: Choosing fabric for this beginner project
When choosing fabric for your project, you have lots of options:
- Base fabric: Choose a fabric that complements your shapes. Solids or subtle prints work well as a background so the shapes get the focus. I used white for the background to make rainbow colors pop.
- Shapes: Use scraps from your stash or small pieces of fabric to create your shapes. This is a great way to use up remnants and add variety to your project. I had a rainbow color palette in mind and a stack of fat eighths.
- Starch: To make your fabric more stable and easier to work with, you can spray starch on it before cutting out your shapes. Always press even if you don’t use starch for accuracy with tracing and cutting. Folds and wrinkles distort the shapes. Oh no!
Have fun trying out different combinations to add interesting texture to your quilt.
Step 2: Transferring the Template Design
You need a sturdy template to transfer the design onto fabric.
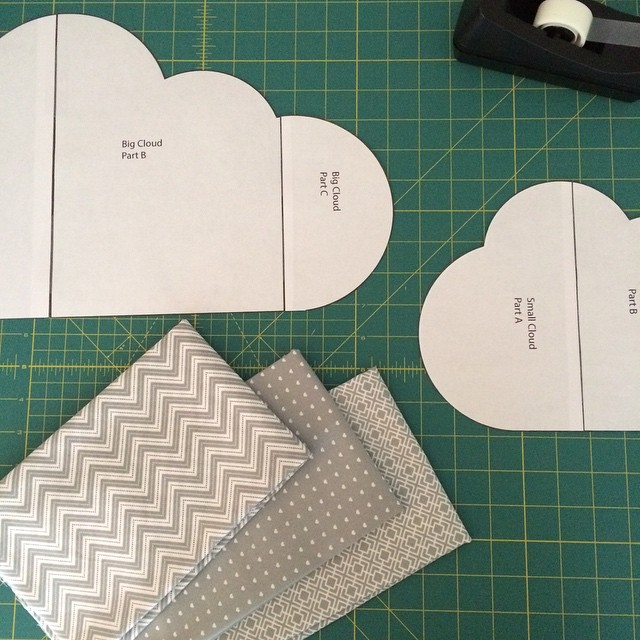
- Print a copy of the template onto cardstock.
- Cut out the cardstock shape. Use the cardstock as the template or trace onto template plastic and cut out, whatever your preference.
- Add 1/4 inch seam allowances if needed.
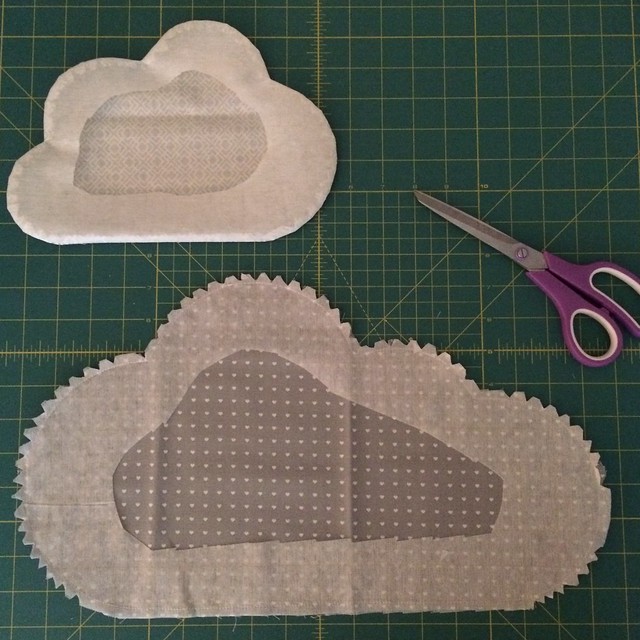
- Trace closely around the shapes on the fabric and fusible interfacing with a pencil. Trace an equal number on the fabrics as the interfacing. I cut out 17 raindrop and one of each cloud shape.
Step 3: Cutting and Preparing Appliqué Pieces
Once the design is transferred onto the fabric, it’s time to cut out your appliqué pieces.
Tip: Use sharp scissors to cut out your appliqué shapes, which makes clean edges and precise shapes. Take your time and cut carefully.
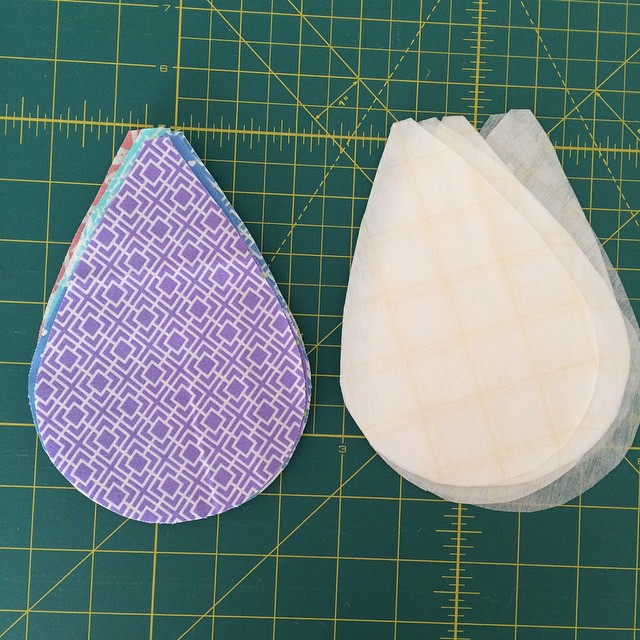
- Pair up a fabric piece with an interfacing piece – right side of fabric facing fusible interfacing side (glue dots).
- Pin together, lining up the raw edges.
Step 4: Stitching Seams
The next step in the quilt appliqué tutorial is stitching the two sides together.

- Sewing around curves shapes takes a little practice. You will need to continuously turn the circle to the left as with each stitch.
- Sew all of the way around the shape and secure the threads by backstitching.
- Add notches (see above) to the convex curves which reduces bulk.
- Make an inch-long slit with scissors in the back interfacing.
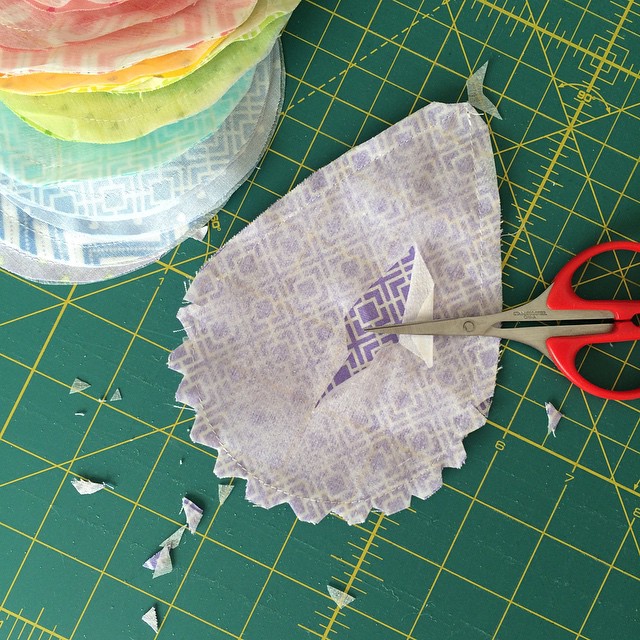
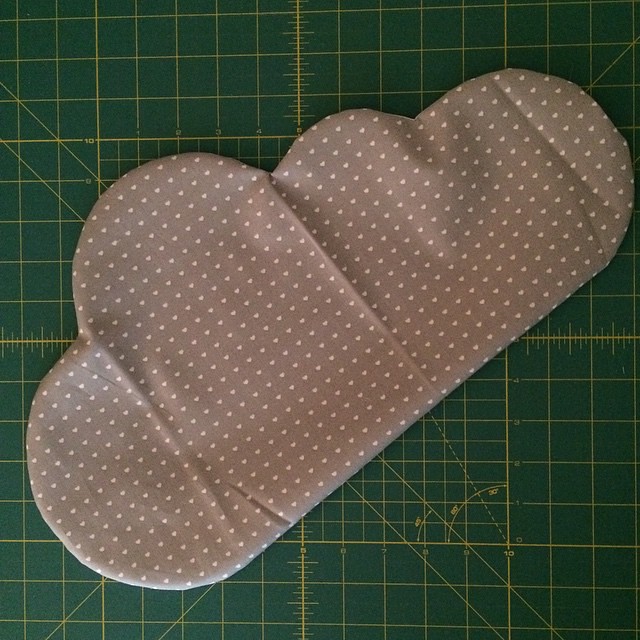
- Turn the shape inside out by pulling the fabric through the slit in the interfacing or use a pair of tweezers to carefully turn the fabric shape right side out through the opening.
- At this point, you can cut away more of the fusible for a bigger opening for turning, but the shapes will lose some of the glue.
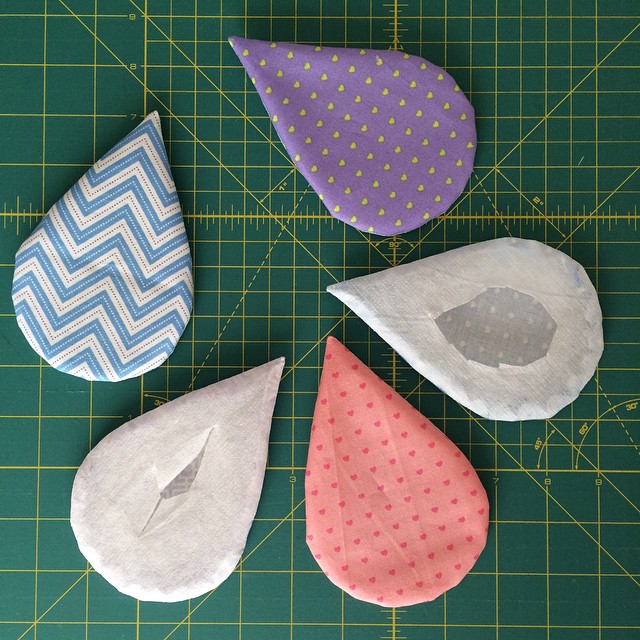
- The sticky, fusible side of the interfacing should now be on the backside of the raindrops.
- Finger press (do not use an iron!) the fabric to flatten the seam lines with even edges.
- Make sure the interfacing is completely tucked underneath.
Step 5: Transfer Design
Patterns usually include a layout guide for placing pieces. I randomly placed the raindrops until I was satisfied. If you have a layout guide to follow, you will need to transfer it to the quilt top to accurately place the pieces. There are several ways to do this:
Technique 1: Tracing with a Light Source
This method works best with light fabric backgrounds.
- Tape the template with painter’s tape to a light board or light source, like a large window or sliding glass door.
- Tape the fabric over the paper template, making sure the fabric is flat and secure. I like painter’s tape so there’s no sticky residue left behind.
- Lightly trace the design onto the background fabric with a heat erasable Frixion pen.
- The lines will disappear when you iron the fabric.
Technique 2: Tracing with White Transfer Paper
This method works best with medium to dark background fabrics. Test the transfer on a scrap first to make sure it works before you trace the entire design. Large pieces (18 x 36) are available at Joann’s and crafts stores.
- Tightly tape the fabric to a table
- Place the transfer paper face down over the fabric and tape in place.
- Lay the design over the transfer paper and tape it down. Trace over the design with a stylus or ballpoint pen several times with 50% pressure. Lift up a corner after tracing a few lines to make sure you see the lines.
- Finish tracing and carefully remove the taped layers.
There are other ways to transfer designs more detailed applique designs. These are my go-to methods for simple designs.
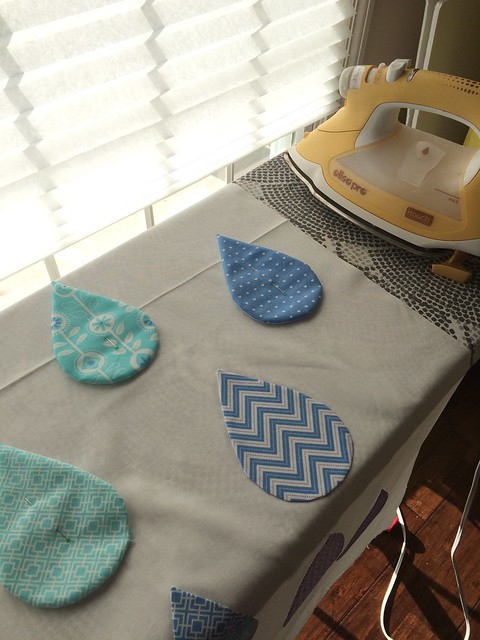
Step 6: Arranging and Fusing Appliqué Pieces on the Background
- Lay out your pieces – make sure to cover the transfer lines – and use regular pins or applique pins to hold them in place.
- Step back and make sure the pieces are in the right places.
- Press one shape at a time to the background. Remove the pin and press for 5 seconds. Press a few more seconds if the glue hasn’t melted to the fabric.
Step 7: Machine Applique Stitching: Straight, Zigzag and Satin
Now that you’ve learned the basic steps for preparing the shapes in this appliqué quilt tutorial, let’s explore some techniques and tips for sewing the appliqué. Whether you’re using a straight, a narrow zigzag, blanket stitch or satin stitching, follow these tips for a pretty finish and professional-looking results.
You can add the batting and backing fabric and sew through all the layers to applique, however, it’s easier to applique them before making the quilt sandwich.
You have so many stitching options – straight stitch, satin stitch, or any desired stitch for securing the pieces onto the quilt. I like using a sewing machine versus hand stitching because its efficient and faster for me. I like easy!
Take your time to stitch around each piece accurately, maintaining a consistent seam allowance. Make sure stitches go through both the appliqué piece and the background fabric.
This step adds dimension and texture to your quilt, enhancing its overall appearance and design. Enjoy the creative process of stitching your unique appliqué pieces onto the quilt, making sure to cover any pieces that are smaller than 3 inches in diameter with a secure stitch around the edges.
Sewing Tips for Quilters Using Appliqué
- Adjust your sewing machine’s stitch length and set up the thread.
- Warm up with stitching
- Be sure to backstitch at the beginning and end of your stitching to secure the threads.
- Start sewing around the edges of the fabric shape, following the outline of the shape.
- Sew close to the shape’s edge.
Straight Stitch for a Simple Outline
The straight stitch is a simple and versatile stitching technique that can be used for outlining your appliqué shapes. Here’s how to achieve a clean and precise straight stitch:
- Set your sewing machine to a straight stitch setting.
- Adjust the stitch length, depending on the look you want.
- Sew around the edges of the fabric shape, following the outline of the shape.
- Maintain a consistent stitch length and sew slowly for accuracy.
When sewing with a straight stitch, be mindful of the tension on your sewing machine. Adjust the tension as needed to achieve even and balanced stitches. Practice on scrap fabric before starting on your quilt to test the settings.
Zigzag Stitch for Durability
The zigzag stitch is a popular choice for securing appliqué shapes because of its durability and ability to prevent fraying. Here’s how to achieve a neat and secure zigzag stitch:
- Set your sewing machine to a zigzag stitch setting.
- Adjust the stitch width and length to your desired settings. A medium width and length are typically used for appliqué.
- Sew around the edges of the fabric shape, following the outline of the shape.
- Maintain a consistent width and length to ensure even and balanced stitches.
The zigzag stitch is similar to a satin stitch but with a longer stitch length that is durable and prevents fraying. Use a narrow zigzag for raw edge applique. It creates a secure finish that prevents fraying and adds durability to your appliqué shapes. Experiment with different stitch widths and lengths to see your options.
Satin Stitching
- Set your sewing machine to a zigzag stitch setting.
- Adjust the stitch width to 2mm and length to .02 for starters. Larger shapes may look better with a medium width (see Jane Sassaman quilts).
- Warm up on scrap fabric and try different thread colors. Use the same color as the shape for blending in.
- Take the first stitch just outside the shape’s edge and fill in toward the inside. 99% of the stitches are sewn just inside the shape’s edge.
- Sew around the edges of the fabric shape, following the outline of the shape.
Decorative Stitches for Embellishment
If you want to add more flair and creativity to your appliqué quilts, consider using decorative stitches for embellishment. Here’s how to achieve decorative stitches:
- Set your machine to a decorative stitch setting.
- Choose a stitching pattern that complements your appliqué design. So many to choose from!
- Sew around the edges of the fabric shape, following the outline of the shape with the decorative stitch.
- Experiment with different stitch patterns, widths, and lengths.
To achieve more intricate and detailed decorative stitches, you can also try free motion quilting. This technique allows you to move the fabric freely under the needle, creating unique and personalized designs. Use an embroidery foot for better visibility and control while free motion quilting.
Conclusion
I hope you’re ready to give appliqueing a whirl with my how to applique quilt tutorial. Mastering the art of appliqué quilting gives you loads of creative options for quilting, even for beginners. By following the step-by-step guide and using these techniques and tips, you can create beautiful quilt designs. Remember to choose the right fabric, tools, and notions for an easy appliqué process. Explore the endless possibilities that come with the world of applique quilting through an applique quilting tutorial and inspiration on Pinterest and Instagram.

Frequently Asked Questions
Can I appliqué on any type of fabric?
While appliqué can be done on various types of fabric, it’s important to consider the fabric’s weight and texture. Light to medium-weight fabrics, such as cotton, linen, or quilting cotton, are best suited for appliqué. Heavier fabrics may be more difficult to work with and may not adhere as well.
What are some common mistakes to avoid in appliqué quilting?
Some common mistakes in appliqué quilting include not trimming the seam allowance close enough to the stitching, using too much adhesive and causing fabric distortion, and not securing the edges of the fabric shapes properly. Take your time and practice to avoid these pitfalls.
How do I choose the right needle and thread for appliqué?
Choosing the right needle and thread for appliqué depends on the fabric weight and type of stitching. Aurifil makes many different weights that change the texture and look. Experiment with different weights and types – glossy, matte, polyester and rayon. Use a sharp needle with a size appropriate for your fabric. For thread, choose a type that matches your fabric and consider using a finer thread for more delicate appliqué work.
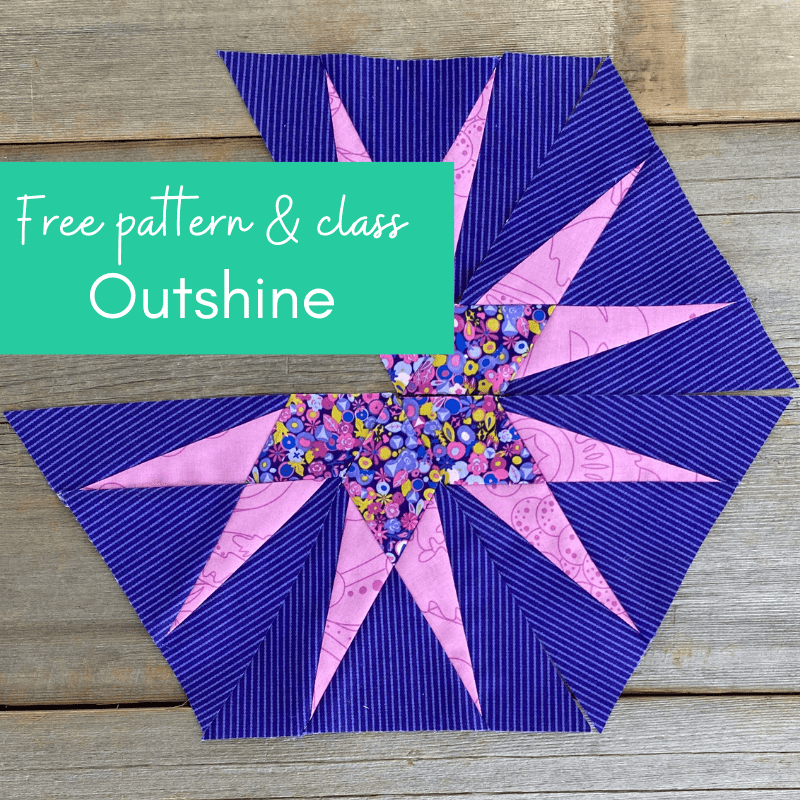
Make a modern triangle with my free pattern and class. Start right here for some sewing fun.

- Master Freezer Paper Piecing – 12 Easy Tips
- Choose Easy Analogous Combinations for Quilts
- Beginners Guide: Using a Walking Foot
- Modern Quilt Colors: Mixing Brights Right Tutorial
- Celebrating Quilty Progress
- Rainbow Quilt Designs: 9 Ways to Make Inspired Rainbow Quilts
- Hexagon Quilts Roundup
- Aurora Block of the Month
- Quilt Coloring Pages: 4 Methods for Successful Color

Nice presentation, a re-introduction for a quilter who had been fearful. I can do this. Snd the raindrops have curves and a point. If I can do that I can also do 💕. One success creates another skill. 😃🪡🧵
Yes! For sure! Love your perspective, thanks for sharing encouragement.
Hi from lower Alabama. I live in Troy. I have done my first applique and it is fun and reinforced me to be patient and go slowly. I did the raw edge application where I pieced the fabric pieces together and fused these pieces into one figure with thin webbing. Then I stitched it in place. How does thst sound to you? Thanks,
Mjw
Sounds pretty good! thanks for sharing!