• About
    • Privacy Policy
  • Teaching
    • Member/Student Login
    • Online Programs
  • Shop
  • Member/Student Login
  • Blog
    • Free Quilt Patterns – Scrappy Whirligig Quilt

Bryan House Quilts

Nine Patch Baby Quilt Tutorial

Tutorial

2 Feb

My nine patch baby quilt tutorial is perfect for the charm pack you’ve been holding onto for something special.

Grab a cute charm pack and let’s sew! (you know, that super cute charm pack you’re holding onto for the perfect project.)

Key Highlights

  • Learn to make a nine patch baby quilt with this start-to-finish tutorial.
  • Perfect for beginners, this project uses simple squares and basic sewing techniques.
  • No need to choose fabrics – just decide where you want to place them – with helpful tips and clear instructions.
  • Answers to frequently asked questions.

Introduction

When my baby boy was 16 months old, he was in dire need of another quilt – he’d loved the first one to pieces. Literally. He needed one made by his momma. And every time he saw it he said, “Mine!”. Love him.

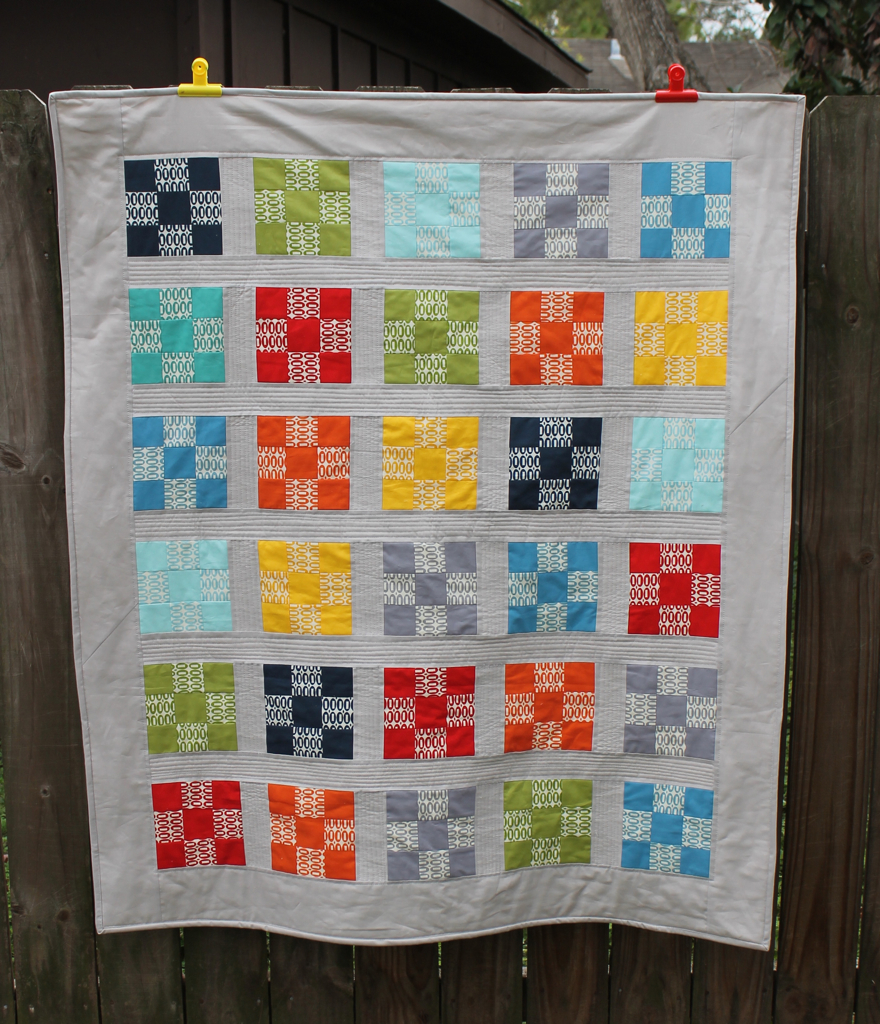
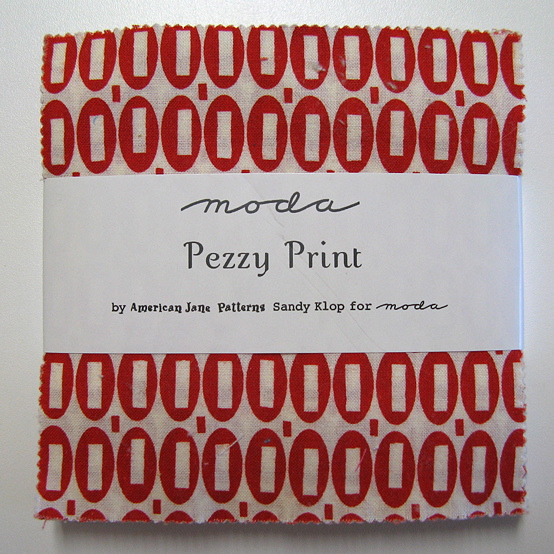
The quilt was so easy and fast that I thought I’d share “the how” with you. I used my almost-too- precious-to-use Pezzy Print charm pack by Moda. Sew cinchy.

Pezzy Charm Pack by Moda

This baby nine patch quilt is perfect for quilters of all levels, especially if you’re searching for easy and free quilt patterns. The finished size is 46 x 54 inches with 30 quilt blocks. This classic design comes together quickly, making it an ideal for the charm you’re itching to use. Let’s get started!

Prep: Baby Nine Patch Quilt

Before diving into sewing, let’s gather our supplies and make some fun decisions about color and design. You will need:

  • Rotary cutter and cutting mat
  • Clear acrylic ruler
  • Matching thread
  • Size 80/12 needle
  • Iron and pressing mat

Choosing Additional Fabrics to Mix In

While charm packs are practically perfect in every way, mixing in solids, stripes and other prints adds contrast and value within the individual quilt blocks. Plus, it pulls the design together or makes a primary or secondary pattern stand out. When selecting fabrics for your nine patch baby quilt, consider the following:

  • Layout your charm pack fabrics in one vertical row from light to dark value by color. You will easily see the gaps and opportunities to improve the design.

Solid fabrics chosen with Kona fabrics card swatches

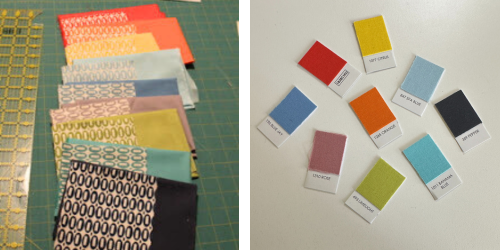
  • Check out a solids collection such as Kona Cotton to fill in needed lights to dark fabrics in specific colors. I have a Kona swatch card library on hand making this an easy Pezzy matchfest. More on this in the tutorial below.
  • Directional prints like stripes and fun fussy motifs (Mermaids! Octapus!) add spark and movement. Make sure they face the same direction if needed.
  • Colors that match or complement the nursery or home’s decor. For example, blue has infinite versions. I ask the momma-to-be to send a pic of the wall color or other nursery items. Make momma swoon!

Fabric Requirements: Easy Nine Patch Baby Quilt Pattern

Have fun matching your charm squares with additional fabrics!

Fabric for Quilt Top:

  • 1 charm pack (you will use 30 out of 42 charm squares),
  • 3/4 yard total of all additional coordinating fabrics. You could use portions of of fat quarters to get enough variety or matching for the additional 150 2.5 inch squares. Another option is using 38 charms from another pack.
  • 1.25 yards for sashing- I used Kona Ash because I liked how the neutral fabric played off the bright prints and saturated solid colors.

TIP: Jelly roll strip leftovers are easy replacements for charm packs if you have coordinating strips from another project.

Fabric for backing and binding: 2 ½ yards for a pieced backing and ½ yard for binding.

Step-by-Step Guide to Making a Nine Patch Baby Quilt

Step 1: Cutting Your Fabric into Squares

This quilt finishes with thirty (30) 9-patch blocks. Each 9-patch block is made from 1 charm square plus five (5) 2.5 inch squares from a coordinating fabric (#1).

1. Sub cut each charm into four (4) 2.5 inch squares (#2).

Fabric selection laid out, cutting charm squares into 4 pieces, using strips for smaller squares and laying the nine patch block design.

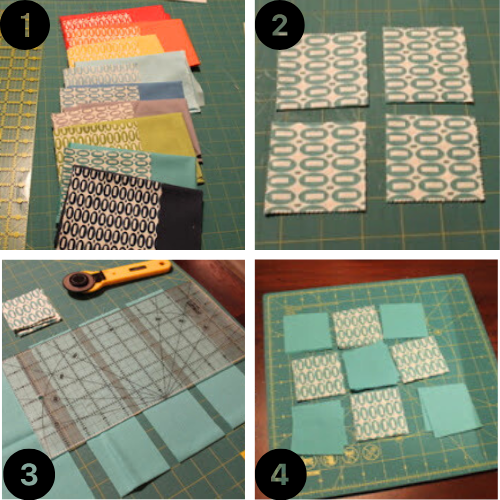
2. Next, cut 2 ½ squares from the coordinating fabrics. If you use 38 charm squares, it will yield a total of 152 2.5 inch squares (you need 150). Each charm square yields four (4) 2.5 inch squares. The math looks like this: 38 x 4 = 152.

Alternately, the charm pack I used came with 3 or 4 charms of each print so I cut the coordinating fabrics from 9 solid fat quarters (#3)

Then I cut 2.5 inch strips and then sub cut those strips into 2.5 inch squares. That particular print in the photo had 3 charms in the pack, so I cut 3 strips from my fat quarter.

3. Cut the fabric for your sashing and border:

  • 4 (four) 2.5-inch by WOF (width of fabric) strips, then sub cut into 24 2.5 inch by 6.5 inch strips
  • 5 (five) 2.5 inch by WOF strips
  • 2 (two2) 4.5 inch by WOF strips (border)
  • 3 (three) 4.5 inch by WOF strips (border)

Step 2: Arranging Your Nine Patch Blocks

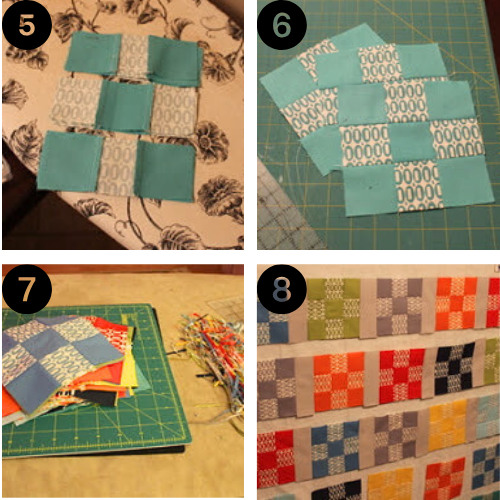
Now it’s time to arrange your fabric squares into the classic nine patch block layout. Take your nine squares and arrange them in three rows – a top row, a middle row and bottom row, with three squares in each row. Be mindful of the placement of your light, medium, and darker fabrics to create a balanced design (#4 above).

When you’re happy with the nine patch block layout, snap a photo for a visual reference.

Step 3: Sewing Your Blocks Together

1. With your nine patch blocks arranged, thread your sewing machine with a matching thread color. Begin by stitching your nine patch blocks with the fabric right sides together (#5) Starting with the top row, sew the squares together using a quarter-inch seam allowance. Press seams open or toward the darker fabric to reduce bulk.

sewing nine patch 2 ½ inch blocks into rows, then sewing the rows into blocks, trimming and laying out the design for the nine patch baby quilt.

TIP: Alternate the pressing direction for each row so it’s easier to nest and match seams as you go.

Then, sew the middle row squares in the same manner, followed by the bottom row. You’ll now have three separate strips of fabric, each representing a row in your nine patch block (#6).

To complete your blocks, sew the three rows together, ensuring your seams are aligned. Press the seams of your quilt blocks open and admire your progress.

Sew all 30 nine patch blocks.

2. Trim your nine patch blocks to the same size with a rotary cutter and ruler. They are *supposed* to finish at 6.5 inch squares. I trimmed mine down to 6.25 inch squares to make them consistent (#7).

Step 5: Assembling the Quilt Top

Now that your nine patch blocks are complete, arrange them side by side to visualize the layout of your quilt top. Experiment with different arrangements (#8 above).

Sew the rows together in six rows of five blocks with a 2.5 inch by 6.5 strip of sashing in between each block. Press seams open to minimize bulk.

Finally, sew the rows together using a 2.5 inch by 38.5 inch strip of sashing in between each row.

TIP: To better align my quilt blocks, I use my ruler and make small tick marks where I want my blocks to line up. Then I match the marks and pin.

Stand back and admire your handiwork! Your nine patch baby quilt is starting to take shape.

Step 5: Adding Borders (Optional)

Sew 2 (two) 4.5 inch by 38.5 inch strips of sashing fabric to the top and the bottom edges. Next, sew 2 (two) 4.5 inch by 54.5 inch strips to each side.

Square up the quilt top in each corner – see this if you need directions.

Borders on a nine patch baby quilt top can add to the quilt size and enhance the color scheme with just a few fabric strips for a nice finish on a small quilt. This adorable baby quilt is even cuter with borders!

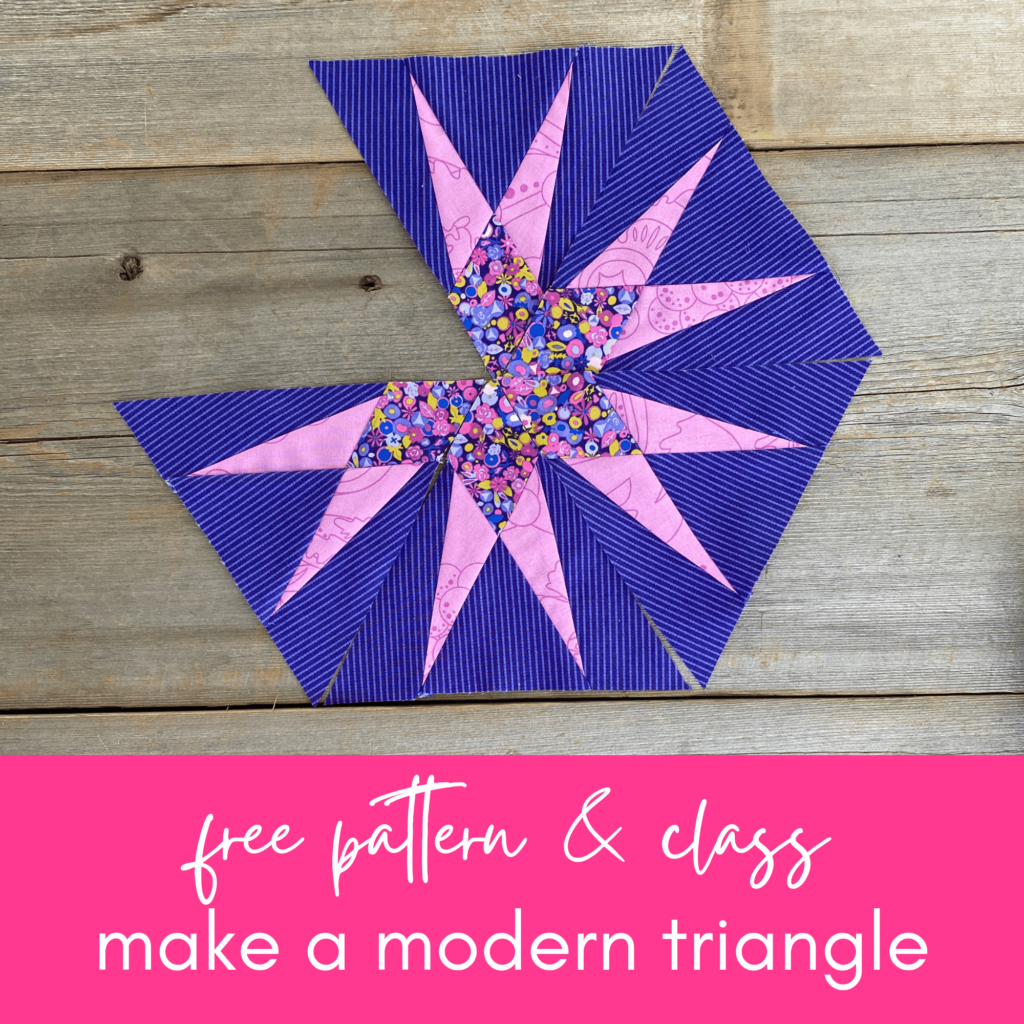
Make a modern triangle with my free pattern and class. Start right here for some sewing fun.

Finishing Touches for Your Baby Quilt Nine Patch Pezzy

The final steps in creating your nine patch baby quilt involve layering, quilting, and adding binding. These essential elements bind the layers together, add durability, and provide a beautiful finishing touch.

Basting Quilt Layers Together

Basting is a crucial step that secures your quilt layers – the pieced top, batting, and backing fabric – preventing them from shifting during quilting. See my in depth post on Finishing a Quilt Top

Quilting Techniques for Beginners

While there are countless quilting techniques, beginners can start with simple options, especially for a nine patch quilt block. Get schooled on stitching the top with Finish a Quilt – Stitch Methods and my Beginner’s Guide to Straight Line Stitching.

Binding a Quilt

Binding encases the raw edges of your quilt, creating a neat and durable finish.

If you’re new to binding, head on over to my posts My Favorite Machine Quilt Binding Tutorial with photos of the entire process. Plus, I’ve put together 25 creative ideas for binding. You’ve got options!

Conclusion

Making a nine patch baby quilt is a quick and easy keepsake for the little ones in your life. I loved making this for my little boy exactly when he needed it in no time at all!

Frequently Asked Questions

How much fabric do I need for a nine patch baby quilt?

The amount of fabric you need depends on the size of your quilt and the size of your nine patch blocks. For a baby quilt, you’ll generally need around 2-3 yards of fabric for the top, backing, and binding.

What is the best batting for a baby quilt?

For baby quilts, consider a soft and breathable batting like an 80/20 cotton and polyester blend, which holds its shape well and adds warmth.

How can I personalize my nine patch baby quilt?

You can personalize your nine patch baby quilt in numerous ways! Incorporate embroidered patches, applique designs and fussy cut fabric squares.

Are nine patch baby quilts suitable for beginners?

Absolutely! Nine patch baby quilts are excellent projects for beginners. These easy baby quilt patterns involve simple squares and basic sewing techniques. With a little patience and practice, you’ll have a charming quick quilt in no time!

MORE RESOURCES

  • Master Freezer Paper Piecing – 12 Easy Tips
  • Choose Easy Analogous Combinations for Quilts
  • Beginners Guide: Using a Walking Foot
  • Modern Quilt Colors: Mixing Brights Right Tutorial
  • Rainbow Quilt Designs: 9 Ways to Make Inspired Rainbow Quilts
  • Hexagon Quilts Roundup
  • Aurora Block of the Month

Previous Post: « Wool Batting for Warmer Winter Quilts
Next Post: First Month, First Block, First TA DA! »

Reader Interactions

Comments

  1. Lorraine Salter says

    February 4, 2025 at 10:10 am

    Your step by step tutorial was a easy to follow thankyou for explaining how to put together and how much material you need thanks again

  2. Shirley Swann says

    February 6, 2025 at 4:10 pm

    Thanks for the direction of the baby quilts I had several babies over the past two years. Two boys and two girls .Your direction will keep me on the right track .Again thank you so much 💘💘

Primary Sidebar

New Block of the Month!

Join the 2026 Block of the Month Program

Get my Modern Triangles Quilt Book

Get my Modern Rainbow Quilts Book

Image shows cover of the book "Modern Rainbow Quilts"

Make the Solstice Quilt!

Solstice Block of the Month by Bryan House Quilts

Get Your Invite!

Make Modern Triangles Logo

Make the Sparkler Quilt!

Image Shows Sparkler Quilt Top by Rebecca Bryan

Make the Echo (Echo!) Quilt

Echo BOM now open to join

Make the Wildflower Quilt!

Wildflower Block of the Month by Bryan House Quilts

Make the Stargazer Quilt!

Anne's Stargazer BOM

Make the Rainbow Triangles Quilt!

Rainbow Triangle BOM, modern triangle quilt, Rebecca Bryan

About

Hey there! I’m Rebecca, an author and teacher and freezer paper piecing evangelist. I’m also the founder of the Make Modern Triangles Quilt Club.

Disclosure

Just so you know, my site includes affiliate links from which I (it’s me! Rebecca!) receive payment or compensation. Something to consider as you peruse my website. Thanks!

Latest on Instagram

I’ve just recently got all of these quilts back fr I’ve just recently got all of these quilts back from the quilter!!!! 😍

SWIPE to see them all and tell me which one is your favorite in the comments! 💕 👇

#quiltpattern #quiltinspiration #modernquilting #finishedquilt
I think as quilters, we sometimes get really wrapp I think as quilters, we sometimes get really wrapped up in a project or wanting to finish by a certain deadline, that we forget to just play. 🙌

Triangle blocks are especially fun for playing with! 

Because the same exact blocks can look completely different depending on how you arrange them.

All of a sudden, you’re not just following a pattern anymore, you’re creating something unique. 🪄

And I think that’s where a lot of the joy in quilting lives.

Not in getting it “right” or making it perfect, but in letting yourself be curious. 

Letting yourself try something, change it, try something else, and be a little playful instead of precise.

Some of my favorite quilts didn’t come from a perfectly planned layout… 👇

They came from standing at the wall, thinking, “Wait… what if I try it like this instead?” 👀

So if you have a few triangle blocks sitting nearby, take a little time to play with them and see what kind of pattern they end up in. 

Comment ‘TRIANGLE’ if you want to take my free class where I teach you how to make a modern triangle, and give you a block pattern to start sewing. 💕

#modernquilting #quiltingtechnique #quiltingforbeginners #beginnerquilter
This time of year in the sewing room is always so This time of year in the sewing room is always so lovely. 

We FINALLY get to have the windows open, the world outside is getting colorful again, and the extra daylight is a big bonus. 

This is my recipe for a PERFECT April sewing day...

✨ Self care: plan meals/snacks for eating right & getting your exercise (booooooo! I know, I know.) Maybe a fun wee treat tho!?

✨ Entertainment: if it’s just you, get your show/ sporting event/ audible, etc. Or if you’re with your quilty buds, you know what to do! Sew, gab, laugh!

✨ Something you’re excited to sew: latest bingeable project at the ready!? Latest fabric stack that arrived in the post? Or...finally get that WIP d.u.n!

✨ Essential responsibilities taken care of: feed the dog, respond to that time-sensitive email, dinner for the fam? Take care of what you must get done so you can check out more completely.

Finally, set a timer for your hard stop time.

I set my alarm for when I need to pick up my kiddos from school. That way, I can get carried away by my creativity and indulge in “me” time!

Shut the laptop, check out, it’s sew time! 🧵 Everything else on your to-do list can wait. It is time for you!

What are you working on for a perfect April sewing day? ⬇️

#quiltingprogress #quiltinginspiration #quiltpattern #springsewing
If my WIP pile was getting out of control… here’s If my WIP pile was getting out of control… here’s exactly what I’d do: ⬇️

👉 Find a community of quilters to connect with, learn from, and grow with. People who cheer you on, celebrate your blocks, and make you want to keep going!!! 

👉 Make it easier on yourself with freezer paper piecing. This technique completely changed my life. I wanted to give up on quilting altogether at one point before I found freezer paper piecing. 

It’s not that you don’t finish quilts…

It’s that you don’t have the right support or the right process yet. 🧵✨ Comment ‘FREE’ to take my free class, learn the freezer paper piecing technique, and get invited to join an amazing community. 💕

#quiltingcommunity #quiltingclass #quiltingtechnique #quiltinginspiration
One stitch at a time!!! 🪡 Sometimes, a few hours One stitch at a time!!! 🪡

Sometimes, a few hours (or days) in the sewing room just makes it all alright. 🙌

Who agrees? ⬇️

#quiltingismytherapy #quiltinglife #quiltingismybliss #quiltersgonnaquilt
Comment ‘FREE’ to sign up for the class! 🫶 One th Comment ‘FREE’ to sign up for the class! 🫶

One thing that will NEVER get old with freezer paper piecing... ⬇️

The number of blocks I can sew from just ONE foundation! 🙌

It always amazes me, and it’s one of my favorite things about the technique. 

I save so much time not having to make a new foundation for every single block, and that’s not to mention the time saved from not having to rip the paper bits of those foundations out of the seams. ✨

I’m hosting a free class where I teach you this technique, and give you a modern triangle block pattern to start sewing! 

Comment ‘FREE’ if you want to sign up! 🫶
.
.
.
#quiltingclass #quiltingforbeginners #foundationpaperpiecing #paperpiecing
Follow on Instagram

Browse by Category

Archives

  • Instagram
  • Facebook
  • Pinterest
  • email
I’ve just recently got all of these quilts back fr I’ve just recently got all of these quilts back from the quilter!!!! 😍

SWIPE to see them all and tell me which one is your favorite in the comments! 💕 👇

#quiltpattern #quiltinspiration #modernquilting #finishedquilt
I think as quilters, we sometimes get really wrapp I think as quilters, we sometimes get really wrapped up in a project or wanting to finish by a certain deadline, that we forget to just play. 🙌

Triangle blocks are especially fun for playing with! 

Because the same exact blocks can look completely different depending on how you arrange them.

All of a sudden, you’re not just following a pattern anymore, you’re creating something unique. 🪄

And I think that’s where a lot of the joy in quilting lives.

Not in getting it “right” or making it perfect, but in letting yourself be curious. 

Letting yourself try something, change it, try something else, and be a little playful instead of precise.

Some of my favorite quilts didn’t come from a perfectly planned layout… 👇

They came from standing at the wall, thinking, “Wait… what if I try it like this instead?” 👀

So if you have a few triangle blocks sitting nearby, take a little time to play with them and see what kind of pattern they end up in. 

Comment ‘TRIANGLE’ if you want to take my free class where I teach you how to make a modern triangle, and give you a block pattern to start sewing. 💕

#modernquilting #quiltingtechnique #quiltingforbeginners #beginnerquilter
This time of year in the sewing room is always so This time of year in the sewing room is always so lovely. 

We FINALLY get to have the windows open, the world outside is getting colorful again, and the extra daylight is a big bonus. 

This is my recipe for a PERFECT April sewing day...

✨ Self care: plan meals/snacks for eating right & getting your exercise (booooooo! I know, I know.) Maybe a fun wee treat tho!?

✨ Entertainment: if it’s just you, get your show/ sporting event/ audible, etc. Or if you’re with your quilty buds, you know what to do! Sew, gab, laugh!

✨ Something you’re excited to sew: latest bingeable project at the ready!? Latest fabric stack that arrived in the post? Or...finally get that WIP d.u.n!

✨ Essential responsibilities taken care of: feed the dog, respond to that time-sensitive email, dinner for the fam? Take care of what you must get done so you can check out more completely.

Finally, set a timer for your hard stop time.

I set my alarm for when I need to pick up my kiddos from school. That way, I can get carried away by my creativity and indulge in “me” time!

Shut the laptop, check out, it’s sew time! 🧵 Everything else on your to-do list can wait. It is time for you!

What are you working on for a perfect April sewing day? ⬇️

#quiltingprogress #quiltinginspiration #quiltpattern #springsewing
If my WIP pile was getting out of control… here’s If my WIP pile was getting out of control… here’s exactly what I’d do: ⬇️

👉 Find a community of quilters to connect with, learn from, and grow with. People who cheer you on, celebrate your blocks, and make you want to keep going!!! 

👉 Make it easier on yourself with freezer paper piecing. This technique completely changed my life. I wanted to give up on quilting altogether at one point before I found freezer paper piecing. 

It’s not that you don’t finish quilts…

It’s that you don’t have the right support or the right process yet. 🧵✨ Comment ‘FREE’ to take my free class, learn the freezer paper piecing technique, and get invited to join an amazing community. 💕

#quiltingcommunity #quiltingclass #quiltingtechnique #quiltinginspiration
Follow on Instagram
© 2026 Bryan House Quilts