• About
    • Privacy Policy
  • Teaching
    • Member/Student Login
    • Online Programs
  • Shop
  • Member/Student Login
  • Blog
    • Free Quilt Patterns – Scrappy Whirligig Quilt

Bryan House Quilts

How to Square Up a Quilt

Tutorial

14 Apr

Once you finish quilting your quilt, before sewing the binding on, your next step is squaring up your quilt. In this post, I’m sharing the best process for how to square a quilt top. You can use the steps outlined to get crisp and beautiful corners for your finished quilt. And you don’t need a square ruler!

WHAT IS SQUARING UP A QUILT?

Squaring up a quilt simply means each corner of your quilt is a square 90° angle, and all the quilt sides are trimmed straight. The process I share here is called squaring.

DO YOU NEED TO SQUARE UP A QUILT?

Recently, one of our new Make Modern Triangle Club members, Janet S, reached out for help with making the sides of her Scrappy Whirligig/Modern Triangle #47 quilt straight.

Photo shows a pink "Scrappy Whirligig" quilt by Janet S

Side note: look how pretty Janet’s quilt is! Squeeee! Pretty in Pink!

So, Janet? This blog’s for you!

Don’t Waste a Good Edge

First of all, I must ask, “why waste a good zig zag? Or a good wonk? If you’re working with a zig zaggy pattern like Janet’s or a wonky funky improv quilt, don’t feel like you must conform to perfectly square corners and straight edges.

For example, my Hexy Plus quilt features zig zaggy edges and I wouldn’t have it any other way!

Photo shows Hexy Plus quilt pattern by Bryan House Quilts

I wanted to give you some ideas and permission to explore designs beyond the square. The rest of this post shares tips and information for all things square and straight edge. But if you’re looking for more ideas for fun and interesting edges, you can read this blog for inspiration.

DO YOU SQUARE A QUILT BEFORE OR AFTER QUILTING?

Typically quilts are squared after they are completely quilted and before attaching the binding. When you quilt your quilt, or have it quilted by a professional longarm quilter, the backing and batting will be larger than the quilt top.

Usually, if you’re doing it the “right” way, you’ll have at least 4” of batting and backing fabric extending beyond the top.

Once your quilt sandwich is completely quilted, you’ll want to square up your quilt top to square up the project but also to get rid of the excess batting and quilt backing before binding.

Now, I work with a lot of wonky edged quilt designs, so I usually square up my quilt top before quilting. And then after it’s quilted, I do do another trimming because sometimes the quilting process warps the project a bit.

DO YOU HAVE TO SQUARE UP A QUILT BEFORE ADDING BORDERS?

On a related note, did you know you’re supposed to square up a quilt before adding borders?

I know I know, another “should” that might stand in your way of finishing your quilt. Now I don’t want to “should” on you, but you probably would like to know what happens if you don’t square up before adding a border.

So, yeah, it’s actually an important step because if you don’t do it, you might end up with a quilt top that won’t lay flat. Orrrr you might get some bubbles when you quilt it… So yeah, it’s maybe annoying but an important step.

And you must know, sometimes I skip this step. But I usually regret it, ha!

HELPFUL QUILT NOTIONS

If you’re ready to square a quilt, then at this point in your quilting journey you have all the notions you need. (Probably. I don’t wanna assume… but if you’re curious I’ve got my favorite notions curated in my shop.)

For best results, you’ll want a large space where you can lay out your quilt sandwich as flat as possible. For me, that means cleaning off my work table or a large table. Anddddd that means just moving all the clutter to a different surface, ha!

Photo shows notions used to square up a quilt

You’ll want to use your large cutting mat.

Bonus tip, don’t get rid of your old worn out cutting mats. I keep my old ones under my bed and bring them out anytime, I’m squaring up a large quilt. But, if you’re like me, you’ll need to dust that baby off! (Lots of dust bunnies under my bed… ahem!)

And you’ll also need your largest rulers. If you’ve got a large square acrylic ruler, that’s even better. I typically just use my 6” x 24” acrylic rulers.

Finally, you’ll need the star of the show: your rotary cutter.

THE BEST WAY TO SQUARE A QUILT

I’ll show you my process for squaring up a quilt by showing you a recent finish, my Wildflower quilt. Before diving into the tutorial, notice that this quilt just needs the sides trimmed up, as the top and bottom edges are already straight.

STEP 1: START BY SQUARING A CORNER

To get started, layout your quilt top or quilted quilt sandwich on a large flat surface. Smooth out your quilt top as best you can and position your cutting mat underneath the first corner.

Use your rotary cuter and large square ruler to make a quilt corner 90 degrees. If you don’t have a square ruler just use a longer ruler or two rulers. I usually will use two 6”x24” rulers if I don’t want to dig out my large square rulers.

Photo shows how to square up a quilt

In the above picture, I’m showing the first trimmed corner for my Wavelength quilt top, which I squared up on my large dining room table. I squared up before quilting, because the edges were very much uneven due to the piecing construction.

STEP 2: TRIMMING THE FIRST EDGE

Once you have the first corner squared, you’ll follow the newly cut edge and continue trimming the first side of the quilt to cut all the uneven edges. Before using your rotary cutter, smooth out your quilt top so that it lays flat.

You can see from the below picture, I’m lining up the edge of my long ruler with the previously cut edge and the outer edge of the shortest fabric strip toward the top of my ruler.

Photo shows how to square up a quilt

You can also use the cutting lines on your cutting surface to trim in a straight line.

Now, you’ll be like Dory and just keep swimming. Except you are a quilter and you will just keep trimming!

You can see from the below picture, I’ve adjusted my quilt top with the edges straight on top of my cutting mat and the quilt top is smoothed out.

Photo shows how to square up a quilt

Finally, you’ll adjust your quilt top or finished quilt sandwich so that the next corner is on top of the cutting mat. Now you’ll line up the long ruler (or square ruler) with the side AND the top side.

By doing so, you’ll be able to get a nice 90° angle for corner number two. And if you want to use your big square ruler for this next corner, now’s a good time.

Photo shows how to square up a quilt

Then trim and voila a beautiful square corner!

Photo shows how to square up a quilt

STEP 3: REPEAT AROUND ENTIRE QUILT

To get square quilt corners and straight edge sides, continue this process to trim for all four sides and all the corners for your quilt.

Below you’ll see the images of me trimming the left side and each corner of my Wildflower quilt.

Photo shows how to square up a quilt

You can see I don’t use a large square ruler when squaring up a quilt. I can still get straight sides! Just take it one corner at a time and double check before you trim your rotary cutter.

Last but Most Important Step

And then don’t forget your last step. “Ta da!” Admire your work. Look at those square corners! That beautiful quilt! You did a great job! Now you’re ready for binding!

Photo shows a squared up a quilt (Wildflower by Bryan House Quilts)

SPECIAL NOTE: PAY ATTENTION TO ANY POINTS ALONG THE EDGES

Before wrapping up, I want to give a special shout out to quilts featuring a design with points along the outer edges. For these beautiful quilts, you want to take special care not to trim the points off.

For example, Wildflower Star quilt (I promise the same names are a coincidence! But I guess I need to branch out!) features pretty colorful stars with points along the edges.

Photo shows Wildflower Star Quilt top

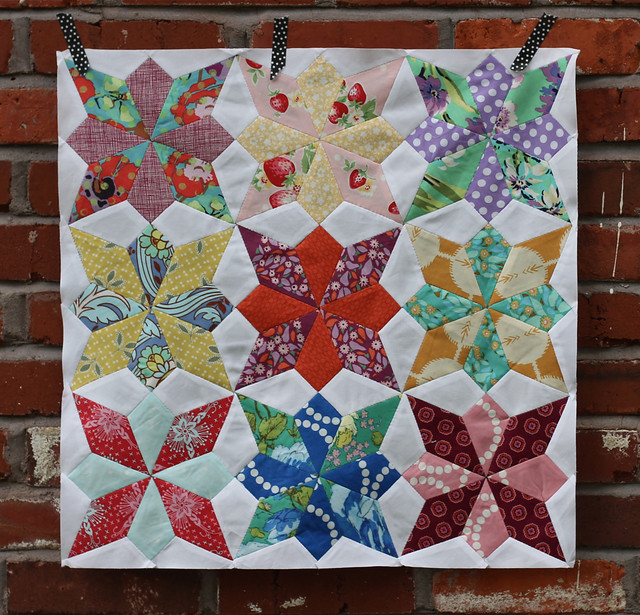
Below, you can see the project as I worked on it and you can see that the edges are not straight.

Photo shows an EPP Quilt in progress by Bryan House Quilts

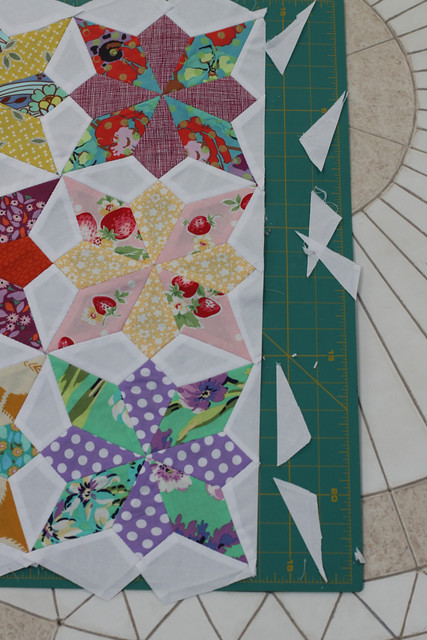
When you square up these quilts, make sure to leave a quarter inch seam allowance for your pretty points. Personally, I prefer to leave a generous quarter inch. I’d rather leave a gap of background than nip a point!

Below you can see what the quilt top looked like with a trimmed straight edge.

Photo shows how to square up a quilt

In the close up shot of the trimmed edge, you can see my generous seam allowances a bit more clearly.

Photo shows a close up of a squared up quilt

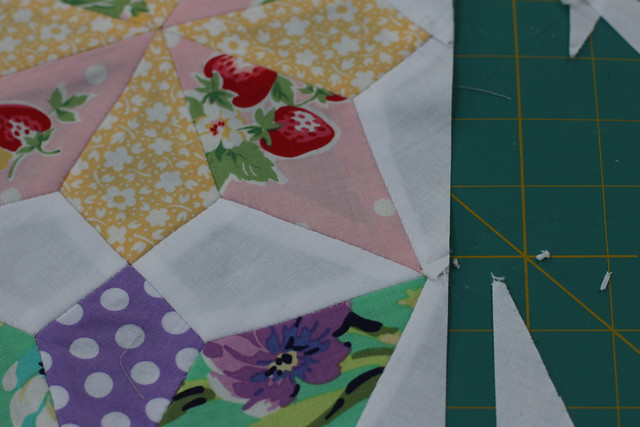
I’ll also add, for my quilt tops I care more about to not trim off my points than I do a perfectly square quilt top. So whenever I square up a quilt with points, I start with the points versus starting with a corner.

Photo Wildflower Star Pillow by Bryan house Quilts

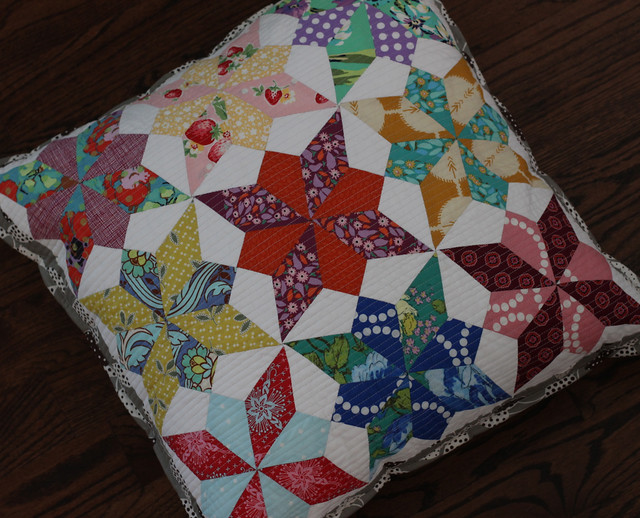
This little pillow debuted in Issue 11 of Love Patchwork & Quilting Magazine. You can read more about it here.

NEXT STEPS & FREE CLASS

I hope you’ve found this article about how to square up a quilt helpful and informative!

As with anything, there’s no one right way to do anything, so as you’re reading this and thinking about your own quilting process feel free to take what works for you and ditch the rest.

If you have more tips, we always want to hear those. So please leave a comment to share your tricks and tips.

And once you’re ready to bind your quilt, check out our 25 Creative Ways to Bind your Quilt post or our favorite machine binding tutorial.

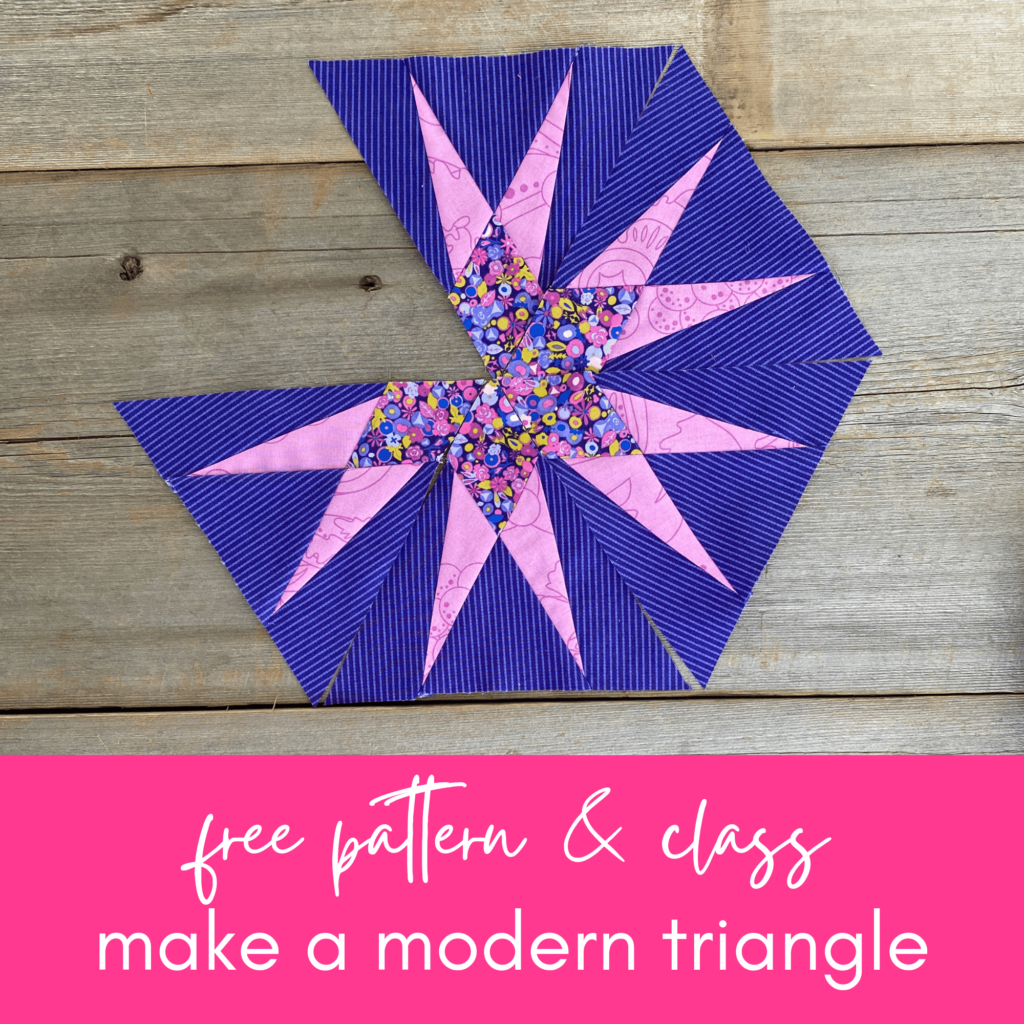
Get the “Outshine Star” pattern free when you take our Free Class

If you’d like to make your own quilt complete with zig zaggy corners like our member Janet S., then you can find the pattern inside our free, “Outshine Star” Modern Triangle Class. You can learn more and register here.

Previous Post: « Celebrating Cosmos Blocks and More!
Next Post: Improv Quilting – Rainbow Remix »

Reader Interactions

Comments

  1. Pamela Wright says

    April 14, 2023 at 1:52 pm

    Loved you great tutorial on squaring up the quilt. Answered a lot of questions on where to begin.

    • rebeccabryan says

      April 17, 2023 at 12:58 pm

      So glad you found it useful! Thanks for commenting!

Primary Sidebar

New Block of the Month!

Join the 2026 Block of the Month Program

Get my Modern Triangles Quilt Book

Get my Modern Rainbow Quilts Book

Image shows cover of the book "Modern Rainbow Quilts"

Make the Solstice Quilt!

Solstice Block of the Month by Bryan House Quilts

Get Your Invite!

Make Modern Triangles Logo

Make the Sparkler Quilt!

Image Shows Sparkler Quilt Top by Rebecca Bryan

Make the Echo (Echo!) Quilt

Echo BOM now open to join

Make the Wildflower Quilt!

Wildflower Block of the Month by Bryan House Quilts

Make the Stargazer Quilt!

Anne's Stargazer BOM

Make the Rainbow Triangles Quilt!

Rainbow Triangle BOM, modern triangle quilt, Rebecca Bryan

About

Hey there! I’m Rebecca, an author and teacher and freezer paper piecing evangelist. I’m also the founder of the Make Modern Triangles Quilt Club.

Disclosure

Just so you know, my site includes affiliate links from which I (it’s me! Rebecca!) receive payment or compensation. Something to consider as you peruse my website. Thanks!

Latest on Instagram

This time of year in the sewing room is always so This time of year in the sewing room is always so lovely. 

We FINALLY get to have the windows open, the world outside is getting colorful again, and the extra daylight is a big bonus. 

This is my recipe for a PERFECT April sewing day...

✨ Self care: plan meals/snacks for eating right & getting your exercise (booooooo! I know, I know.) Maybe a fun wee treat tho!?

✨ Entertainment: if it’s just you, get your show/ sporting event/ audible, etc. Or if you’re with your quilty buds, you know what to do! Sew, gab, laugh!

✨ Something you’re excited to sew: latest bingeable project at the ready!? Latest fabric stack that arrived in the post? Or...finally get that WIP d.u.n!

✨ Essential responsibilities taken care of: feed the dog, respond to that time-sensitive email, dinner for the fam? Take care of what you must get done so you can check out more completely.

Finally, set a timer for your hard stop time.

I set my alarm for when I need to pick up my kiddos from school. That way, I can get carried away by my creativity and indulge in “me” time!

Shut the laptop, check out, it’s sew time! 🧵 Everything else on your to-do list can wait. It is time for you!

What are you working on for a perfect April sewing day? ⬇️

#quiltingprogress #quiltinginspiration #quiltpattern #springsewing
If my WIP pile was getting out of control… here’s If my WIP pile was getting out of control… here’s exactly what I’d do: ⬇️

👉 Find a community of quilters to connect with, learn from, and grow with. People who cheer you on, celebrate your blocks, and make you want to keep going!!! 

👉 Make it easier on yourself with freezer paper piecing. This technique completely changed my life. I wanted to give up on quilting altogether at one point before I found freezer paper piecing. 

It’s not that you don’t finish quilts…

It’s that you don’t have the right support or the right process yet. 🧵✨ Comment ‘FREE’ to take my free class, learn the freezer paper piecing technique, and get invited to join an amazing community. 💕

#quiltingcommunity #quiltingclass #quiltingtechnique #quiltinginspiration
One stitch at a time!!! 🪡 Sometimes, a few hours One stitch at a time!!! 🪡

Sometimes, a few hours (or days) in the sewing room just makes it all alright. 🙌

Who agrees? ⬇️

#quiltingismytherapy #quiltinglife #quiltingismybliss #quiltersgonnaquilt
Comment ‘FREE’ to sign up for the class! 🫶 One th Comment ‘FREE’ to sign up for the class! 🫶

One thing that will NEVER get old with freezer paper piecing... ⬇️

The number of blocks I can sew from just ONE foundation! 🙌

It always amazes me, and it’s one of my favorite things about the technique. 

I save so much time not having to make a new foundation for every single block, and that’s not to mention the time saved from not having to rip the paper bits of those foundations out of the seams. ✨

I’m hosting a free class where I teach you this technique, and give you a modern triangle block pattern to start sewing! 

Comment ‘FREE’ if you want to sign up! 🫶
.
.
.
#quiltingclass #quiltingforbeginners #foundationpaperpiecing #paperpiecing
Spring is in the AIR! (and in the sewing room!) 🌸 Spring is in the AIR! (and in the sewing room!) 🌸 🪡

Here’s a photo dump of some of my favorite quilts that feel like spring. 😍

This season is always so inspiring, as everything starts to come back like, you can open the windows in the sewing room, and the whole world just gets more colorful and bright. ✨

Let me know which one of these quilts is your favorite in the comments! 💕
.
.
.
#springquilting #quiltpatterns #springhobby #quiltinginspiration #quiltinghobby
There’s so much pressure on us in the quilting wor There’s so much pressure on us in the quilting world to finish what we started. 👇

But if you’re stuck staring at a stack of unfinished blocks, and it’s keeping you out of the sewing room because it’s the last thing you want to sew right now, this is the advice that I would give you. 

It’s okay to put a project down for a while. 🫶

I’ve had projects and quilts that sat folded up for weeks… months… even longer. Projects I avoided because I got stuck, or lost momentum, or honestly just wasn’t in the mood to sew that anymore. AND IT’S OKAY! 🙌

Every single time I came back to them after putting them down for a while, I felt that spark for sewing again. I felt the inspiration that I started the project with, and I started ENJOYING it again. ✨

So if you have something that you’re avoiding sewing, let this be your permission slip to just put it down and know that you’ll come back to it when the time is right. 

Put your favorite emoji in the comments if you needed to hear this. 💕

#quiltingadvice #quiltinginspiration #quiltingtips #quiltingforbeginners
Follow on Instagram

Browse by Category

Archives

  • Instagram
  • Facebook
  • Pinterest
  • email
This time of year in the sewing room is always so This time of year in the sewing room is always so lovely. 

We FINALLY get to have the windows open, the world outside is getting colorful again, and the extra daylight is a big bonus. 

This is my recipe for a PERFECT April sewing day...

✨ Self care: plan meals/snacks for eating right & getting your exercise (booooooo! I know, I know.) Maybe a fun wee treat tho!?

✨ Entertainment: if it’s just you, get your show/ sporting event/ audible, etc. Or if you’re with your quilty buds, you know what to do! Sew, gab, laugh!

✨ Something you’re excited to sew: latest bingeable project at the ready!? Latest fabric stack that arrived in the post? Or...finally get that WIP d.u.n!

✨ Essential responsibilities taken care of: feed the dog, respond to that time-sensitive email, dinner for the fam? Take care of what you must get done so you can check out more completely.

Finally, set a timer for your hard stop time.

I set my alarm for when I need to pick up my kiddos from school. That way, I can get carried away by my creativity and indulge in “me” time!

Shut the laptop, check out, it’s sew time! 🧵 Everything else on your to-do list can wait. It is time for you!

What are you working on for a perfect April sewing day? ⬇️

#quiltingprogress #quiltinginspiration #quiltpattern #springsewing
If my WIP pile was getting out of control… here’s If my WIP pile was getting out of control… here’s exactly what I’d do: ⬇️

👉 Find a community of quilters to connect with, learn from, and grow with. People who cheer you on, celebrate your blocks, and make you want to keep going!!! 

👉 Make it easier on yourself with freezer paper piecing. This technique completely changed my life. I wanted to give up on quilting altogether at one point before I found freezer paper piecing. 

It’s not that you don’t finish quilts…

It’s that you don’t have the right support or the right process yet. 🧵✨ Comment ‘FREE’ to take my free class, learn the freezer paper piecing technique, and get invited to join an amazing community. 💕

#quiltingcommunity #quiltingclass #quiltingtechnique #quiltinginspiration
One stitch at a time!!! 🪡 Sometimes, a few hours One stitch at a time!!! 🪡

Sometimes, a few hours (or days) in the sewing room just makes it all alright. 🙌

Who agrees? ⬇️

#quiltingismytherapy #quiltinglife #quiltingismybliss #quiltersgonnaquilt
Comment ‘FREE’ to sign up for the class! 🫶 One th Comment ‘FREE’ to sign up for the class! 🫶

One thing that will NEVER get old with freezer paper piecing... ⬇️

The number of blocks I can sew from just ONE foundation! 🙌

It always amazes me, and it’s one of my favorite things about the technique. 

I save so much time not having to make a new foundation for every single block, and that’s not to mention the time saved from not having to rip the paper bits of those foundations out of the seams. ✨

I’m hosting a free class where I teach you this technique, and give you a modern triangle block pattern to start sewing! 

Comment ‘FREE’ if you want to sign up! 🫶
.
.
.
#quiltingclass #quiltingforbeginners #foundationpaperpiecing #paperpiecing
Follow on Instagram
© 2026 Bryan House Quilts