• About
    • Privacy Policy
  • Teaching
    • Member/Student Login
    • Online Programs
  • Shop
  • Member/Student Login
  • Blog
    • Free Quilt Patterns – Scrappy Whirligig Quilt

Bryan House Quilts

Hello Houston Quilt Tutorial

Free quilt pattern· Sewing with Triangles· Tutorial

10 Apr

Learn how to make scrappy half square triangles that pop and harmonize in my Hello Houston quilt tutorial. This quilt is the perfect project to showcase your favorite prints, use up your larger scraps and experiment with color placement.
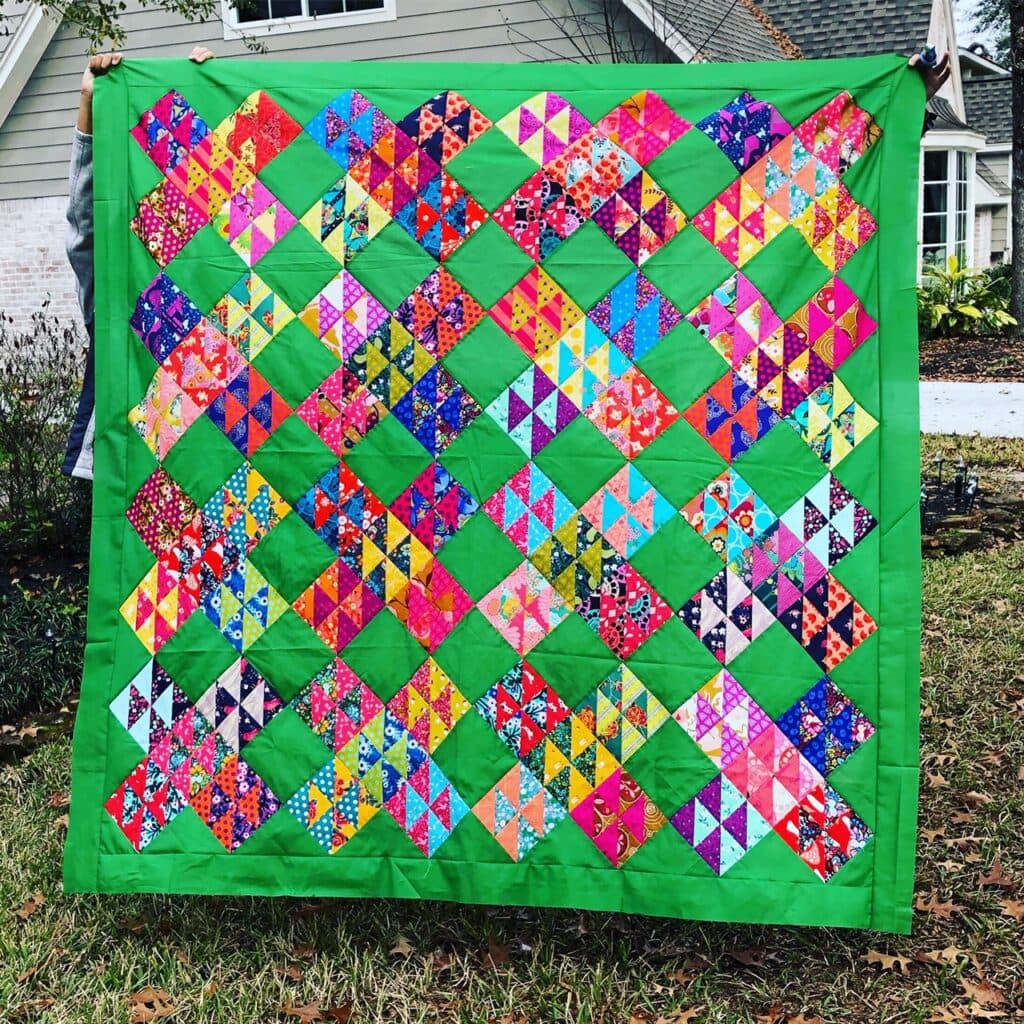
Hello houston quilt made with scrappy half square triangles
Hello Houston, a free scrappy quilt tutorial

Make this quilt using the free tutorial below. These quilt blocks simmer on the back burner with a no-rush vibe. Make ’em when you can and you’ll get there eventually.

The first time I posted about this quilt was 6 years ago so it’s about time I showed you how to make it!

Finished HST: 3’’ x 3’’

Finished Quilt: 72 ⅜’’  x 72 ⅜’’

Home is where the sewing machine Is

My inspiration? After moving to Houston, 11 months after moving from St. Louis to the Netherlands (can you say stressful?!), I needed some scrappy quilting therapy. Something I could pick up for a quick sewing session and ease the day’s stress. My Hello Houston quilt was the antidote, which simply pair two scraps together to make half square triangle four-patch units.

how can i use my fabric scraps to make half square triangle quilt blocks?
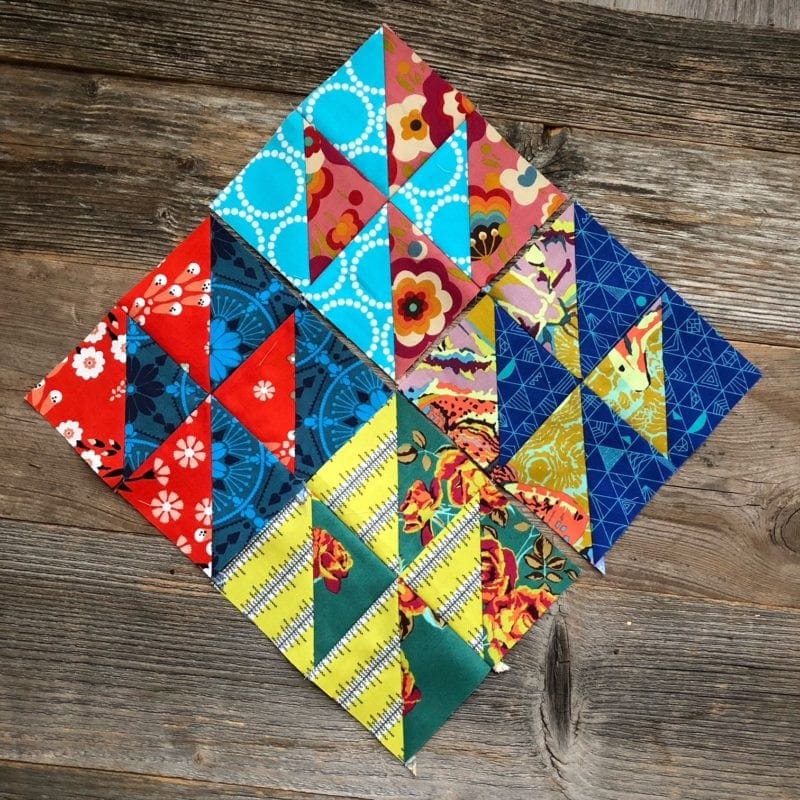
Four completed HST blocks with brightly colored fabric scraps from hello houston quilt tutorial

The Hello Houston quilt tutorial is awesome confidence booster for pairing fabrics. Some quilters intuitively mix their scraps together for blocks. And some get a bit anxious working with so many choices and fabrics all at once. A quilter may not have the experience, struggle with color confidence or how to use mix prints. The process could stall in a decision gridlock. Oh, no!

Break the gridlock and indecision by using my scrappy quilters’ framework. Once you learn and practice the steps, using all kinds of prints and colors together becomes easier.

I’ll show you my process for pairing fabric scraps photo-by-photo. By showing you the options and the final choices, you will see the how and why I chose each pairing.

FABRIC Scrap size TO MAKE THE Scrappy HST BLOCKS

You will need 160 4 x 8 inch scraps to make a 72-inch square quilt. I have so many scraps about this size. Not enough to use in another quilt and perfect for scrappy quilts. I could make bunches of Hello Houston quilts with my extensive scrap stash.

Quick Fabric Selection tips FOR HELLO HOUSTON QUILT TUTORIAL

More variation is better in my opinion. The best way to approach fabric selection for Hello Houston is using as many different fabrics as possible with tons of contrast.

Adopt a playful, no judgment, anything-goes attitude. Pull out all of your favorite colors and fabrics. I’ll show you how I pair scraps together for half square triangles, using contrast in color, types of prints and scale.

How to pair up fabrics using color AS CONTRAST

I like to use simple approaches to color pairings using contrast.

Hello Houston is all about CONTRAST, starting with color.

My first step is to choose a fabric. Then I select an accent color from that same fabric to riff on. Knowing I want bright, saturated fabrics for this entire quilt, each pairing starts with a brightly colored fabric. Perfect pairs aren’t the goal; the goal is creating harmony and excitement in your half square triangles (at the micro level), then in the larger block combinations, and last, the final layout (the macro level).
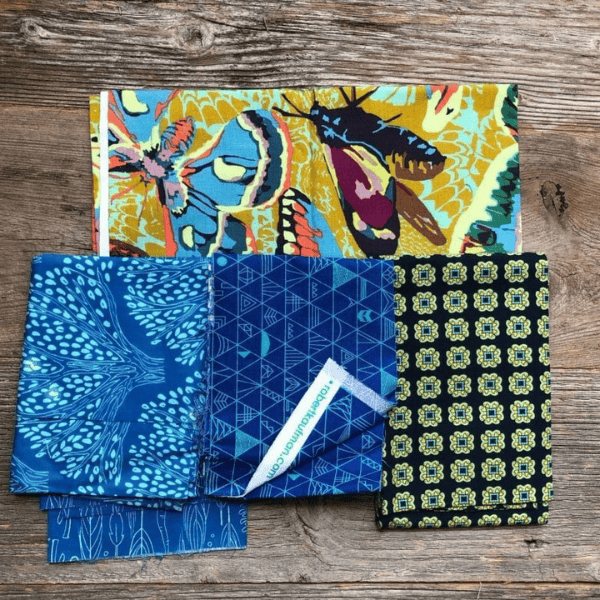
How to select fabric example to make scrappy blocks in the hello houston quilt tutorial

The main contrast in this pairing is color. In all, I found three ways to contrast with the main fabric in the pairing.

  1. Color. The butterfly print is loaded with accent color options. I auditioned blues and a green because they offer more contrast with the warmer chartreuse and orange. Blue is across the color wheel from orange and yellow so that’s an automatic contrast win!
  2. Type of print – geometric, floral, organic (curvy) or tossed. Next, I consider accent fabrics based on the type of print. I picked four options and ultimately chose the dark blue geometric print because the lines and angles contrast with the organic, curved shapes in the butterfly fabric.
  3. Scale. Notice that all of the accent fabrics are small scale prints (½ inch or less motifs), which contrast more with the larger scale butterfly motifs.

My final choice…
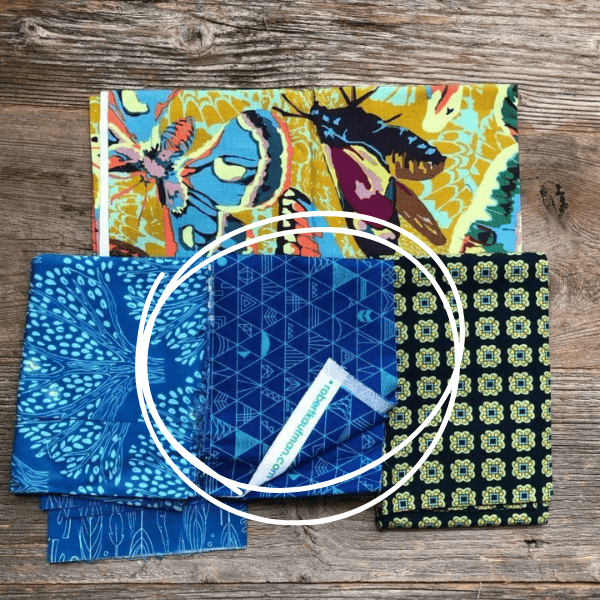
choosing contrast with the saturated blue

PAIRING UP FABRIcs for HALF SQUARE TRIANGLES

Here’s another example of pairing with contrast. I chose a large floral print where most of the colors were similar, except for the teal green accents.

I pulled similar warm colors in different values – dark, medium and light pinks – to build contrast. Well, nope. Nothing stood out like the other pairs I had created. I wanted a big visual pop in every pair. Bring on the bright teal!

This fabric also offers print contrast. The geometric circles pop against the organic flowers.
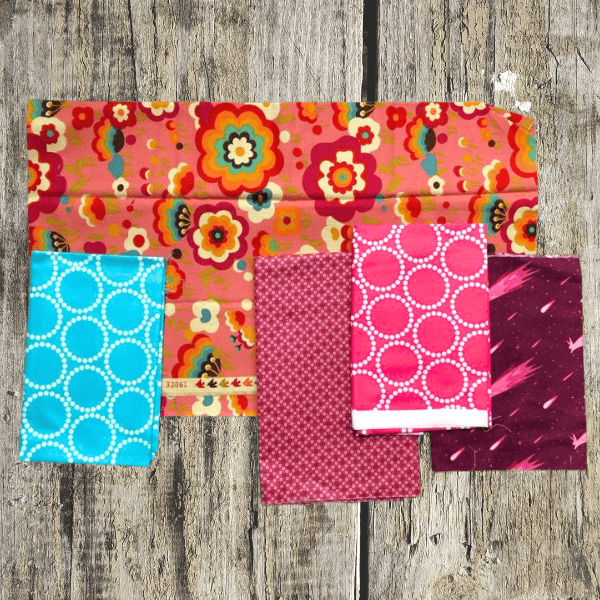
fabric swatches showing examples of contrast with color for the hello houston quilt tutorial

How to pair up fabrics using prints As CONTRAST

Mixing prints makes your scrappy quilt even more interesting. For my pairs, in addition to color, I also considered the type of print. For example, pair a large scale print with a smaller scale print, such as a “tossed (non-gridded) design or lines, stripes and geometric shapes.

Below, the accent fabric options include a tossed blue leaf print, an organic tone-on-tone leaf print and a linear arrow print.
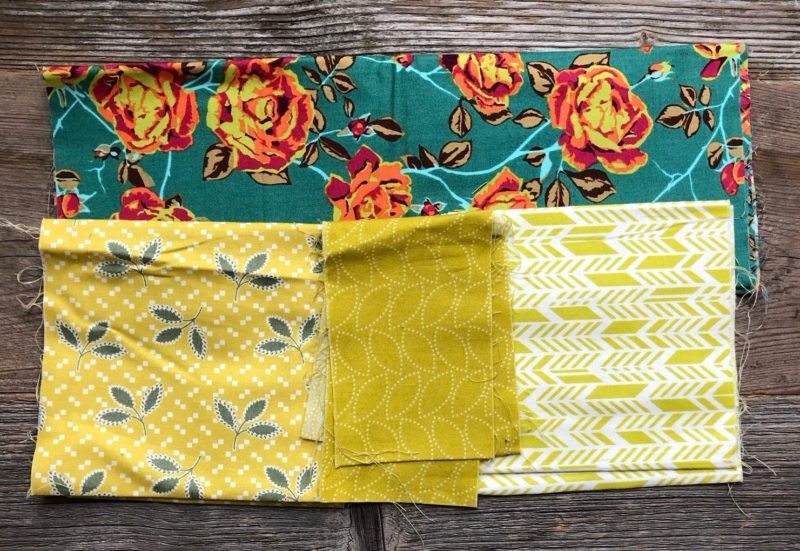

And then I found this stripe-y yellow fabric and oh yes!
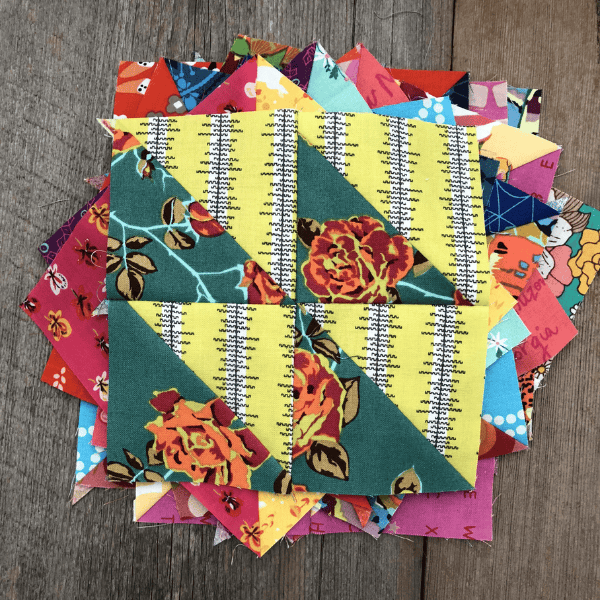
This fabric works hard by:

  • Harmonizing with the yellow bits in the main fabric
  • Contrasting linear stripes against a floral organic motif
  • Popping a bright yellow color next to the dark green background

How to pair up fabrics using SCALE AS CONTRAST

A funny thing about scale: it changes when you cut the fabric into smaller pieces. The scale also changes depending on the scale of the fabric next to it. Scale, you’re a tricky feature.
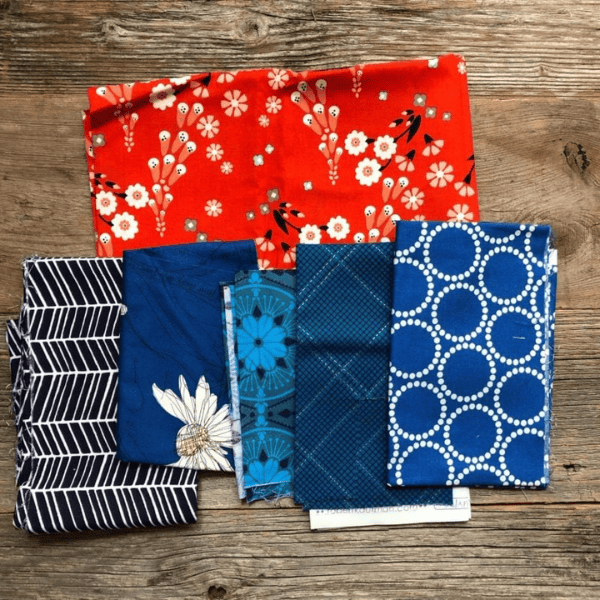
In this example, the fabrics vary from dainty flowers to large, medium dotted circles to medium lines to a large scale teal-on-navy print. Every blue fabric could work! In the end, I chose my favorite color combo which offers a bright pop, teal and red.
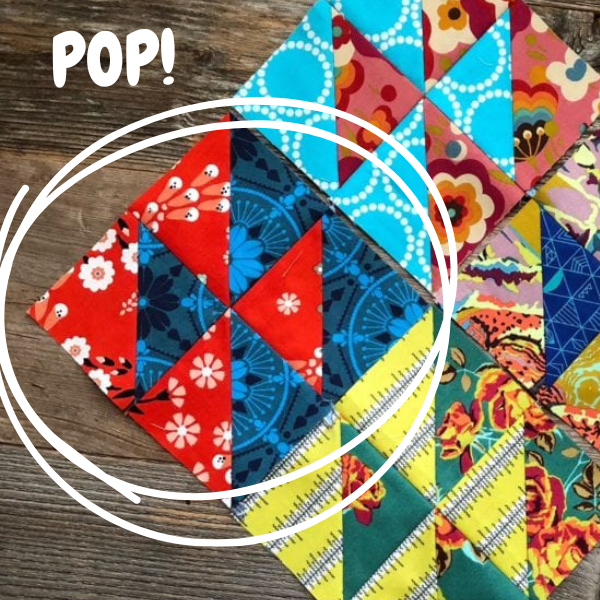
So far, you have learned at least three ways to choose and mix scraps in this Hello Houston quilt tutorial: color, contrast and scale. Dig in to your stash and have fun with it.

PART 2: Fabric Requirements and Cutting instructions

  • Blocks: 160 various 4″ x 8″ fabric scraps
  • Background/Borders: 2 ⅞ yards
  • Backing: 4 ⅛ yards (based on 43 inches wide usable yardage)
  • Batting: 75 x 75 inch square. (Cut a packaged queen size batting down)
  • Binding: 302 inches or 8 strips cut on straight grain from ⅝ yard (43+ inches wide)

CUTTING Background fabric

From the green fabric cut: 6 Strips 6 ½’’ x WOF, subcut:

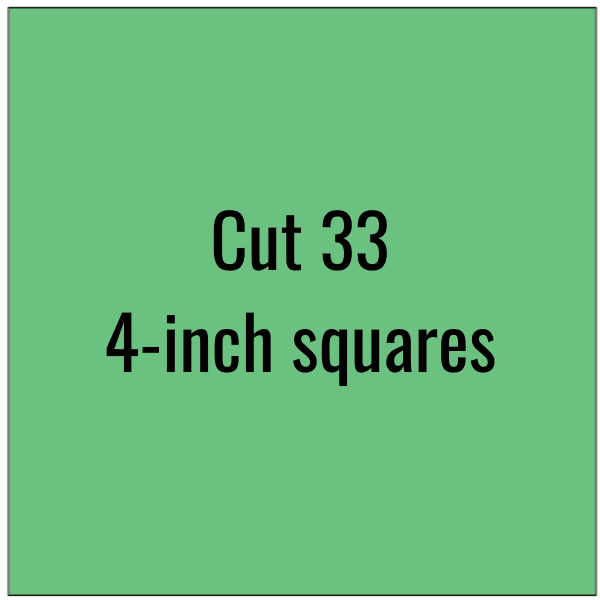
  • 33 squares 4″ x 4’’
diagram showing 4 x 4-inch square
Cut 33 4-inch squares

3 Strips – 6 ⅞’’ x WOF, subcut:

  • 14 squares, 6 ⅞’’ x 6 ⅞’’. Cut each square in half diagonally once to yield 28 side setting triangles
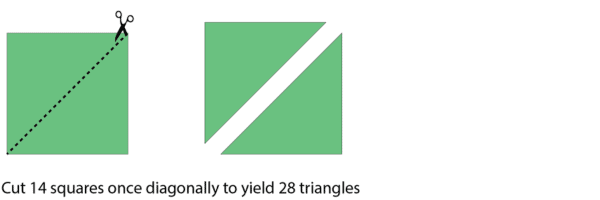
cut 14 squares once diagonally to yield 28 triangles diagram

Cut 1 square 7 ¼’’ x 7 ¼’’. Cut the square in half diagonally twice to yield 4 corner triangles
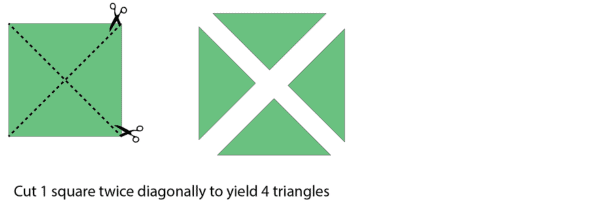
diagram how to cut 1 square twice diagonally to yield 4 corner triangles.
Cutting 4 Corner Triangles

6 Strips 2 ½’’ x WOF, then sew the strips together end to end to make one long continuous strip. Then subcut:

  • 2 lengths 2 ½’’ x 68 ⅜’’ 
  • 2 lengths 2 ½’’ x 72 ⅜’’ 

CUTTING Binding

Cut 8 strips 2 ½’’ on the straight grain of 5/8 yard.

HELLO HOUSTON QUILT TUTORIAL: PIECING

Seam allowances are 1/4” unless otherwise noted.

Make the Half Square Triangle Four Patch Blocks

If you’re new to half square triangle making, get up to speed with my 4 ways to make half square triangles tutorial. You’ve got this!

1. Grab two scraps of fabric and cut 2 squares 4’’ x 4’’ from each 

2. On the wrong side of half the squares, draw a diagonal line from one corner to another using a fabric marking tool. 

3. Sew 1/4 ’’ on either side of the marked diagonal line. 

4. Cut along the marked diagonal line. Each pair will yield 2 Half Square Triangles (HSTs).

5. Press the seams to the dark side.

6. Trim the HSTs to 3 ½’’ x 3 ½’’.
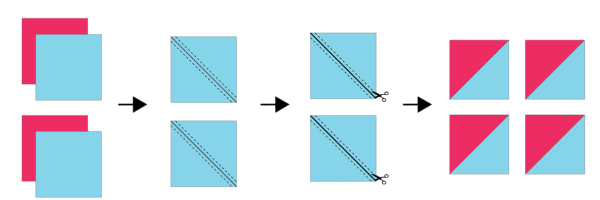
diagram how to make two at a time half square triangels HSTs
Two-at-a-time HSTs

7. Arrange 2 each matching HST units and squares in 2 rows of 2 blocks as shown. Sew together in rows, pressing the seams open, then sew the rows together to create a 4-patch block. Press as desired.  

Your HST Four-Patch should finish at 6 ½’’ x 6 ½’’ square.
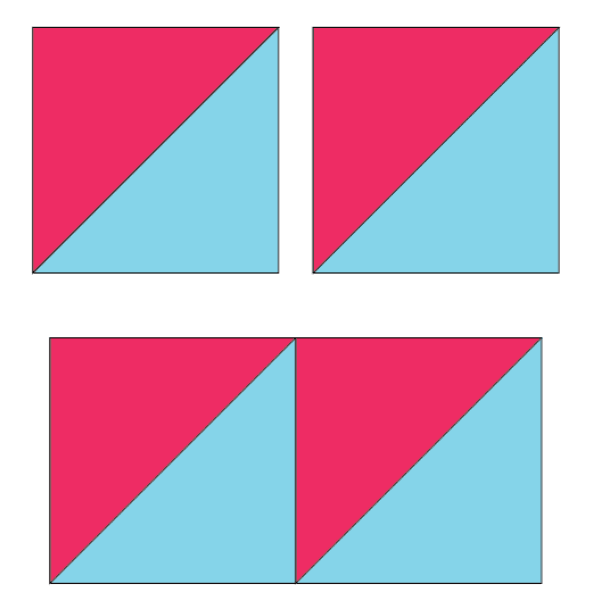
diagram showing how to join half square triangles (HST) to form a 4-patch block for hello houston quilt tutorial.
Making HST Four-Patch blocks

8. Repeat Steps 1-7, to make 80 HST Four-Patch blocks.
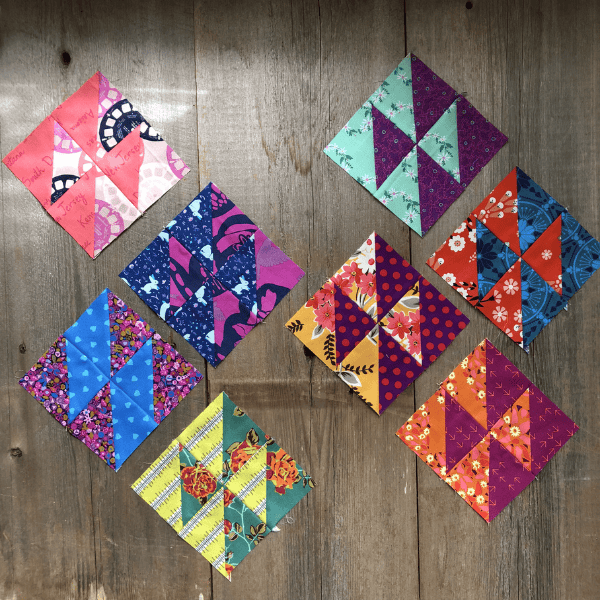
Making progress
4 patch HST blocks
Tada! 80 four-patch blocks!

Tip: Made an oopsies in your 4-patch orientation? Don’t sweat it, simply add in your mistakes to your final quilt. We’re human. I betcha no one sees the oopsies in the final result! 
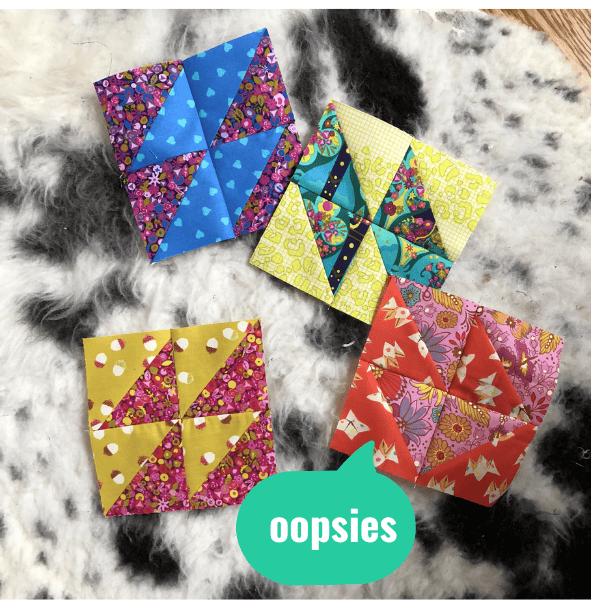
oopsies included in the final quilt
These oopsies were included in my final quilt. Will they be found out?

Assemble the Quilt Top

1. Lay out your 80 HST Four-Patch blocks on a design surface and arrange until satisfied with the color and value placement. 
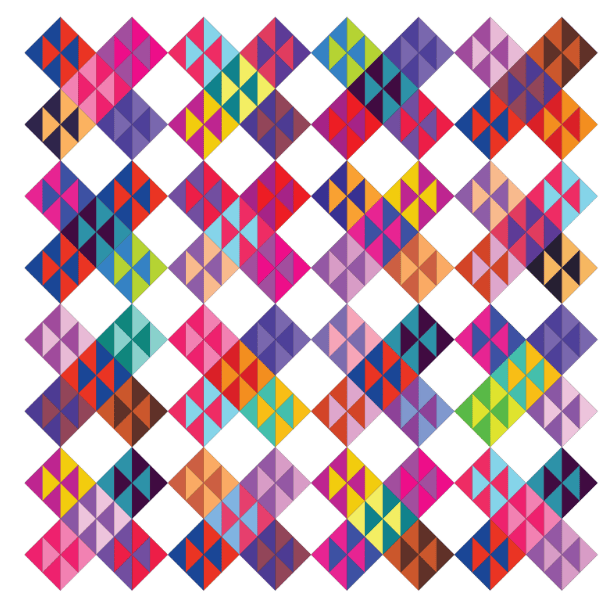
Layout diagram showing only the four patch HST blocks
Lay out of the HST blocks

2. Then add in the background 33 squares, the 28 side setting triangles, and the 4 corner triangles. 
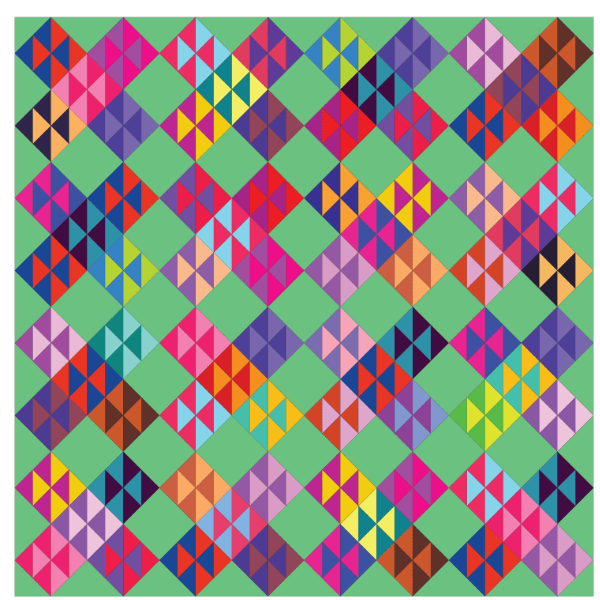
diagram of layout for Hello Houston quilt ltutorial with setting triangles, background squares and corner triangles
Layout with background pieces

3. Assemble your quilt top into diagonal rows as shown in the assembly diagram, pressing the seams toward the background. 

4. Sew the rows together. Press the seams open. (Careful with the edges of the flimsy at this point… the edges are all on the bias, which means it could stretch!)
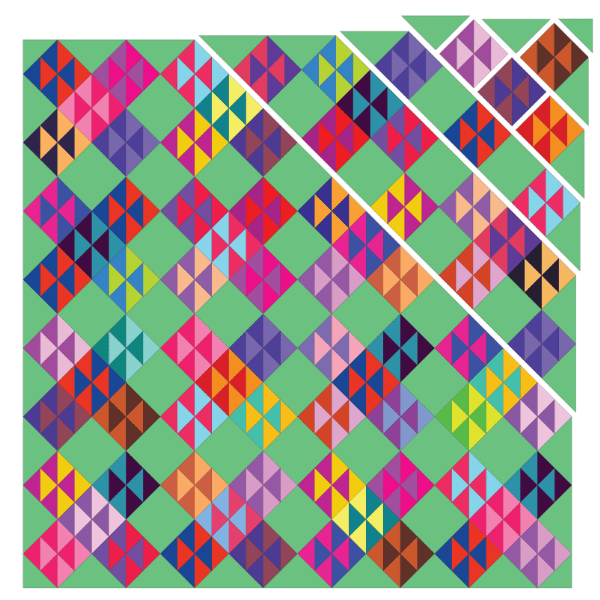
Hello houston quilt tutorial layout diagram
Quilt Top Assembly Diagram

5. Attach the 2 borders 2 ½’’ x 68 ⅜’’ to the top and the bottom, pressing the seams toward the background. Then attach the 2 borders 2 ½’’ x 72 ⅜’’ to each side. Press the seams toward the background. (Now with the borders attached, there’s no bias edges along the edges of your quilt flimsy. Phew!)
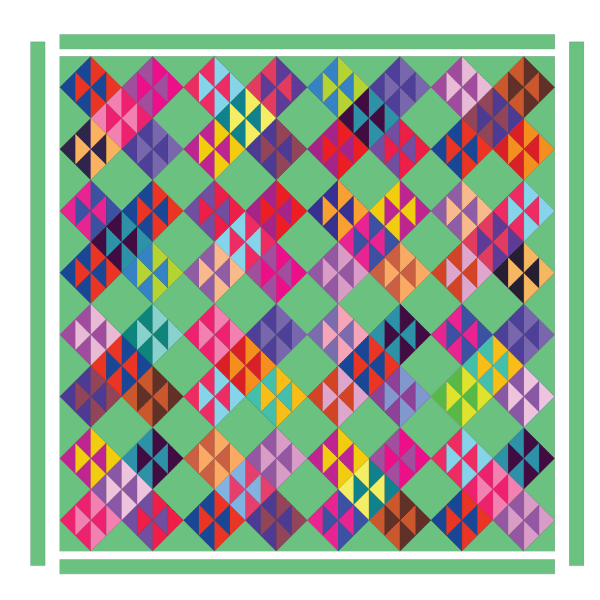
diagram showing how to attach the borders on the hello houston quilt tutorial
Attaching the borders

HEllo Houston quilt Tutorial – FinishING

I wanted the cuddliest finish for my new scrappy beauty. So I used wool batting, double gauze backing, and hand quilting. This will be a quilt my kids fight over! Ha! 
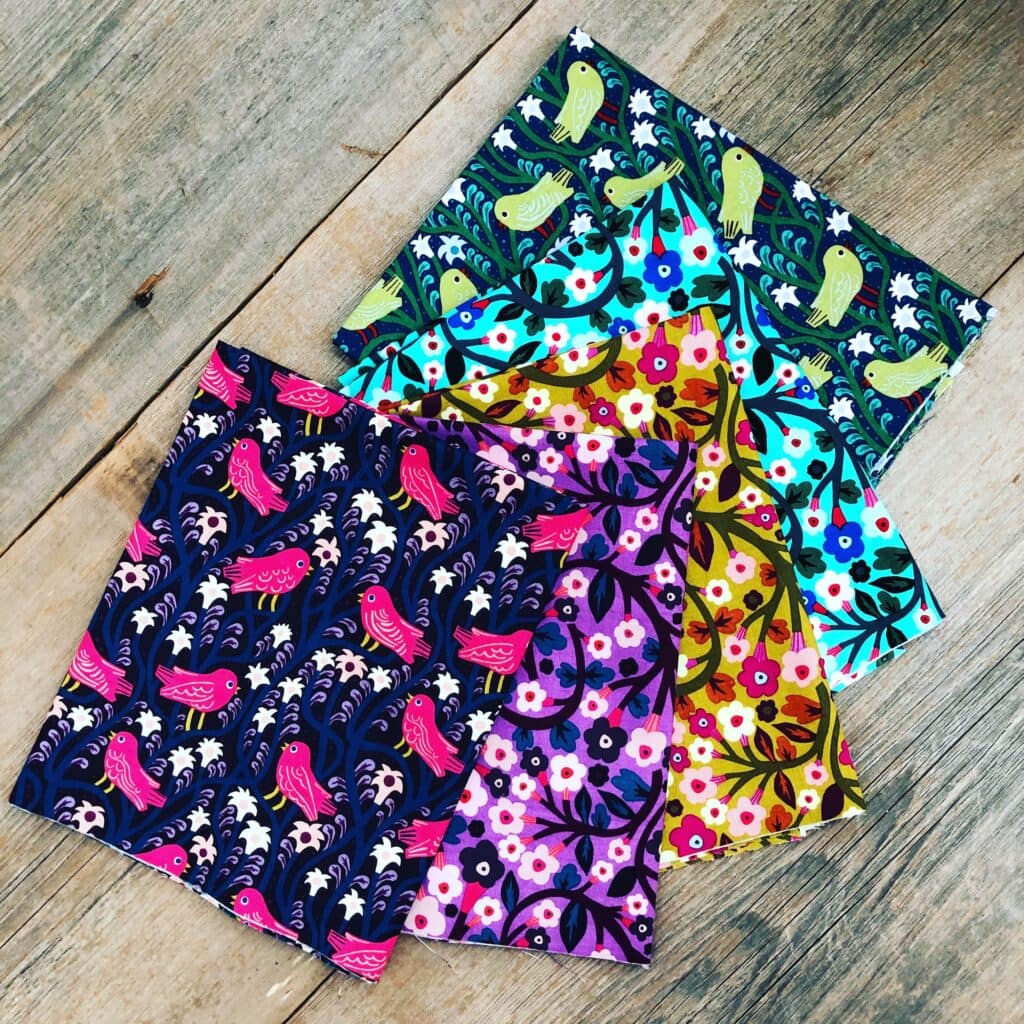
backing fabrics are double gauze prints
My backing fabric choices

1. Trim the quilt backing to 72 ¼ inches x 72 ¼ inches.

2. Baste and quilt as desired.

3. Finish the binding as preferred.

My next steps? 

I LOVE the texture of handquilting, so I’m hand quilting my Hello Houston. Yup, I’m doing it. It’s a slow process, but in my opinion, totally worth it.
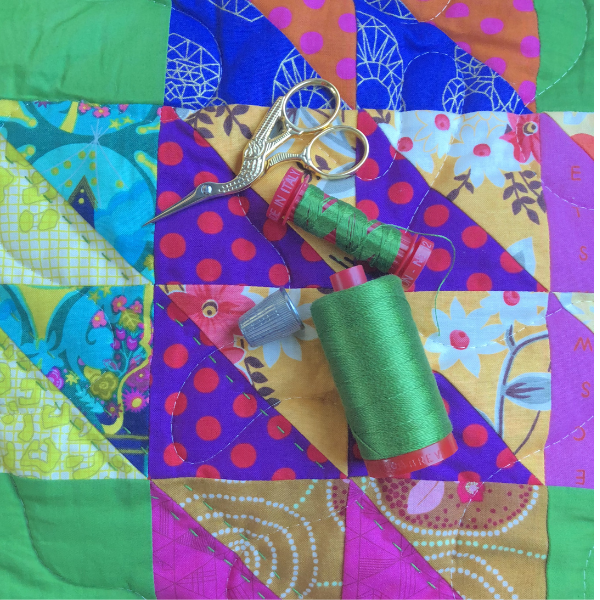
thread choice for hand quilting
My thread choice for hand quilting

Who do I need by my side during hours of hand quilting?

Bruce Wayne, my quilting companion dog. Loyal, sweet and ready for cuddles anytime I put the needle down!
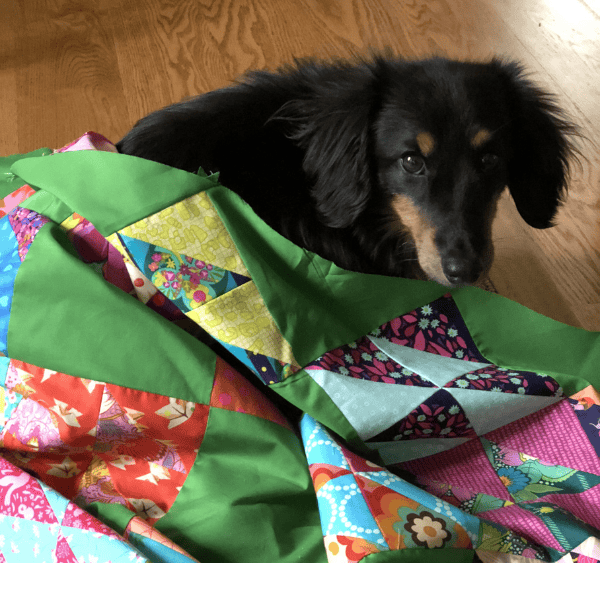
Bruce Wayne, my quilting companion dog

I hope you make this beginner-friendly scrappy HST quilt. You’ll enjoy the fun mash up with fabric prints and colors and the super easy construction. I sure enjoyed putting the Hello Houston quilt tutorial together for you.

Happy quilting!

xo Rebecca

PS. Try my easiest log cabin quilt tutorial for beginners – see the link below.

More FREE QUILTING resources

  • The Four Best Ways to Make Half Square Triangles
  • Easiest Log Cabin Quilt Tutorial for Beginners
  • Cutest Nine-Patch Baby Quilt Tutorial
  • Finish a Quilt – Stitch Methods for Quilt Tops
hello houston quilt tutorial blog featured image
Previous Post: « Rolling Out TADA Moments
Next Post: Halfway to the Big Finish »

Reader Interactions

Comments

  1. Debra says

    April 11, 2026 at 9:39 am

    What an excellent tutorial on pairing scraps! Detailed and makes perfect sense – thank you. I’m itching to make this in all solid color scraps!

  2. Theresa Spragins says

    April 11, 2026 at 1:28 pm

    Looks like a fun, no stress quilt to build. I think it would be pretty too in pastels!

  3. Heather says

    April 11, 2026 at 3:03 pm

    Thanks for this tutorial, I’m immediately smitten and am going to start collecting pairs of 4” squares straight away. I just wanted to check whether your square graphic has an error – it says to cut 33 4” squares, but I assume it is meant to be 6.5” squares?

    • rebeccabryan says

      April 11, 2026 at 3:58 pm

      I think there is an error. We are checking on it. Thanks!

    • Jane Baumstark says

      April 14, 2026 at 12:54 am

      Hi Heather, thanks for catching our oops! Yes, you need 4-inch squares, not 6.5-inch squares.

  4. Susan says

    April 12, 2026 at 6:12 pm

    Just wondering if you double checked Heather’s comment about the size difference in the printed instructions and the graphic show for it, since the discrepancy is still there.

    • Jane Baumstark says

      April 14, 2026 at 12:57 am

      Susan, Heather caught our oops! Yes, use 4-inch squares. We also corrected the information in the blog post.

  5. Heather Jean Hochbaum says

    April 15, 2026 at 8:41 am

    The background setting squares still need to be 6 1/2. because the HST units are 6 1/2.

Primary Sidebar

Get Your Free Ticket to Quilters Paradise Holiday! 🎁

New 2026 Block of the Month!

Graphic of Alchemy Quilt

Join the 2026 Block of the Month Program

Get my Modern Triangles Quilt Book

Get my Modern Rainbow Quilts Book

Image shows cover of the book "Modern Rainbow Quilts"

Make the Solstice Quilt!

Solstice Block of the Month by Bryan House Quilts

Get Your Invite!

Make Modern Triangles Logo

Make the Sparkler Quilt!

Image Shows Sparkler Quilt Top by Rebecca Bryan

Make the Echo (Echo!) Quilt

Echo BOM now open to join

Make the Wildflower Quilt!

Wildflower Block of the Month by Bryan House Quilts

Make the Stargazer Quilt!

Anne's Stargazer BOM

Make the Rainbow Triangles Quilt!

Rainbow Triangle BOM, modern triangle quilt, Rebecca Bryan

About

Hey there! I’m Rebecca, an author and teacher and freezer paper piecing evangelist. I’m also the founder of the Make Modern Triangles Quilt Club.

Disclosure

Just so you know, my site includes affiliate links from which I (it’s me! Rebecca!) receive payment or compensation. Something to consider as you peruse my website. Thanks!

Latest on Instagram

I was ready to give up on foundation paper piecing I was ready to give up on foundation paper piecing altogether, and then I was introduced to freezer paper piecing, and it changed my whole world forever.

Let’s talk about Freezer Paper Piecing versus traditional Paper Foundation Piecing. 👇

The techniques are similar, both methods focus on precision and ease of assembly, but with Freezer Paper Piecing, you get to reuse your templates without turning them into confetti! 🎉 MAJOR WIN!

All you have to do is trace a few copies onto freezer paper or use printable sheets for your printer. It’s versatile, efficient, and saves you tons and tons of time.

🌟 The key benefits of freezer paper piecing: 🌟

👏 Reuse & Recycle: No more wasteful piles of ripped paper templates.
👏 Easy Removal: Templates peel off effortlessly, leaving your masterpiece intact.
👏 Versatility: From intricate designs to straightforward patterns, freezer paper can be used for any foundation.

WAY MORE TIME TO QUILT! 🙌

In all of my programs, we use the Freezer Paper Piecing method, and anyone can learn this, even first-time quilters! I’ve got a NEW block-of-the-month quilt design coming soon, so follow along if you’re looking for a faster and easier way to paper-piece! ✨

#modernquilting #paperpiecing #foundationpaperpiecing #quiltingtechnique #quiltteacher
Want to make a witchy little Modern Triangle with Want to make a witchy little Modern Triangle with me? 🧙‍♀️🧵

I’m teaching a FREE class, and we’re getting a little spooky with this one! 🤓

I’ll show you my favorite way to make Modern Triangles using my no-waste, no picking method, and then we’re turning our triangle into a WITCH HAT. ✨

And yes, beginners are absolutely welcome!

I’ll walk you through it step by step, show you how these simple little triangles can be arranged into much more complex-looking designs, and we’ll spend some time actually PLAYING with what we make.

PLUS, if you show up live, you’ll get my exclusive Spooky Witch Hat Modern Triangle pattern FREE so you can keep sewing after class. 🎁

Come hang out, learn something new, make a witch hat, and have some fun with me!

Comment WITCHY, and I’ll send you the link to save your free spot! 🧙‍♀️

#modernquilting #paperpiecing #foundationpaperpiecing #quiltingtechnique #quiltteacher
Tell me you’re a quilter without telling me you’re Tell me you’re a quilter without telling me you’re a quilter. 😂🧵

I’ll go first: I can find quilt inspiration in approximately ANYTHING. I own fabric that is apparently too special to actually use, and “one more seam” has never once meant one more seam.

Your turn. 🤓 Finish the sentence in the comments 👇 

#modernquilting #paperpiecing #foundationpaperpiecing #quiltingtechnique #quiltteacher
A couple of weeks ago, I picked my colors for next A couple of weeks ago, I picked my colors for next year’s “Starburst” Block of the Moth, and I had to laugh at myself because even though I started with a few pretty pinks and yellows as my inspiration...

I devolved back to rainbows for my final selection. I do love a rainbow gradient! So glorious, so delicious!

Honestly, sometimes it takes me several, several, several rounds to get the colors just how I want them. 😭  But the good news is, I do have the rainbow fabric on hand!

Now I can Netflix and sew... as I work on my Starburst sample! Hooray!

Who else just can’t resist a rainbow palette??? Follow along @bryanhousequilts to be the first to see my latest “Starburst” design! 💫

#modernquilting #paperpiecing #foundationpaperpiecing #quiltingtechnique #quiltteacher
SWIPE to see the big finish, my completed Peppermi SWIPE to see the big finish, my completed Peppermint Twist Dutch Summer! 🤍

The joy really is in the journey with my Block of the Month programs, where every single month you make one block, sew your whole batch, and, month by month, start to see the design come together with each new block.

And that’s why ANYONE can make this quilt! Yes, even a first-timer! 

You don’t have to sit down and make an entire quilt all at once. You make one batch of blocks, then another, and another... You learn as you go, watch your skills develop, and slowly start seeing the whole quilt come together.

And then one day, all those individual triangles you’ve been making come together and you’ve made THIS. 🥹

I absolutely love how this Peppermint Twist version of Dutch Summer turned out, and seeing all of the blocks together makes me want to do the whole thing all over again in another color palette! 😂

If you want to make your own version of the Dutch Summer, comment ‘DUTCH’ and I’ll send you the details! 💌

#modernquilting #paperpiecing #foundationpaperpiecing #quiltingtechnique #quiltteacher
We’re deep into the ‘ber months, which means cozy We’re deep into the ‘ber months, which means cozy sewing season is in FULL swing! 🙌

👉 We’re chugging along with the Alchemy block of the month, five months in! 
👉 We’re celebrating SO MANY big finishes of our Dutch Summer block of the month quilt tops
👉 I’ve been planning our next block of the month... 

There’s SO much good stuff going on over here, and I can’t wait to reveal my latest design to you so soon, along with all of the projects I’ve been sewing!!! 

Follow along to see my next block-of-the-month design reveal in November! ✨

#modernquilting #paperpiecing #foundationpaperpiecing #quiltingtechnique #quiltteacher
Follow on Instagram

Browse by Category

Archives

  • Instagram
  • Facebook
  • Pinterest
  • email
I was ready to give up on foundation paper piecing I was ready to give up on foundation paper piecing altogether, and then I was introduced to freezer paper piecing, and it changed my whole world forever.

Let’s talk about Freezer Paper Piecing versus traditional Paper Foundation Piecing. 👇

The techniques are similar, both methods focus on precision and ease of assembly, but with Freezer Paper Piecing, you get to reuse your templates without turning them into confetti! 🎉 MAJOR WIN!

All you have to do is trace a few copies onto freezer paper or use printable sheets for your printer. It’s versatile, efficient, and saves you tons and tons of time.

🌟 The key benefits of freezer paper piecing: 🌟

👏 Reuse & Recycle: No more wasteful piles of ripped paper templates.
👏 Easy Removal: Templates peel off effortlessly, leaving your masterpiece intact.
👏 Versatility: From intricate designs to straightforward patterns, freezer paper can be used for any foundation.

WAY MORE TIME TO QUILT! 🙌

In all of my programs, we use the Freezer Paper Piecing method, and anyone can learn this, even first-time quilters! I’ve got a NEW block-of-the-month quilt design coming soon, so follow along if you’re looking for a faster and easier way to paper-piece! ✨

#modernquilting #paperpiecing #foundationpaperpiecing #quiltingtechnique #quiltteacher
Want to make a witchy little Modern Triangle with Want to make a witchy little Modern Triangle with me? 🧙‍♀️🧵

I’m teaching a FREE class, and we’re getting a little spooky with this one! 🤓

I’ll show you my favorite way to make Modern Triangles using my no-waste, no picking method, and then we’re turning our triangle into a WITCH HAT. ✨

And yes, beginners are absolutely welcome!

I’ll walk you through it step by step, show you how these simple little triangles can be arranged into much more complex-looking designs, and we’ll spend some time actually PLAYING with what we make.

PLUS, if you show up live, you’ll get my exclusive Spooky Witch Hat Modern Triangle pattern FREE so you can keep sewing after class. 🎁

Come hang out, learn something new, make a witch hat, and have some fun with me!

Comment WITCHY, and I’ll send you the link to save your free spot! 🧙‍♀️

#modernquilting #paperpiecing #foundationpaperpiecing #quiltingtechnique #quiltteacher
Tell me you’re a quilter without telling me you’re Tell me you’re a quilter without telling me you’re a quilter. 😂🧵

I’ll go first: I can find quilt inspiration in approximately ANYTHING. I own fabric that is apparently too special to actually use, and “one more seam” has never once meant one more seam.

Your turn. 🤓 Finish the sentence in the comments 👇 

#modernquilting #paperpiecing #foundationpaperpiecing #quiltingtechnique #quiltteacher
A couple of weeks ago, I picked my colors for next A couple of weeks ago, I picked my colors for next year’s “Starburst” Block of the Moth, and I had to laugh at myself because even though I started with a few pretty pinks and yellows as my inspiration...

I devolved back to rainbows for my final selection. I do love a rainbow gradient! So glorious, so delicious!

Honestly, sometimes it takes me several, several, several rounds to get the colors just how I want them. 😭  But the good news is, I do have the rainbow fabric on hand!

Now I can Netflix and sew... as I work on my Starburst sample! Hooray!

Who else just can’t resist a rainbow palette??? Follow along @bryanhousequilts to be the first to see my latest “Starburst” design! 💫

#modernquilting #paperpiecing #foundationpaperpiecing #quiltingtechnique #quiltteacher
Follow on Instagram
© 2026 Bryan House Quilts