• About
    • Privacy Policy
  • Teaching
    • Member/Student Login
    • Online Programs
  • Shop
  • Member/Student Login
  • Blog
    • Free Quilt Patterns – Scrappy Whirligig Quilt

Bryan House Quilts

Easiest Log Cabin Quilt for Beginners

Free quilt pattern· Quilt Blocks· Tutorial

23 Aug

Key Highlights

  • Use the easiest strip piecing method in this log cabin quilt tutorial perfect for beginners
  • Simple, relaxing, no-rules technique
  • How to select fabrics for a log cabin quilt block and creative print and color mixes
  • Learn pro tips for sewing straight lines
  • Step-by-step photo guide and video tutorial

Tutorial: Log Cabin Quilt for Beginners
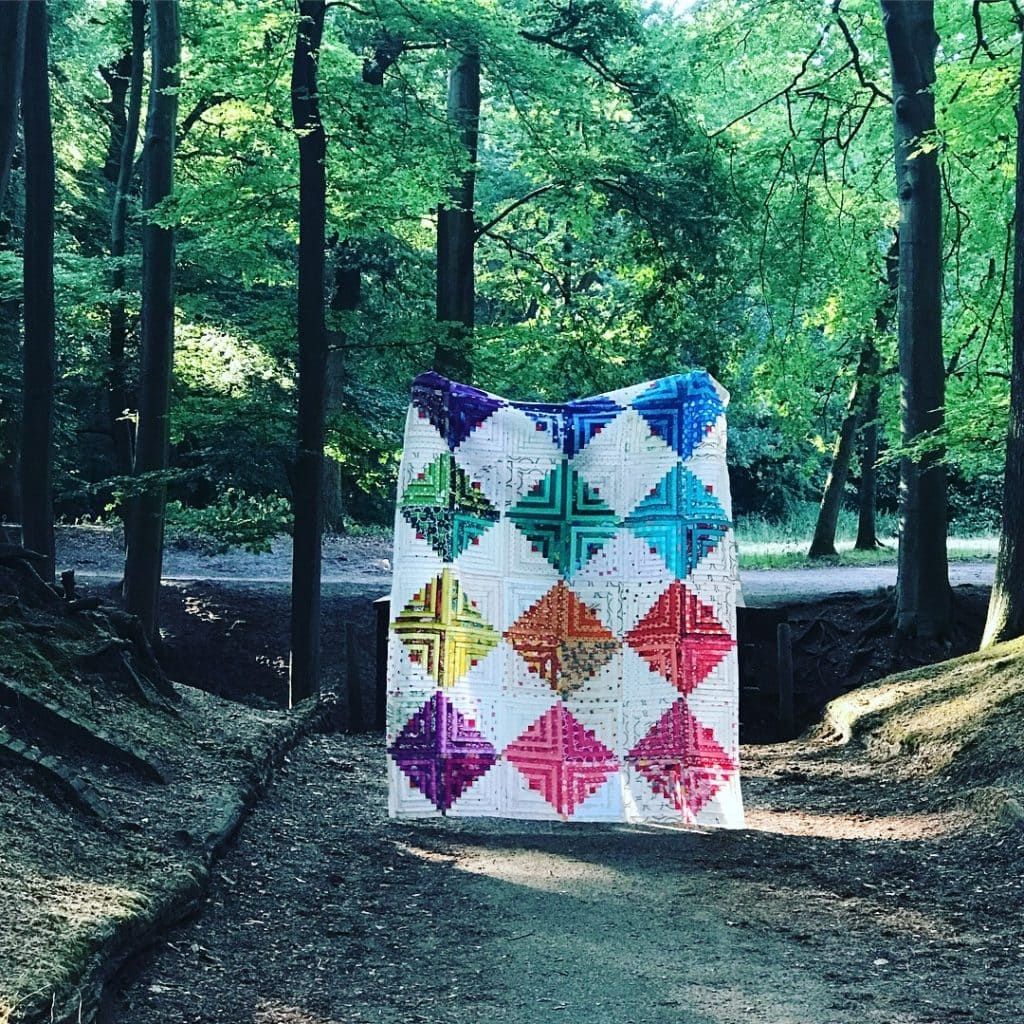
Log cabin quilt in Dutch Forest in rainbow colors
Hello Holland log cabin quilt in the Dutch Forest

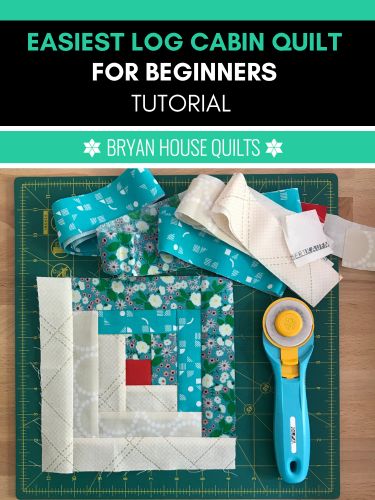
Ready to make the easiest log cabin quilt? These quilts are typically pieced with hundreds of cut-to-measure strips. But not this one! I use 1.5 inch strips cut from fat eighths or fat quarters, all the same length. If you can cut straight strips with a rotary cutter, use this tutorial for your first-time log cabin quilt block. Follow along in the step-by-step photo guide with instructions.

Sometimes, I want a carefree sew, when it doesn’t matter if the blocks end up, well, not quite square. Quilters, this is the stress-free version! Luckily, using colorful prints puts the focus on the design, and not so much on the matching. In the end, all you see is a fantastic quilt.

Classic Log Cabin Quilts for Beginners

These blocks are simple in theory – different lengths of fabric strips are placed around a center square in a repeating pattern. Contrasting colors in light and dark colors make it striking. Hundreds of design options have been created by changing colors and rotating blocks to make optical illusions. The four classic log cabin quilt versions below were created with the same block, just like the one in my tutorial. Isn’t that amazing?
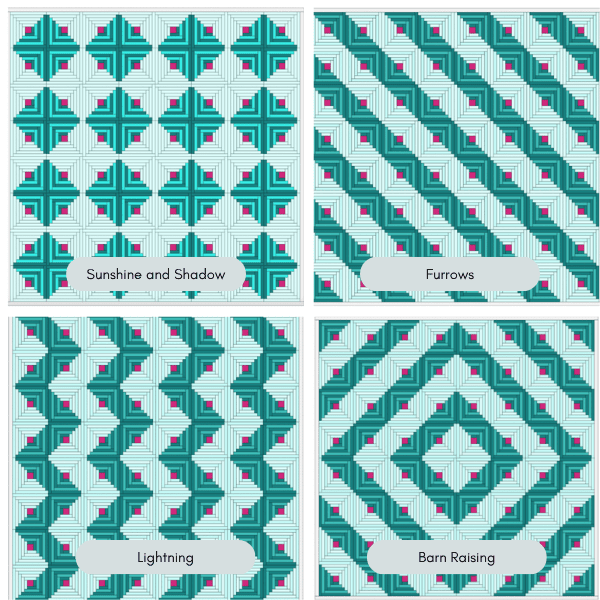
Classic log cabin quilts

What Fabrics work best for a Log Cabin Quilt?
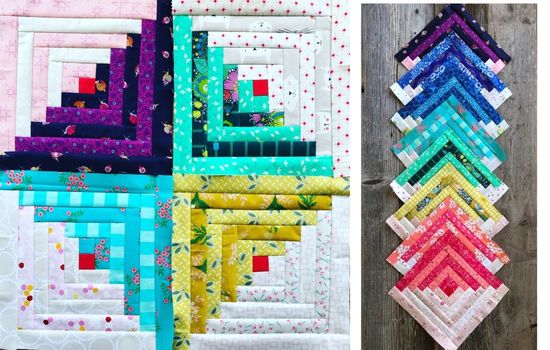
Completed blocks for the log cabin quilt for beginners method in bright rainbow colors.

Colors with lots of contrast are beautiful in modern log cabin quilts. I can’t resist saturated colors. In this tutorial, we’ll choose color pairs for the light and dark fabrics in quilting cottons, and a bright pop of color in the center square. The contrast between the two sides of the block— light versus. dark— is the hallmark design element that makes it pop.

FABRICS REQUIREMENTS

To make this quilt, you’ll will use 48 blocks, 12 per row.

  • 16 fat eighths – medium dark to dark fabrics
  • 16 fat eighths – light fabrics

Each block uses approximately 1 ½ to 2 ¼ 4 strips of each color, depending on placement.

Get some extra color help in this post about choosing monochromatic pairs and color schemes.

  • Start by pairing up your dark fabrics into sets of 2 fabrics.
  • Then pair up your light fabric choices.
  • Pair up a light and dark set and repeat for all of the fabric pairs.

PRO TIPS:

  • Use fat quarters or fat eighths from a designer’s collection – they all go together.
  • Large, multi-color prints blur the edges between fabrics, especially when the background color is similar to your light fabric pairs. Lay out your strips side by side to make sure you have enough contrast. Want the blurred effect? Use the big prints.
  • Use solids or blenders for a modern look and definitely a pop of the color contrast in the center blocks.

Sewing Notions

  • Sewing machine
  • Rotary cutter with sharp blade and self-healing mat
  • Quilting ruler
  • Iron and ironing board
  • Straight pins or clips
  • Square up ruler
  • 50 weight thread and 80/12 machine needle

Step-by-Step Guide for Log Cabin Quilt Block

This easy step-by-step guide shows you how to make a log cabin block from start to finish. When you finish one, you’ll want to make more.

1. Cutting Fabrics

First, wash (or not wash, your choice) and then press your fabrics with Best Press. This stabilizes the fabric for cutting into strips. Use a rotary cutter and a quilting ruler on a self-healing mat.

Square up the edges of your fabrics before cutting strips. Each strip is 1.5 inches wide cut on the crosswise grain of a fat quarter and 20 inches long. You can get 11 strips from one fat quarter and 5 strips from a fat eighth.

2. Sewing Straight Lines

Use a 1/4 inch seam allowance. When you’re a beginner, stop and check the seams often with a small ruler or sewing gauge. Get extra help for sewing strips together better here.

Sewing straight lines will keep your quilt blocks square and the seam allowances even. When you sew the blocks together into rows, the seams are more likely to line up.

Try out these easy tips:

  • Use a seam guide to line up the edges of the fabric under the needle.
  • 1/4” piecing foot is super helpful and worth having on hand.
  • Go slowly when you sew. You can pick up the pace eventually.
  • Keep the strips flat while you sew.
  • Gently feed them under the presser foot – no pushing or pulling – so the feed dogs do the work.

3. Assembly

This method is quick because you will work with one long strip at a time and trim as you go.

Be sure to always place the right sides together. Press your seams toward the outer edge of the block. Give the right side of the block a quick press before you move on.

One good tip for new quilters is to lay out your strips in the order you will sew them. It keeps the process smooth and also prevents you from color mix ups.
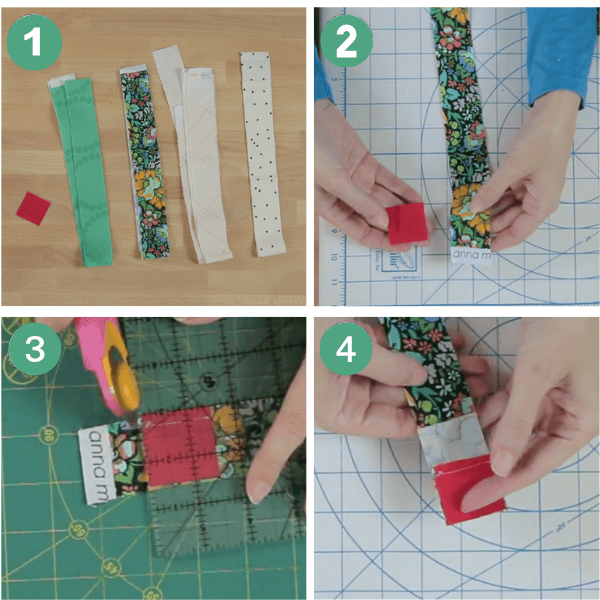
Steps 1 through 4: Starting at the center block

1. After cutting, group your fabrics into block sets: 2 strips light fabrics and 2 strips dark fabrics and one center square.

2. Lay a dark strip right side up and place the center square at the end, matching edges. Sew along the top edge

3. Trim off the excess dark fabric at the end of the strip, even with the center square. Finger press the seam open.

4. Place the sewn pieces on top of the dark strip again, right sides together. Sew along the top edge.

NEXT ROUND
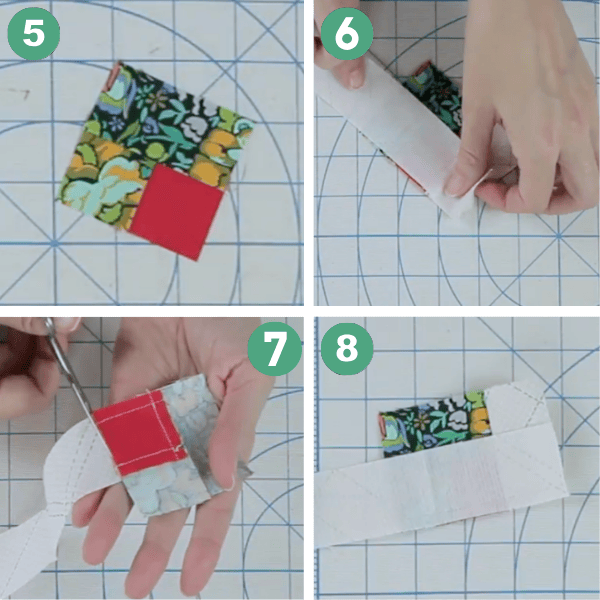
Steps 5 through 8: Adding the light fabric

5. Trim excess dark fabric and you have your first square. Press with a hot iron.

6. Join a light fabric strip, matching one of edges along the center block. Stitch along that edge.

7. Trim excess the light fabric. Use a scissors or a rotary cutter.

8. Place the long strip matching the edges along the center block. Stitch along that edge.
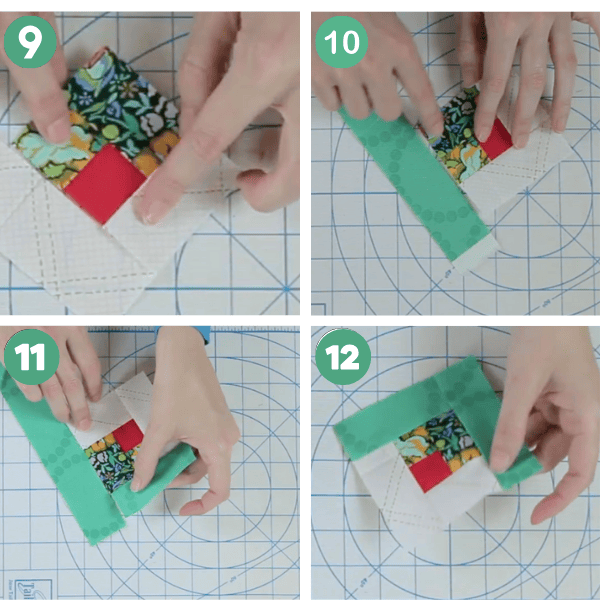
Steps 9 through 12: Adding the second set of dark fabric strips.

9. Press open.

10. Add the other dark fabric strip opposite of the first set of dark strips.

11. Add another dark strip as you work around the block adding strips.

12. Press open.

Now you have completed a full rotation around the center square. Repeat steps 8 through 12 by adding two consecutive light and dark strips to complete the block.

Step 4: Square up Blocks and Finishing

Squaring up each block is the last step before piecing the rows together. You will need a square-up ruler or you can use the grid on your cutting mat and match up the side and bottom edges to get a straight cut.

Measure each log cabin quilt block two times before you cut. Trim your block so it matches the finished log cabin quilt block size 10.5 x 10.5 inches. Put the ruler in place, check if all the sides are even and straight, then trim off any uneven edges. Doing this makes sure your quilt blocks fit together well in the finished quilt.

Before you start putting the quilt top together, take a minute to look over your log cabin blocks. Make sure they are the same size and shape. Press them one last time. After that, you can sort the blocks by color or set them up how you want the layout to look. Paying extra attention now helps to avoid problems later.

To make your quilt top, lay out the log cabin blocks on a flat surface in any log cabin design. Working left to right, stitch the top row together by joining the sides of the blocks. Press the seams flat after each block is stitched as well as on the right side of the top.

Match the vertical seams in each row and pin or clip them to hold in place. Join two rows at a time, then join the pairs of rows. And you are done with the quilt top!

Conclusion

I hope you try this easy method for stitching up a log cabin quilt for beginners. Or just make one block. This log cabin quilt design and method is meant to be relaxing and fun with a no-rules approach. I love this process and the results, and I think you will too.

Frequently Asked Questions

How do I assemble log cabin blocks into a full quilt top?

To make your quilt top, lay out the log cabin blocks on a flat surface in any log cabin design. Working left to right, stitch the top row together by joining the sides of the blocks. Press the seams flat after each block is stitched as well as the right side of the top.

Match the vertical seams in each row and pin or clip them to hold in place. Join two rows at a time, then join the pairs of rows. And you are done with the quilt top!

What is the ‘quilt-as-you-go’ method and how does it work for beginners?

The quilt-as-you-go way lets you sew and quilt each block on its own. You can then join the blocks together later. This is good for people who are new to quilting. You get to work with smaller pieces at a time on your sewing machine, so the quilt is easier to manage and not as heavy.

Are there easy machine quilting designs for finishing my log cabin quilt?

Yes, straight lines, soft diagonal lines, or a simple grid are all great ways for beginners to try quilting on a log cabin quilt. Learn more about using a walking foot for quilting which makes straight line quilting so much easier. Leah Day has a gallery of designs and excellent videos on her blog.

Free Patterns and Tutorials: Log Cabin Quilt Blocks

These free patterns and tutorials are a great place to find inspiration for a log cabin quilt block:

  • Use the traditional method to make it with strips cut to size on the Freshly Pieced blog.
  • Watch a video tutorial using the traditional method by Riley Blake Designs blog.

More Resources On My Blog

  • 5 Tips for Sewing Strips Together Better
  • Make Better Flying Geese
Previous Post: « BOM blocks, are you ready for your close-up?
Next Post: Shining the Member Spotlight on Heather O. »

Reader Interactions

Comments

  1. Patti says

    August 23, 2025 at 2:02 pm

    This has never been my favorite block to make but after watching you I plan to give it another try. Thanks in advance!!!

    • rebeccabryan says

      August 31, 2025 at 2:09 pm

      It’s so versatile! If you find you like making log cabins, why not explore different designs using the block? You might find a design that makes your heart go pitter pat!

      But if you don’t enjoy making it… ha! It’s fine to leave it in your quilty past.

      Enjoy!

Primary Sidebar

New Block of the Month!

Join the 2026 Block of the Month Program

Get my Modern Triangles Quilt Book

Get my Modern Rainbow Quilts Book

Image shows cover of the book "Modern Rainbow Quilts"

Make the Solstice Quilt!

Solstice Block of the Month by Bryan House Quilts

Get Your Invite!

Make Modern Triangles Logo

Make the Sparkler Quilt!

Image Shows Sparkler Quilt Top by Rebecca Bryan

Make the Echo (Echo!) Quilt

Echo BOM now open to join

Make the Wildflower Quilt!

Wildflower Block of the Month by Bryan House Quilts

Make the Stargazer Quilt!

Anne's Stargazer BOM

Make the Rainbow Triangles Quilt!

Rainbow Triangle BOM, modern triangle quilt, Rebecca Bryan

About

Hey there! I’m Rebecca, an author and teacher and freezer paper piecing evangelist. I’m also the founder of the Make Modern Triangles Quilt Club.

Disclosure

Just so you know, my site includes affiliate links from which I (it’s me! Rebecca!) receive payment or compensation. Something to consider as you peruse my website. Thanks!

Latest on Instagram

Quilting is one of those things that sooner or lat Quilting is one of those things that sooner or later becomes more than just a hobby. 🫶

It might start as fabric and a project idea or a pattern…

And then somewhere along the way, you’re thinking about who it’s for, what they’ll love about it, and how they’ll use it. But you’re thinking of them the entire time you make it. 

And they think of you every single time they see it! ✨

And years later, that same quilt is still there on the back of a couch, at the end of a bed, or wrapped around someone you love.

We’re not just making quilts. We’re making memories and things that get used, loved, and held onto long after the last stitch is sewn.

Send this to a mom you want to know you are thinking of this week. 💌

#quiltinginspiration #quilterslife #quiltinggma #grannyhobby
I’ve just revealed a BRAND-NEW pattern!!! 🪄 Alche I’ve just revealed a BRAND-NEW pattern!!! 🪄

Alchemy is my latest block of the month pattern, and this one is for quilters who want something new and maybe even a bit of a challenge! 😉

Presale opens on May 11th. Mark your calendars and follow along! 💕

#advancedquilting #quiltdesign #modernquilting #quiltersgonnaquilt
Do you ever feel like a quilting turtle... slow an Do you ever feel like a quilting turtle... slow and behind? 🐢

Well, let’s just say you’re not alone in that experience! 😅

I know the cycle all too well. Imagine, decide, plan, prep, and sew. Ope... enter mistakes and setbacks. A trip to the fabric store (again). Cut. Stitch. Rip. Stitch.​

Then, the sew-sweet finish! Finally, lol!

When progress feels slow like a turtle... I find it helpful to focus on three things: ⬇️

1️⃣ Celebrate Progress. Just taking the next (teeny tiny) small step can feel every which way but forward. But It’s still progress, especially if you took time for yourself to create! Celebrate it!

2️⃣ Delight in the unknown. Feeling unsure, wanting to quit, or starting over? It’s the normal artist’s experience. Isn’t it great? Haha!

3️⃣ Imagine the end game. Imagine how it’s going to feel when you finish that last stitch! And it’s going to be beautiful! Keep making progress (yes... even if it’s teeny tiny turtle progress!)! We’ve seen it happen, and it’s so possible for you! You can do this.

We all feel like turtles sometimes, that’s why it’s VITAL to celebrate progress, even if it’s block by block or one stitch at a time. 🪡

So today, take some time to celebrate your progress! It’s so thrilling every time I see a block finish! Eeeeeeeee! Every. time! Tell me what you are celebrating in the comments! ✨

#quiltingprogress #quiltingjourney ##quiltingtips #quiltingproblems
So I uh... well, you see... inspiration hit, and I So I uh... well, you see... inspiration hit, and I designed and made a new Block of the Month quilt!

I know, I know... crazy?!

TOMORROW, I'll be revealing the design and walking you through the color choices and all that fun "new project planning" stuff!

Behind the scenes, I'm extra excited because I did the quilty math on the rainbow version, and it turns out we can use fat quarters!

A fat quarter-friendly project just makes choosing fabrics so easy! Fat quarters are like potato chips, you can't just have one... you simply collect them. 🧐

So, if you're like me! You probably have quite a collection of fat quarters. 🌈 🥹

I'll be making this new quilt design alongside you, using my collection of Alison Glass fabrics.

This BOM quilt is more challenging than my other BOM quilts, but still totally doable. Of course, the primary technique will be freezer paper piecing, so you can brush up on your skills in my "Scrappy Whirligig" class. Comment 'FREE' to take the class! 💌

I'm so proud of this quilt, and I cannot wait to show it to you! 🤩 If you want first dibs on the new Block of the Month program, comment 'FIRST' to add your name to the "first dibs" wait list, and I'll be sure you are the first to know when sign-ups are open! 🫶

#blockofthemonth #modernquilting #rainbowfabrics #quiltpattern
Mark your calendars... I am revealing a BRAND-NEW Mark your calendars... I am revealing a BRAND-NEW block of the month design on May 1st! 🗓️ ✨

Yes, you read that right! 🙌

I have been working behind the scenes on ANOTHER block of the month pattern, and you’ll finally be able to see it on May 1st! 

And get excited, because this one is completely new and unlike any I have ever released before. I think you’re going to love it. 🤭

👉 Turn on post notifications so you don’t miss the reveal! ✨

#modernquilting #quiltpattern #quiltingdesign #quiltinginspiration
I’ve just recently got all of these quilts back fr I’ve just recently got all of these quilts back from the quilter!!!! 😍

SWIPE to see them all and tell me which one is your favorite in the comments! 💕 👇

#quiltpattern #quiltinspiration #modernquilting #finishedquilt
Follow on Instagram

Browse by Category

Archives

  • Instagram
  • Facebook
  • Pinterest
  • email
Quilting is one of those things that sooner or lat Quilting is one of those things that sooner or later becomes more than just a hobby. 🫶

It might start as fabric and a project idea or a pattern…

And then somewhere along the way, you’re thinking about who it’s for, what they’ll love about it, and how they’ll use it. But you’re thinking of them the entire time you make it. 

And they think of you every single time they see it! ✨

And years later, that same quilt is still there on the back of a couch, at the end of a bed, or wrapped around someone you love.

We’re not just making quilts. We’re making memories and things that get used, loved, and held onto long after the last stitch is sewn.

Send this to a mom you want to know you are thinking of this week. 💌

#quiltinginspiration #quilterslife #quiltinggma #grannyhobby
I’ve just revealed a BRAND-NEW pattern!!! 🪄 Alche I’ve just revealed a BRAND-NEW pattern!!! 🪄

Alchemy is my latest block of the month pattern, and this one is for quilters who want something new and maybe even a bit of a challenge! 😉

Presale opens on May 11th. Mark your calendars and follow along! 💕

#advancedquilting #quiltdesign #modernquilting #quiltersgonnaquilt
Do you ever feel like a quilting turtle... slow an Do you ever feel like a quilting turtle... slow and behind? 🐢

Well, let’s just say you’re not alone in that experience! 😅

I know the cycle all too well. Imagine, decide, plan, prep, and sew. Ope... enter mistakes and setbacks. A trip to the fabric store (again). Cut. Stitch. Rip. Stitch.​

Then, the sew-sweet finish! Finally, lol!

When progress feels slow like a turtle... I find it helpful to focus on three things: ⬇️

1️⃣ Celebrate Progress. Just taking the next (teeny tiny) small step can feel every which way but forward. But It’s still progress, especially if you took time for yourself to create! Celebrate it!

2️⃣ Delight in the unknown. Feeling unsure, wanting to quit, or starting over? It’s the normal artist’s experience. Isn’t it great? Haha!

3️⃣ Imagine the end game. Imagine how it’s going to feel when you finish that last stitch! And it’s going to be beautiful! Keep making progress (yes... even if it’s teeny tiny turtle progress!)! We’ve seen it happen, and it’s so possible for you! You can do this.

We all feel like turtles sometimes, that’s why it’s VITAL to celebrate progress, even if it’s block by block or one stitch at a time. 🪡

So today, take some time to celebrate your progress! It’s so thrilling every time I see a block finish! Eeeeeeeee! Every. time! Tell me what you are celebrating in the comments! ✨

#quiltingprogress #quiltingjourney ##quiltingtips #quiltingproblems
So I uh... well, you see... inspiration hit, and I So I uh... well, you see... inspiration hit, and I designed and made a new Block of the Month quilt!

I know, I know... crazy?!

TOMORROW, I'll be revealing the design and walking you through the color choices and all that fun "new project planning" stuff!

Behind the scenes, I'm extra excited because I did the quilty math on the rainbow version, and it turns out we can use fat quarters!

A fat quarter-friendly project just makes choosing fabrics so easy! Fat quarters are like potato chips, you can't just have one... you simply collect them. 🧐

So, if you're like me! You probably have quite a collection of fat quarters. 🌈 🥹

I'll be making this new quilt design alongside you, using my collection of Alison Glass fabrics.

This BOM quilt is more challenging than my other BOM quilts, but still totally doable. Of course, the primary technique will be freezer paper piecing, so you can brush up on your skills in my "Scrappy Whirligig" class. Comment 'FREE' to take the class! 💌

I'm so proud of this quilt, and I cannot wait to show it to you! 🤩 If you want first dibs on the new Block of the Month program, comment 'FIRST' to add your name to the "first dibs" wait list, and I'll be sure you are the first to know when sign-ups are open! 🫶

#blockofthemonth #modernquilting #rainbowfabrics #quiltpattern
Follow on Instagram
© 2026 Bryan House Quilts