I recently introduced you to my new Christmas quilt, Hollyberry Merry Modern Tree Farm. This week, I’m sharing the planning process used for all of my quilt patterns. I’ve tested and revised it over the years so you’ll be successful making your own version.
PLAN a hollyberry merry modern tree farm quilt
Learning freezer paper piecing is a big part of making this quilt. First timers, I promise you’re going to love it. Experienced foundation piecers, you’re going to really love it, too! (no more ripping out tiny papers!) But if you like paper piecing, go for it!
Each tutorial for this quilt is loaded with photos and instructions, plus some video lessons. Make the blocks at your own pace. All of the resources you need to learn freezer paper piecing (FPP) are included. So no worries!

Step 1: Download the Coloring Sheet
Interested in quilting along? Get the Coloring Sheet to plan your color scheme.
Download the Coloring Sheet here and enjoy!

MMT Club members, the coloring pages – print and digital – are located in the Welcome section for Hollyberry: Coloring Pages.
Templates for the tree blocks are included in my Modern Triangle Quilts book in the Isosceles Sampler pattern.
I recommend using colored pencils or markers to trial colors. If you have an iPad, download the Procreate app to colorize the digital coloring page. Not familiar with quilt coloring pages? Learn four ways to use quilt coloring pages to get started.

Time-saving tip: Color one-quarter or quadrant of the quilt and make 4 color photocopies. Cut and arrange them into the full quilt to gauge your color plan.
FINISHED SIZE
I’ve listed the fabrics in solid colors below (I’m a solids girl), however, I used lots of prints in Hollyberry to create a scrappy look. The colors are suggestions.
The finished quilt will measure 76 1/2” x 76 1/2”, with each Merry Modern Tree measuring 12” finished.
Fabrics:
- Crimson: 1 yard
- Crimson: 1 yard
- Red: 1 yard
- Pink: 1 yard
- Evergreen: 1/2 yard
- Green: 1/2 yard
- Sage: 1/2 yard
- Cream: 4 2/3 yards
- Binding: 5/8 yard
- Backing: 7 yards (assuming 40” width of fabric, and 8” total overage)
NOTE: ¾ yard total of green fabrics will make all of the trees you need. I used six different green fabrics.
Notions and Materials
- Quilters Template Plastic
- Legal size copy paper or cut freezer paper from the roll to legal size (8 1/2” x 14”)
- Foundations from Modern Triangle Quilts book, Modern Triangle Quilts ebook or membership in the Make Modern Triangles Quilt Club (see details on the membership below).
- Add a Quarter ruler and rotary cutter/self-healing mat
printing foundations and templates
- Print a copy of each foundation on the freezer paper. They can be reused many times.
- If using paper foundation paper, print the number of foundations needed to complete the blocks.
- Trace the cutting templates onto the quilters template plastic and cut apart.

STEP 2: CHOOSING FABRICS
Incoming fun! Choose your fabrics using the coloring page as a guide. With the done-for-you version, you can use prints to make it your own. Using your stash is easy, especially if you’ve got lots of prints in the same color family. Match your fabric scraps to the foundations with an extra ½ inch around the edges. Make little piles of coordinating fabrics for each block (you will have many piles so claim extra space and spread out!)

Press your fabrics with Best Press starch (or your preference). Try to handle them as little as possible to keep the stretchy bias from stretching more. You’ll be so glad you took the extra time to do this.
Step 3: Cutting fabrics
I cut fabric and foundations when I’m fully awake and caffeinated! Quilty math, too. My secret is prepping everything before my sewing session so that my piecing routine is easy and stress-free (no hollering about where the rotary cutter is hiding). I learned this during a few back-to-back moves in and out of the country. Read how this saved my sewing sanity here while herding a family of six around the Netherlands.
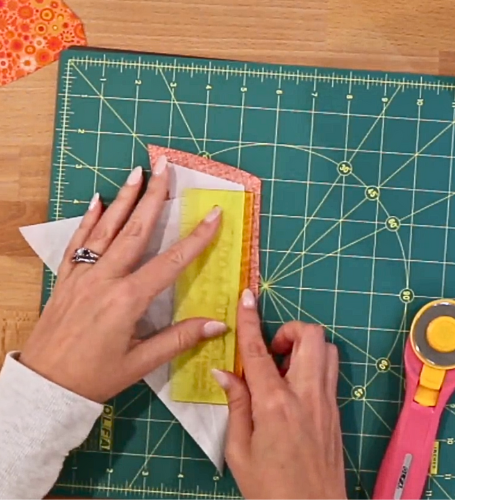
Cut out the freezer paper piecing shapes from the foundation with a ruler and rotary cutter. Then cut your fabric pieces at least ¼ to ½ inch larger on all sides. Put like pieces in a pile. Now cut the fabrics for the adjoining shape and put in a pile, and so on. Keep them in sewing order and you’ll love how this sews together. I work in batches so I make one triangle block at a time.
STEP 4: Setting up your sew-Flow station
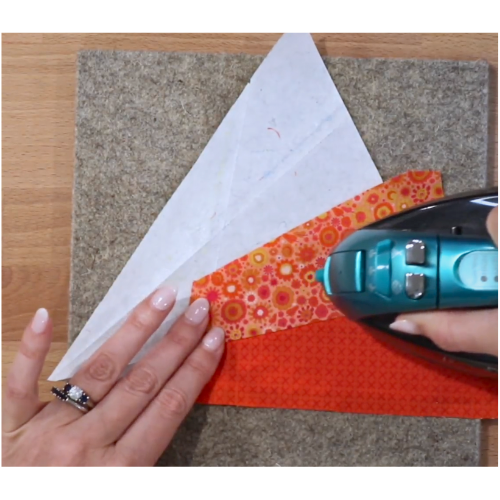
I keep smaller versions of cutting mats and wool pressing mats close by for trimming and pressing. My cutting mat is 12-inches square and rotates; the wool pressing mat is 8-inches square. I easily move them around on my sewing table as needed. My Panasonic 360 iron is cordless and smaller than typical irons. It stays hot as long as I put it back in the charging cradle between pressed. The back end is curved like front end which allows me to see more of the mat.
I angle my sewing machine just a tad to make more room in front of me for the mats. Probably like you, I spend just as much time trimming and pressing as piecing!
Other than having extra bobbins filled, you’re ready to sew your first test block.
NEXT STEPS: PIECING THE BLOCKS
In the next post, I’ll share my tips on freezer paper piecing and assembling the Hollyberry quilt.
Happy quilting!
Rebecca
Make A MODERN TRIANGLE BLOCK OF THE month Quilt
Learn how to make your own modern triangle quilts by sewing along with us! Dutch Summer is our newest BOM quilt. Everything you need for success is inside the program. Whether you’re an experienced quilter or just starting out, you’ll love this making this quilt at your own pace with our carefully planned step-by-step process. Perfect for busy quilters – complete a whole quilt in a year, with just 4 hours of sewing each month!


