Glue basting curves is a super fast way to match and sew curved seams without puckers. I can’t way to show you how easy this is to do. Glue basting will make you fall in love with curved piecing and leave the shifties behind.
Key Highlights
- Glue basting curves is a fast method for matching edges and sewing pucker-free curves.
- Learn how to apply glue for basting.
- Glue basting quickly dries and fabrics are easy to reposition
- How to remove glue residue from fabrics and quilts.
Glue basting is a total game-changer for curved piecing, binding and applique. I mean, imagine matching seams, beautiful curves and even binding ALL of the time. I have to say that I was nervous about adding glue to my seams. Would glue gunk up my needle? Too-stiff fabric? Will it wash out? Trust me, once you try glue basting, you’ll never go back.
What is glue basting?
Glue basting is a method of bonding fabrics using washable glue. For me, it’s THE ANSWER to shifting fabric, curved seams, matching points and seams, and uneven binding. When I got tired of the shifties – fabrics that don’t stay put – I finally tried glue basting.
I’m the first to say I’m not a stickler for every single seam matching. Yes, I like matching seams and points, but I enjoy quilting more than ripping! Then I learned about glue baste quilt products: an almost ripper-free way to match, fold and hold fabrics in place with perfectly stitched seams. Too good to be true? Read on!
Glue basting opens up creative possibilities for applique, intricate blocks with many seams and precision piecing whether you are a beginner or a seasoned quilter.
Glue Basting Basics – No Pinning!
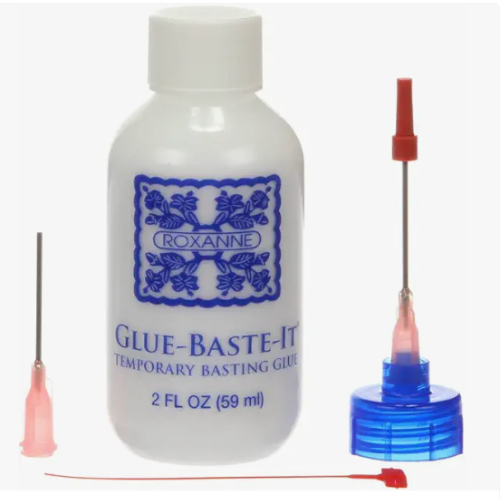
Many quilters use washable school glue for this technique with a fine point applicator tip. Really! Quilters also use glues specifically designed for fabric, like Roxanne’s Glue Baste for a temporary hold. The magic lies in its tacky hold and how easily it washes out.
It allows for greater precision and prevents shifting, which is crucial for those intricate patterns. The glue’s temporary hold ensures that your fabric stays in place while you sew. No more shifties!
Plus, glue basting eliminates pesky pins. No more pricked fingers and pulling out pins as you sew. It makes your whole sewing experience smoother.
Glue Basting Benefits
Many quilters have found that glue basting is a super helper in the sewing room:
- Cost-effective: Elmer’s Washable School Glue is budget-friendly and available everywhere, even the grocery store.
- Accuracy: No mismatched seams or puckering on curved seams. Unlike pinning, which can sometimes shift fabric, glue basting keeps everything perfectly in place. If you use a lot of pins, your fabric won’t shift, but I don’t want to pin LOTS of piins.
- Speedy: It’s much faster to apply glue than to pin, especially for larger projects and curved seams.
- Holding power: Applique and curved improv pieces stay in place until you sew them down.
Essential Supplies for Glue Basting
Gathering your glue-basting tools and supplies is easy – you probably already have most of these in your sewing room:
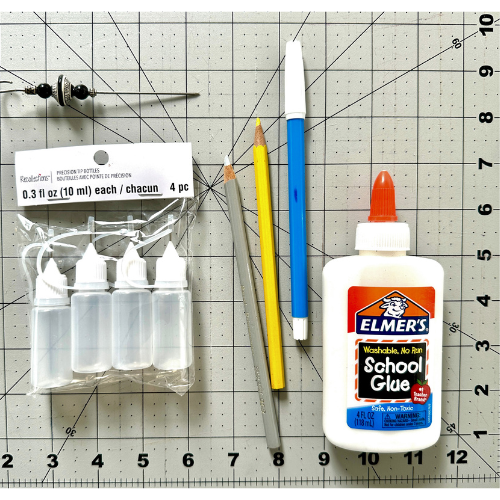
- Washable School Glue: Opt for a good quality washable school glue, like Elmer’s, because it washes out easily. Make sure your glue is fresh.
- Fine Tip Applicator Bottles: No debate, you need these fine point applicator tips or bottles. They give you more control over where the glue goes, especially intricate areas and points.
- Foam Brushes: A foam brush helps to spread the glue evenly, guaranteeing a smooth finish without any clumps or excess glue. Use a foam brush for larger areas – they are too big for ¼ inch seams, unless you are a glue Ninja.
- Clips
- Iron and ironing surface: a medium setting and dry iron sets the glue quickly.
- Parchment Paper: Protect your ironing board and work surface from glue residue.
Choosing the Right Adhesive for Your Project
Elmer’s Washable School Glue is a popular choice among quilters as well as other glues formulated specifically for basting and temporary holds. They create a flexible bond, which is ideal for quilts that will be washed and used frequently.
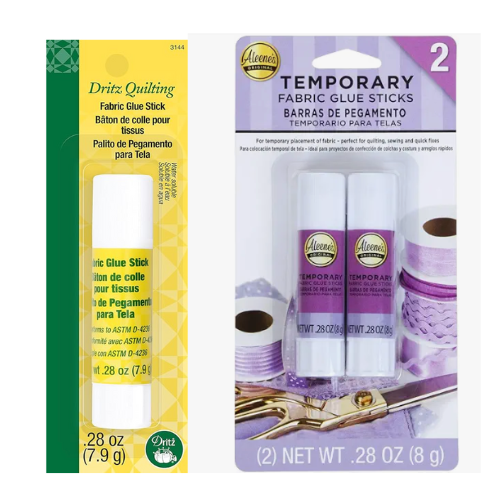
They are offered in glue sticks (more like paste), white thick liquid (school glue) and tacky clear liquid (pen or applicator tip).

Note: Permanent options are rarely used in quilting because seams and folded edges are sewn together or sewn down and then quilted.
Temporary fabric glues are great for basting because pieces can be repositioned, even if the glue has dried. A perfect world of sticking and not sticking. However, if you’re working on a project that requires a more permanent bond, for say, attaching embellishments, then use permanent fabric glue.
Ultimately, the best choice for your project depends on your goals. Do a test run with the glue and fabric to make sure it’s compatible.
Step-by-Step Guide to Basting Glue for Quilting
Glue basting is simple and you’ll learn quickly. I’ll show you step-by-step how I baste curved seams.
Step 1: Preparing Your Fabric
Before you begin basting, give your fabric a good press with a hot, dry iron to remove any creases and wrinkles. Yeah, it’s tempting to skip this step but glue adheres better to smooth surfaces.
Step 2: Applying the Glue
Start by laying your bottom fabric right side up on your work surface. This could be your kitchen table, a cutting mat, or even the floor. I’ve used waxed paper and regular paper to protect the work surface. Scraping dried glue off of anything is more work than I want.
Next, apply a thin line of glue or dots directly onto the right side of the fabric. Don’t go overboard – a little bit goes a long way. You want just enough to create a bond between the layers without glue seeping out. I prefer using an applicator tip over a glue stick. Glue pens are a popular choice, however, I like how washable school glue holds and dries the layers together with quick iron press.
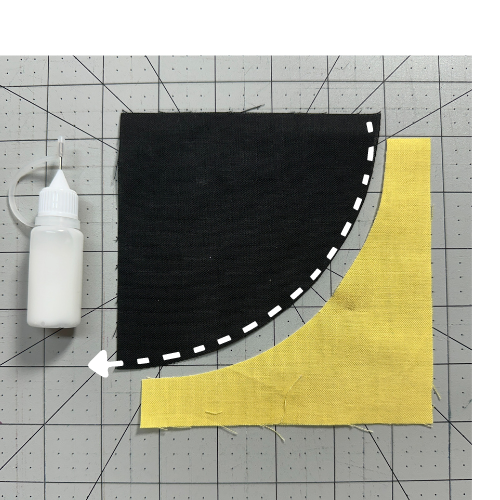
VIT (VERY IMPORTANT TIP): Run the line or dots in the middle of the seam allowance.
If you’re using an applicator bottle, gently squeeze the bottle while moving it along the fabric to create a continuous line. If you’re using glue for larger areas, simply use a regular size bottle and make a zig-zag line, then use a foam brush to spread it out.
Step 3: Positioning the Fabric to Join Curves
Once you’ve applied the glue, carefully position the right side of the adjoining fabric on top, aligning the edges. Gently press the fabric onto the glued surface, smoothing out the wrinkles.
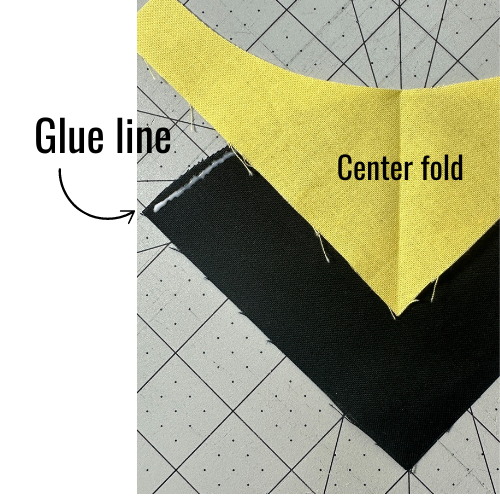
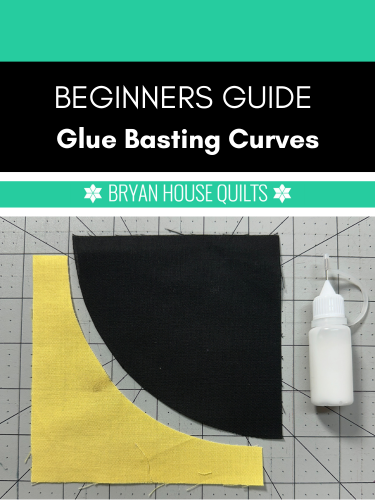
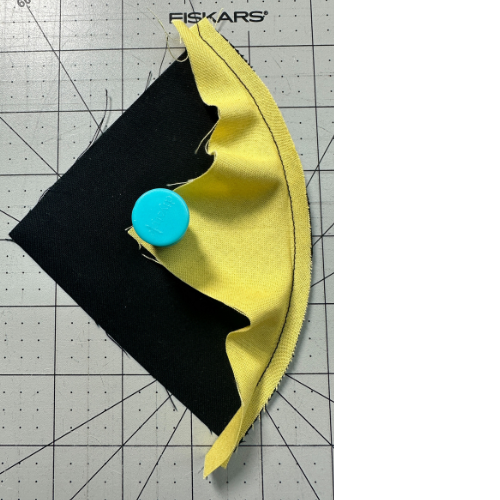
I crease a center fold and match it up with line on my cutting mat and the center of the inset piece (black above). Place a pin along the center line so the shape is evenly distributed along the curve – this makes a huge difference! You’ll be shocked how off center the curve becomes when you skip the center line pin (see photo below).
Starting from the center and working out, I gently press the fabric together matching edges. You won’t believe how fast this goes!
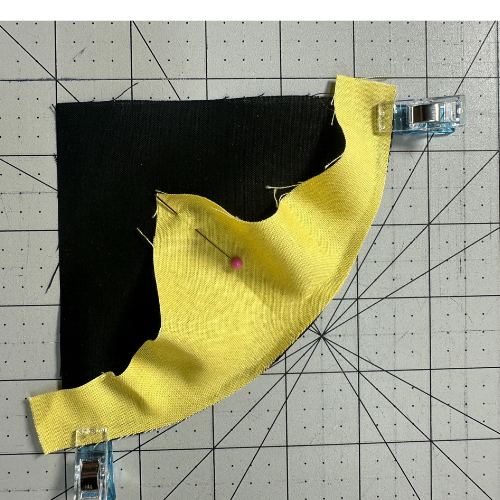
Look, Ma! No hands!
Once you’re happy with the positioning, clip in place.
Step 4: Pressing
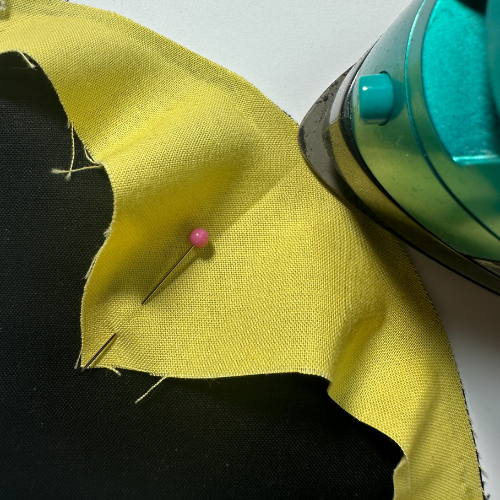
Next, grab your iron. Set it to a medium heat setting with no steam. Place your iron gently on top of the fabric and apply light pressure for a few seconds. Press with an up and down motion – sliding and dragging shifts and distorts the fabric.
For smaller seams and folds, press the tip of the iron over the fabric or use a mini iron for a few seconds. A well-pressed seam makes a happy seam sewist. You’ll love how quickly it dries, stays in place and creates smooth, flat fabric WITHOUT PUCKERS.
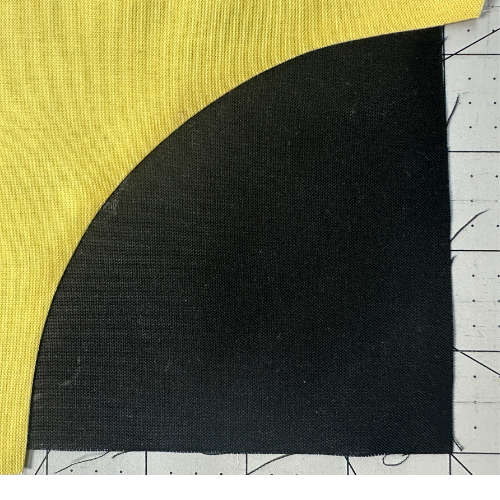
And there you have it – two layers, perfectly basted together. Make sure the glue is dry before stitching. Glue basting the curves took 30 seconds.

And less than 10 seconds to sew the glue basting curves together.
Stitching a curved seam is super speedy when the glue is holding everything together. And no pins in the way.
TADA! So smooth!
Troubleshooting Common Glue Basting Issues
Dealing with Excess Glue
One of the most common issues is using too much glue. Fortunately, it’s an easy fix. First, don’t panic because the glue is water-soluble.
If you notice any seeping glue, grab a damp cloth or sponge, then gently blot the area (rubbing the area will distort the curves). If the glue has already dried, apply a smidge of warm water and let it sit for a few minutes to soften the glue.
Afterward, gently blot the area dry with a clean cloth or paper towel and allow the fabric to air dry completely. And remember, a little goes a long way, so always start with a thin layer of glue and avoid using too much pressure when applying.
Fixing Uneven Fabric Layers
It’s super frustrating when your fabric layers don’t align perfectly, however, you can usually fix it.
If you catch it early on, gently lift the fabric (no tugging) from the glued surface and reposition it. If the glue has already dried, try applying a warm iron to the area to soften the glue. Once it’s more pliable, reposition the fabric and press to dry.
Preserving Your Work: Post-Basting Care
Congratulations, you’ve successfully basted your curved seams! But the work isn’t over yet. Store your basted quilt flat or rolled so it remains smooth. Avoid folding until you have quilted the top.
Removing Glue Residues Effectively
Removing glue residues from your finished quilt is easier than you might think! In most cases, a simple wash in warm water with mild detergent will effectively remove any traces of glue. But sometimes, you might encounter a bit of stubborn glue residue that refuses to budge.
Before attempting any removal methods on those persistent glue spots, always test on a hidden area of your quilt to ensure that the fabric won’t be damaged. If the warm water soak doesn’t completely remove the glue, try using a mild soap solution or a fabric softener sheet to help loosen the adhesive.
Another option is to use white vinegar. Simply mix equal parts white vinegar and warm water in a spray bottle, lightly mist the affected area and let it sit for a few minutes before gently rubbing with a clean cloth. Rinse thoroughly and allow the fabric to air dry.
Buy on Amazon: Basting Glue Supplies
Fine Tip Applicator Squeeze Bottles
Temporary Basting Glue for Sewing
Buy products labeled with “baste” or “basting” which are temporary and repositionable.
Aleene’s Temporary Fabric Glue Sticks
Beacon Quilters Choice Basting Glue
Online Tutorials: Instagram
Search for #gluebasting, #glue baste on Instagram for tips. Quilters are always trying and sharing new tricks.
Give IT A TRY!
Glue basting curves will make you love curved piecing! I hope you try this method so you can make curved blocks, like the Drunkard’s Path. Other methods work well, such as pinning the curved pieces together, however, glue basting curves is the fastest, easiest way to sew flawless, flat curved seams for me.
Frequently Asked Questions
Can I Wash a Quilt That Has Been Glue Basted?
Yes, as long as you use washable elmers school glue or a similar brand for fabric. Wash the quilt as you normally would.
Is Glue Basting Safe for All Types of Fabric?
Always use washable, temporary glue on a scrap piece of fabric first.
How Long Does Glue Baste Hold Before Sewing?
A glue baste will usually hold your seams together indefinitely, but if you handle the pieces often, you may find some fabric pulling apart when the seams aren’t sewn.
Can Glue Basting Affect the Feel of the Fabric?
Not if you apply a thin, even layer of glue. Too much can make the fabric stiff but this isn’t an issue if you use a thin layer. And stiffer fabric makes a NICE crease so no worries there.
Join our Block of the Month programs any time, start any time, make any project, finish any time, work at your pace and repeat! Click here to learn about all of the goodies in the Club!


Apply the glue to the right side of the fabric.
Marlyn, thanks for the catch. My brain had the twisties. I corrected it in the blog.
Rather than applying a line of glue, I apply tiny dots in a line. This holds just as well and avoids getting excess glue.
Iral, thanks for the tip. Dots are great way to add glue.
You state to put the glue on the wrong side of the fabric . It won’t work that way
Mary Ann, thanks for catching that. My brain had the twisties! I corrected it in the blog.
what about pressing the seams open after sewing?
Personally I’m not sure! I’d worry about one side puckering. Do you have experience you can share?
Your curves will press nicely with glue basting because it reduces puckers. The pressed seam also “falls into place” easier because glue basted curved seams are self-correcting, too. Occasionally, the presses may not match where the stitching line is BUT thats a good thing! It corrects itself. The glue also gives it a sturdier, flatter seam.
Having said that, I do not press seams open on curves when glue basting. There are times when you may need to press open a small section to get the seam to curve just right. I rarely need to do that.
I hope this helps!