• About
    • Privacy Policy
  • Teaching
    • Member/Student Login
    • Online Programs
  • Shop
  • Member/Student Login
  • Blog
    • Free Quilt Patterns – Scrappy Whirligig Quilt

Bryan House Quilts

Feathered Star Quilt Along {Week 4 – Piecing the Blocks}

quilt along· quilt pattern

27 Jun

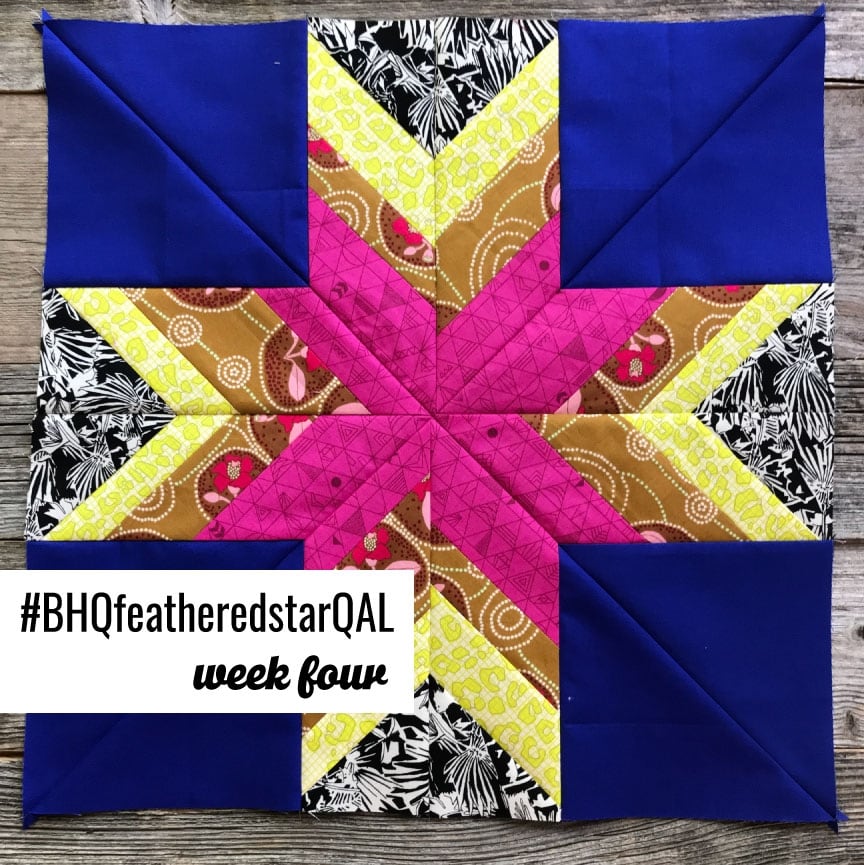
Welcome to Week 4 of our Feathered Star Quilt Along. Last week we sewed all our strip sets together and cut all the star spokes. This week we are assembling the star blocks. In this post I’ll share my tips and tricks for piecing with angled pieces.

Before we get into the meat of our post, I’d like to take a moment to thank this week’s sponsor Cotton Cuts. This week’s prize is a Modern Maker Box.

Last week’s winner of the Aurifil prize is @savoreverystitch. Congrats!

How to follow along:

You have a few options to follow along:

  • Sign up for the weekly Quilt Along emails by clicking the RSVP button below.
  • Follow along on Instagram using the hashtag #BHQfeatheredstarQAL.
  • Every week, on Wednesday, I’ll be posting a quilt along blog post on my website.

RSVP HERE

Schedule of Events

First, let’s check out the schedule again…

Week 1 – June 6: Introduction and Planning

Week 2 – June 13: Cutting 

Week 3 – June 20: Piece and Cut Strip Sets

Week 4 – June 27: Piece Blocks (you are here!)

(Mid QAL Break – Happy 4th of July!)

Week 5 – July 11: Piece Border Units

Week 6 – July 18: Assemble Quilt Tops

Week 7 – July 25: Quilting

Week 8 – August 1: Quilt Parade Link Up Party (Linky will close August 27th)

Closing Post – September 6

Piece the Star Blocks

So, last week we sewed all the strips and cut the star spokes, it’s now time to sew all the star spokes into the star blocks. Below, I’m showing different pictures from my process.
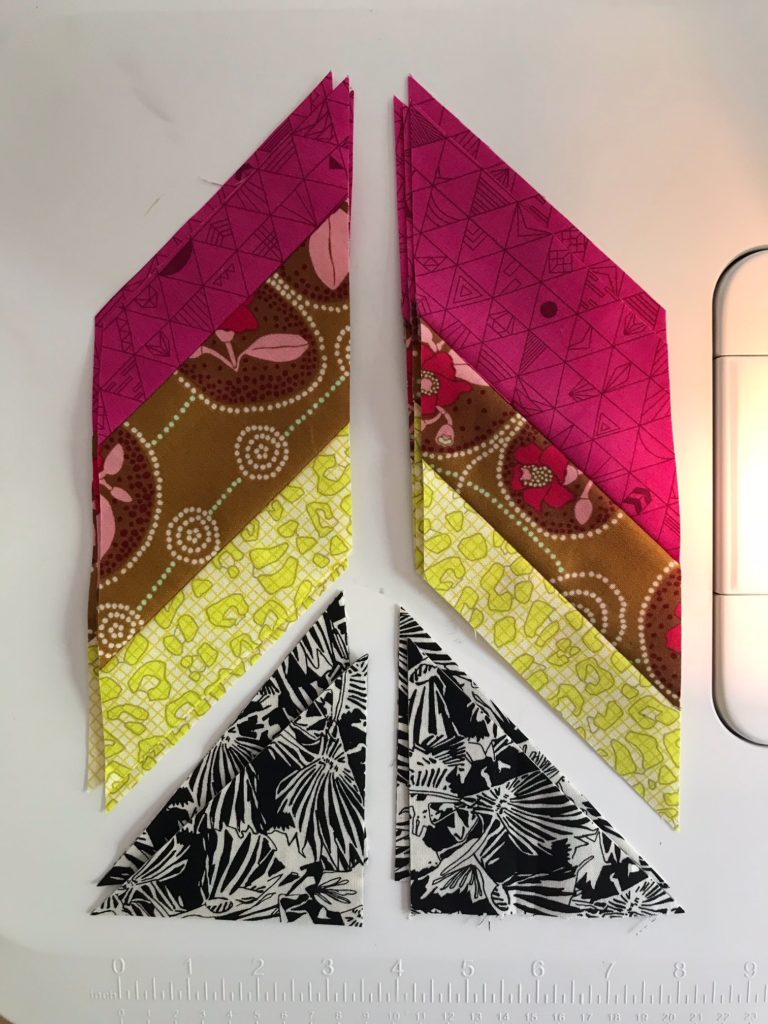
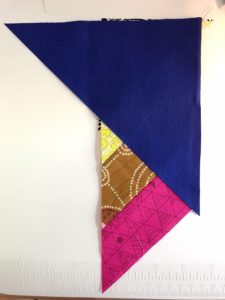
The Star Block assembly starts with sewing the 3 7/8” triangles to the outer edge of each star spoke. Note if you’re using stripes make sure the stripes are oriented to appear as if they are going in to the spoke.
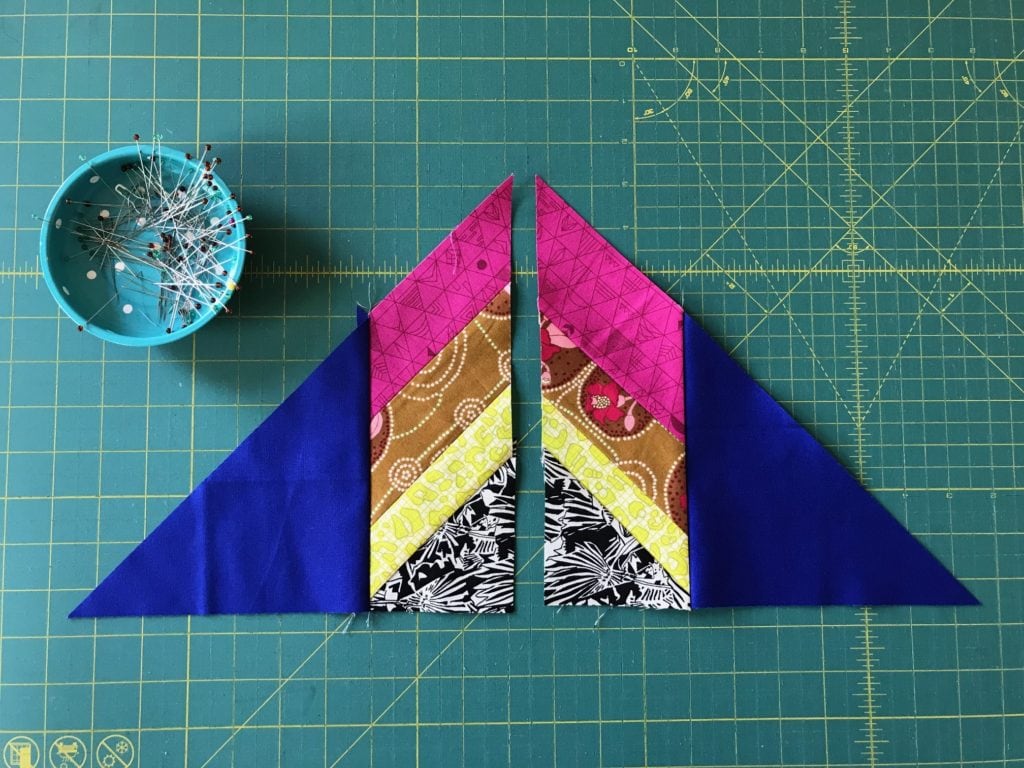
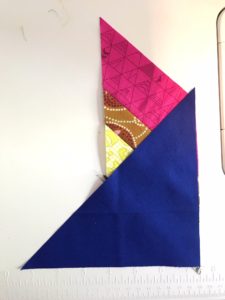
Next you’ll sew the background 6 7/8” triangle to each spoke unit.
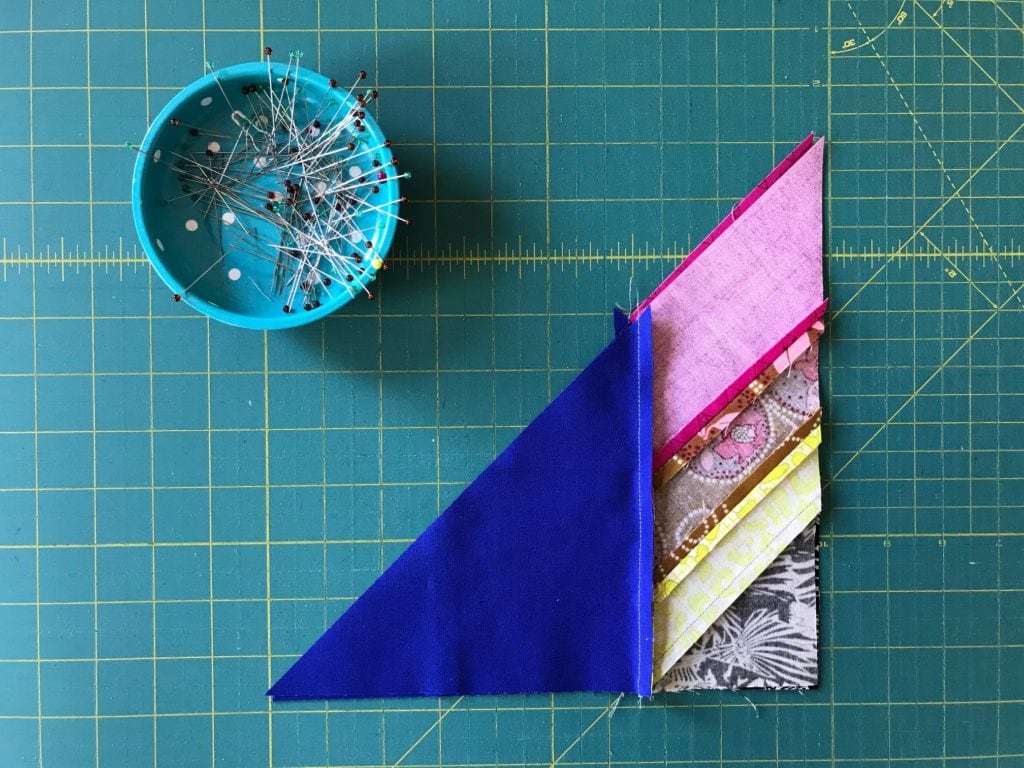
Next we’ll sew the star spokes and reversed star spokes together into a quarter block.
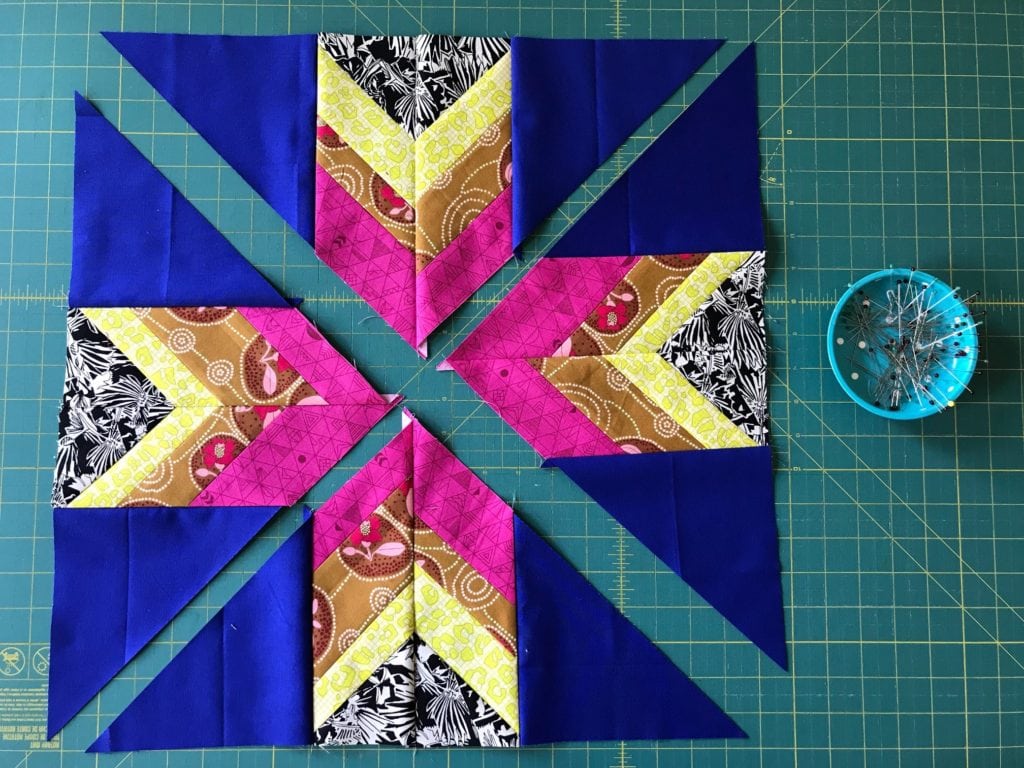
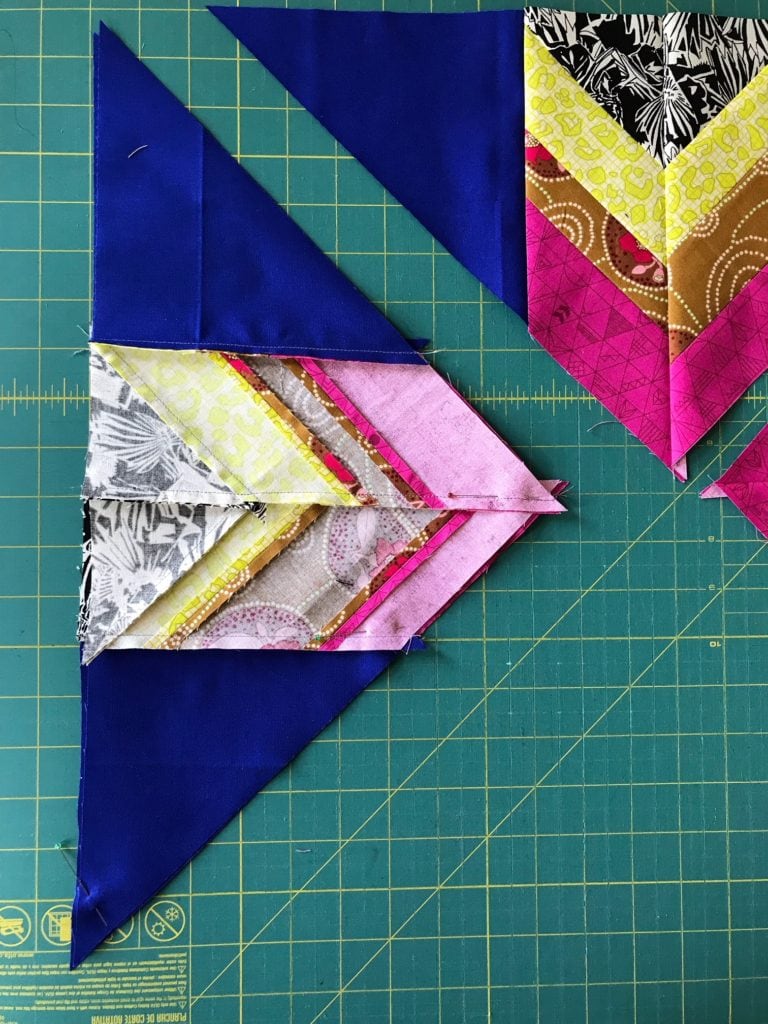
And finally, we sew the quarter blocks together into the final star blocks.
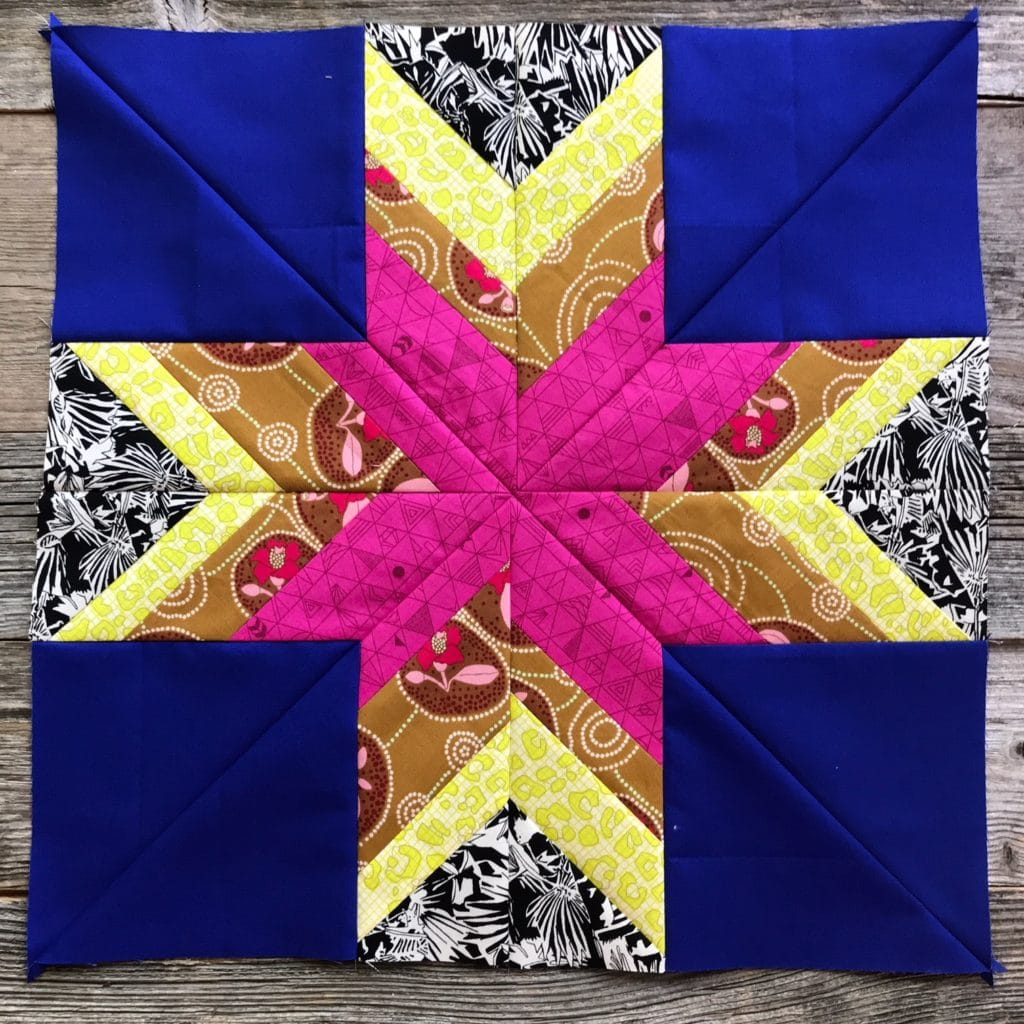
You’ll make 13 star blocks for the regular pattern and 9 star blocks for the alternative layout.

Tips for sewing angled pieces
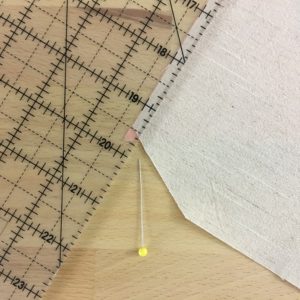
 

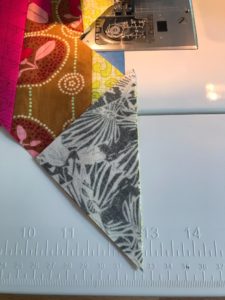
My favorite trick is to use the dog ear, as a seam guide. Notice in the above picture to the left, the wee pink triangle sticking out? This is the dog ear and I’m looking for it to extend past the other piece by roughly 1/4”. You can use your acrylic ruler, or add-a-quarter ruler to measure how far the dog ear sticks out. Anytime I sew with angled pieces, whether it’s triangles, diamonds, and frankly any curve or improv piece, this is my number one tip. I’ve used this trick so many times, I can “eyeball” it.
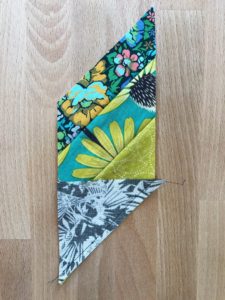
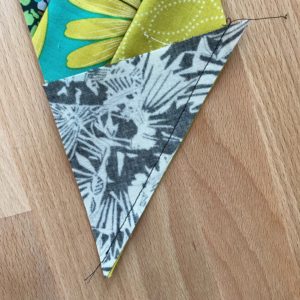
I’ve already sewed this piece so that you can see where the seam will go.
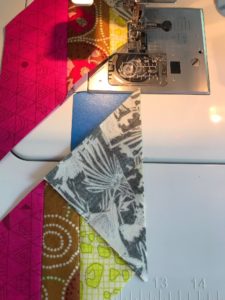


Here are some pictures showing how I employed this tip as I sewed my Feathered Star blocks. If you need additional help, please post in my Facebook Group.


This week’s sponsor

This week, Cotton Cuts is offering a Modern Maker Box to one lucky participant. Inside each Modern Maker box you’ll find: three 1-yard cuts of fabric from a modern (and NEW!) fabric collection, a spool of Aurifil thread, Cotton Cuts’ signature pencil, a BONUS box-exclusive quilt pattern, and 25% off all fabric in Cotton Cuts’ fabric shop, every day.

Thanks so much Cotton Cuts for sponsoring our fun!

How to participate

We’re going to be doing most of our interaction on Instagram. To enter, post a pic of your cutting process this week on Instagram with the #bhqFeatheredStarQAL. I’ll choose a winner at random next Tuesday!

Fine print: To be eligible you’ll need to follow myself and Stash Fabrics and have a public Instagram account.

If you have a question or need help, the quickest way to get an answer from me is to post in my Facebook group “Quilting with Bryan House Quilts“.

Next Week

Next week, we are taking a mid summer, 4th of July break. I hope you enjoy the holiday!

 

Previous Post: « Introducing the Splendid Sampler 2: Block 2 Milk and Cookies
Next Post: Happy Fourth of July {One Day Freebie} »

Primary Sidebar

Get Your Free Ticket to Quilters Paradise Holiday! 🎁

New 2026 Block of the Month!

Graphic of Alchemy Quilt

Join the 2026 Block of the Month Program

Get my Modern Triangles Quilt Book

Get my Modern Rainbow Quilts Book

Image shows cover of the book "Modern Rainbow Quilts"

Make the Solstice Quilt!

Solstice Block of the Month by Bryan House Quilts

Get Your Invite!

Make Modern Triangles Logo

Make the Sparkler Quilt!

Image Shows Sparkler Quilt Top by Rebecca Bryan

Make the Echo (Echo!) Quilt

Echo BOM now open to join

Make the Wildflower Quilt!

Wildflower Block of the Month by Bryan House Quilts

Make the Stargazer Quilt!

Anne's Stargazer BOM

Make the Rainbow Triangles Quilt!

Rainbow Triangle BOM, modern triangle quilt, Rebecca Bryan

About

Hey there! I’m Rebecca, an author and teacher and freezer paper piecing evangelist. I’m also the founder of the Make Modern Triangles Quilt Club.

Disclosure

Just so you know, my site includes affiliate links from which I (it’s me! Rebecca!) receive payment or compensation. Something to consider as you peruse my website. Thanks!

Latest on Instagram

If no one ever showed you this trick, get ready, b If no one ever showed you this trick, get ready, because it might change the way you do it forever! 

 Sew your binding to the BACK of your quilt first. Not the front!

When I first started machine binding, I did it the traditional way. I’d attach the binding to the front, wrap it around to the back, and then stitch in the ditch from the front.

The problem? I couldn’t actually SEE where my stitches were landing on the back. And sometimes the back ended up having a few surprises waiting for me. 😅

Then one day I thought, what if I just do this the other way around?

By attaching the binding to the back FIRST, I can wrap it around to the front and actually see where I’m stitching as I finish it. No more guessing what’s happening underneath!

It’s such a simple switch, but it makes getting a tidy, consistent finish SO much easier.

And when you’ve spent all that time piecing and quilting something beautiful, who doesn’t want the binding to look just as good?!

Give it a try on your next quilt and report back! With our finished quilt tops for the Dutch Summer, members will be binding them soon! Share in the comments how you do your binding! 🩷

#quiltteacher #quiltingtutorial #quiltingtips #modernquilting
I was ready to give up on foundation paper piecing I was ready to give up on foundation paper piecing altogether, and then I was introduced to freezer paper piecing, and it changed my whole world forever.

Let’s talk about Freezer Paper Piecing versus traditional Paper Foundation Piecing. 👇

The techniques are similar, both methods focus on precision and ease of assembly, but with Freezer Paper Piecing, you get to reuse your templates without turning them into confetti! 🎉 MAJOR WIN!

All you have to do is trace a few copies onto freezer paper or use printable sheets for your printer. It’s versatile, efficient, and saves you tons and tons of time.

🌟 The key benefits of freezer paper piecing: 🌟

👏 Reuse & Recycle: No more wasteful piles of ripped paper templates.
👏 Easy Removal: Templates peel off effortlessly, leaving your masterpiece intact.
👏 Versatility: From intricate designs to straightforward patterns, freezer paper can be used for any foundation.

WAY MORE TIME TO QUILT! 🙌

In all of my programs, we use the Freezer Paper Piecing method, and anyone can learn this, even first-time quilters! I’ve got a NEW block-of-the-month quilt design coming soon, so follow along if you’re looking for a faster and easier way to paper-piece! ✨

#modernquilting #paperpiecing #foundationpaperpiecing #quiltingtechnique #quiltteacher
Want to make a witchy little Modern Triangle with Want to make a witchy little Modern Triangle with me? 🧙‍♀️🧵

I’m teaching a FREE class, and we’re getting a little spooky with this one! 🤓

I’ll show you my favorite way to make Modern Triangles using my no-waste, no picking method, and then we’re turning our triangle into a WITCH HAT. ✨

And yes, beginners are absolutely welcome!

I’ll walk you through it step by step, show you how these simple little triangles can be arranged into much more complex-looking designs, and we’ll spend some time actually PLAYING with what we make.

PLUS, if you show up live, you’ll get my exclusive Spooky Witch Hat Modern Triangle pattern FREE so you can keep sewing after class. 🎁

Come hang out, learn something new, make a witch hat, and have some fun with me!

Comment WITCHY, and I’ll send you the link to save your free spot! 🧙‍♀️

#modernquilting #paperpiecing #foundationpaperpiecing #quiltingtechnique #quiltteacher
Tell me you’re a quilter without telling me you’re Tell me you’re a quilter without telling me you’re a quilter. 😂🧵

I’ll go first: I can find quilt inspiration in approximately ANYTHING. I own fabric that is apparently too special to actually use, and “one more seam” has never once meant one more seam.

Your turn. 🤓 Finish the sentence in the comments 👇 

#modernquilting #paperpiecing #foundationpaperpiecing #quiltingtechnique #quiltteacher
A couple of weeks ago, I picked my colors for next A couple of weeks ago, I picked my colors for next year’s “Starburst” Block of the Moth, and I had to laugh at myself because even though I started with a few pretty pinks and yellows as my inspiration...

I devolved back to rainbows for my final selection. I do love a rainbow gradient! So glorious, so delicious!

Honestly, sometimes it takes me several, several, several rounds to get the colors just how I want them. 😭  But the good news is, I do have the rainbow fabric on hand!

Now I can Netflix and sew... as I work on my Starburst sample! Hooray!

Who else just can’t resist a rainbow palette??? Follow along @bryanhousequilts to be the first to see my latest “Starburst” design! 💫

#modernquilting #paperpiecing #foundationpaperpiecing #quiltingtechnique #quiltteacher
SWIPE to see the big finish, my completed Peppermi SWIPE to see the big finish, my completed Peppermint Twist Dutch Summer! 🤍

The joy really is in the journey with my Block of the Month programs, where every single month you make one block, sew your whole batch, and, month by month, start to see the design come together with each new block.

And that’s why ANYONE can make this quilt! Yes, even a first-timer! 

You don’t have to sit down and make an entire quilt all at once. You make one batch of blocks, then another, and another... You learn as you go, watch your skills develop, and slowly start seeing the whole quilt come together.

And then one day, all those individual triangles you’ve been making come together and you’ve made THIS. 🥹

I absolutely love how this Peppermint Twist version of Dutch Summer turned out, and seeing all of the blocks together makes me want to do the whole thing all over again in another color palette! 😂

If you want to make your own version of the Dutch Summer, comment ‘DUTCH’ and I’ll send you the details! 💌

#modernquilting #paperpiecing #foundationpaperpiecing #quiltingtechnique #quiltteacher
Follow on Instagram

Browse by Category

Archives

  • Instagram
  • Facebook
  • Pinterest
  • email
If no one ever showed you this trick, get ready, b If no one ever showed you this trick, get ready, because it might change the way you do it forever! 

 Sew your binding to the BACK of your quilt first. Not the front!

When I first started machine binding, I did it the traditional way. I’d attach the binding to the front, wrap it around to the back, and then stitch in the ditch from the front.

The problem? I couldn’t actually SEE where my stitches were landing on the back. And sometimes the back ended up having a few surprises waiting for me. 😅

Then one day I thought, what if I just do this the other way around?

By attaching the binding to the back FIRST, I can wrap it around to the front and actually see where I’m stitching as I finish it. No more guessing what’s happening underneath!

It’s such a simple switch, but it makes getting a tidy, consistent finish SO much easier.

And when you’ve spent all that time piecing and quilting something beautiful, who doesn’t want the binding to look just as good?!

Give it a try on your next quilt and report back! With our finished quilt tops for the Dutch Summer, members will be binding them soon! Share in the comments how you do your binding! 🩷

#quiltteacher #quiltingtutorial #quiltingtips #modernquilting
I was ready to give up on foundation paper piecing I was ready to give up on foundation paper piecing altogether, and then I was introduced to freezer paper piecing, and it changed my whole world forever.

Let’s talk about Freezer Paper Piecing versus traditional Paper Foundation Piecing. 👇

The techniques are similar, both methods focus on precision and ease of assembly, but with Freezer Paper Piecing, you get to reuse your templates without turning them into confetti! 🎉 MAJOR WIN!

All you have to do is trace a few copies onto freezer paper or use printable sheets for your printer. It’s versatile, efficient, and saves you tons and tons of time.

🌟 The key benefits of freezer paper piecing: 🌟

👏 Reuse & Recycle: No more wasteful piles of ripped paper templates.
👏 Easy Removal: Templates peel off effortlessly, leaving your masterpiece intact.
👏 Versatility: From intricate designs to straightforward patterns, freezer paper can be used for any foundation.

WAY MORE TIME TO QUILT! 🙌

In all of my programs, we use the Freezer Paper Piecing method, and anyone can learn this, even first-time quilters! I’ve got a NEW block-of-the-month quilt design coming soon, so follow along if you’re looking for a faster and easier way to paper-piece! ✨

#modernquilting #paperpiecing #foundationpaperpiecing #quiltingtechnique #quiltteacher
Want to make a witchy little Modern Triangle with Want to make a witchy little Modern Triangle with me? 🧙‍♀️🧵

I’m teaching a FREE class, and we’re getting a little spooky with this one! 🤓

I’ll show you my favorite way to make Modern Triangles using my no-waste, no picking method, and then we’re turning our triangle into a WITCH HAT. ✨

And yes, beginners are absolutely welcome!

I’ll walk you through it step by step, show you how these simple little triangles can be arranged into much more complex-looking designs, and we’ll spend some time actually PLAYING with what we make.

PLUS, if you show up live, you’ll get my exclusive Spooky Witch Hat Modern Triangle pattern FREE so you can keep sewing after class. 🎁

Come hang out, learn something new, make a witch hat, and have some fun with me!

Comment WITCHY, and I’ll send you the link to save your free spot! 🧙‍♀️

#modernquilting #paperpiecing #foundationpaperpiecing #quiltingtechnique #quiltteacher
Tell me you’re a quilter without telling me you’re Tell me you’re a quilter without telling me you’re a quilter. 😂🧵

I’ll go first: I can find quilt inspiration in approximately ANYTHING. I own fabric that is apparently too special to actually use, and “one more seam” has never once meant one more seam.

Your turn. 🤓 Finish the sentence in the comments 👇 

#modernquilting #paperpiecing #foundationpaperpiecing #quiltingtechnique #quiltteacher
Follow on Instagram
© 2026 Bryan House Quilts