• About
    • Privacy Policy
  • Teaching
    • Member/Student Login
    • Online Programs
  • Shop
  • Member/Student Login
  • Blog
    • Free Quilt Patterns – Scrappy Whirligig Quilt

Bryan House Quilts

Feathered Star Quilt Along {Week 3 – Making the Star Spokes}

quilt along· quilt pattern

20 Jun

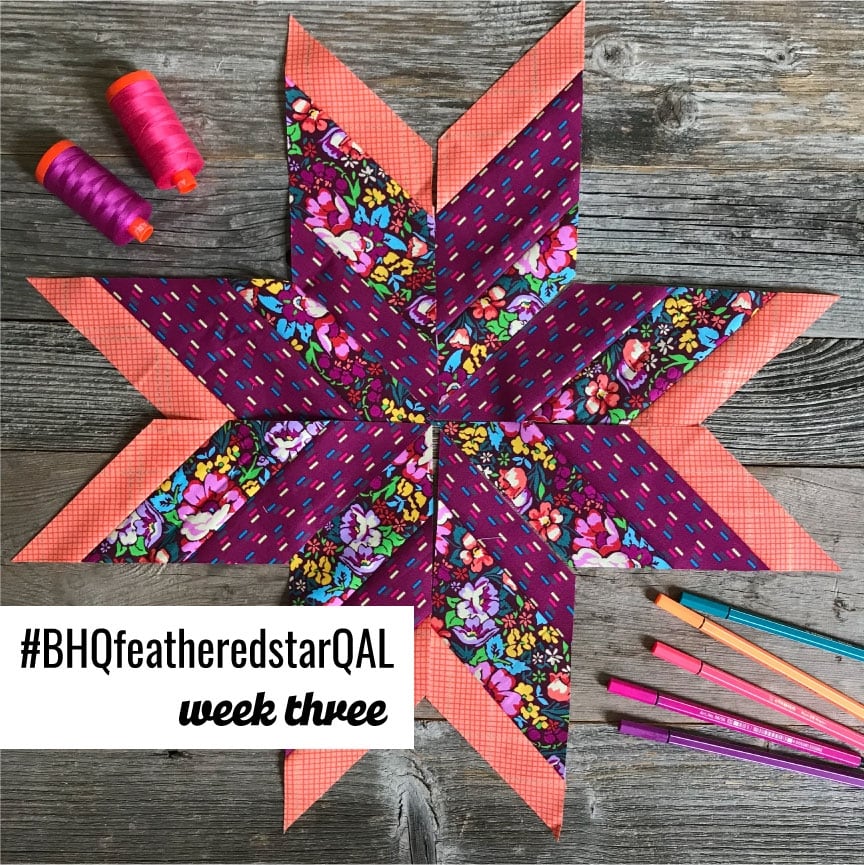
Hello there! Welcome to Week 3 of our Feathered Star Quilt Along.

Last week we did all of our cutting. In this post I’m breaking down this step into lots of pictures.

Before we get into the heart of our post, I’d like to take a moment to thank this week’s sponsor Aurifil. Thanks for your support and for making so much awesome thread. 🙂

Last week’s winner of the Olfa 12×17 folding mat and the 28mm Quick Blade Change cutter is Lynn McIndoe on Instagram. Woo hoo!

How to follow along:

You have a few options to follow along:

  • Sign up for the weekly Quilt Along emails by clicking the RSVP button below.
  • Follow along on Instagram using the hashtag #BHQfeatheredstarQAL.
  • Every week, on Wednesday, I’ll be posting a quilt along blog post on my website.

RSVP HERE

Schedule of Events

First, let’s check out the schedule again…

Week 1 – June 6: Introduction and Planning

Week 2 – June 13: Cutting 

Week 3 – June 20: Making the Star Spokes (you are here!)

Week 4 – June 27: Piece Blocks

(Mid QAL Break – Happy 4th of July!)

Week 5 – July 11: Piece Border Units

Week 6 – July 18: Assemble Quilt Tops

Week 7 – July 25: Quilting and Making the Scrappy Binding

Week 8 – August 1: Quilt Parade Link Up Party (Linky will close August 27th)

Closing Post – September 6

Making the Star Spokes

So, last week we spent our time doing all the cutting. Now we can start sewing! Yah! This week, you’ll be sewing the strips into strip sets and then cutting the star spokes from each strip set.

I’m going to walk you through the process for one block. For the quilt you’ll need to make 13 blocks worth of spokes and for the alternative layout you’ll need 9.

Sew your strip sets together

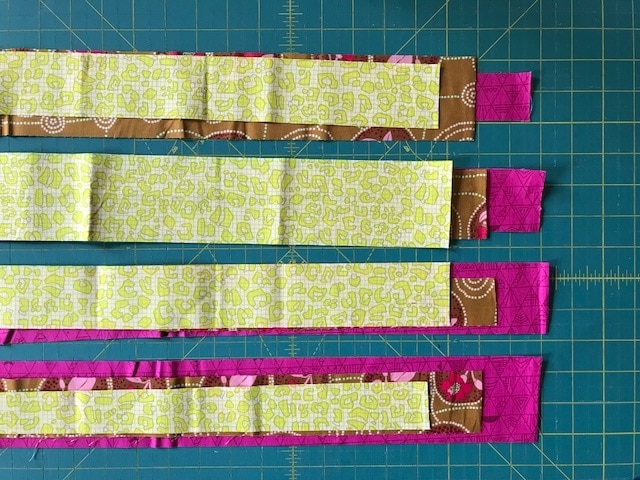
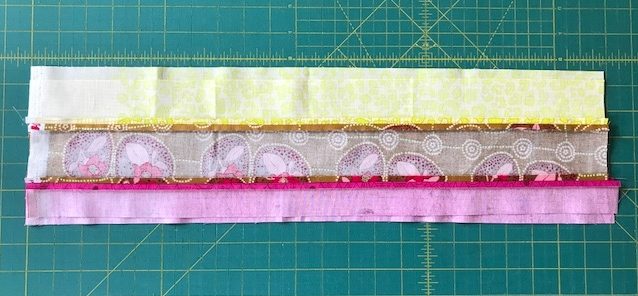
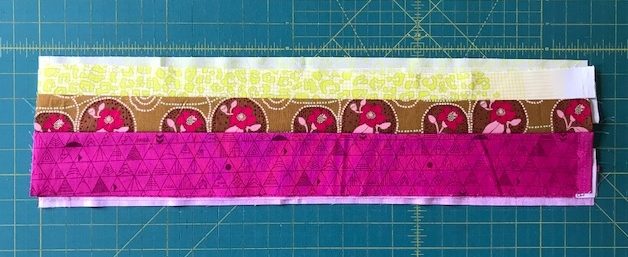
For one star block choose 3 fabrics to work with. I chose a hot pink, and mustard print, and a neon. BTWs the neon will totally mess with my camera. Ha! From each color, choose 4 strips of different sizes.

Divide the colors into groups that will become your strip sets. Make sure to put different sized strips in each grouping. You don’t want to have all your small strips in one group. Now, sew those strip sets together. Be sure to keep the strips in the same order.

Cut the Star Spokes

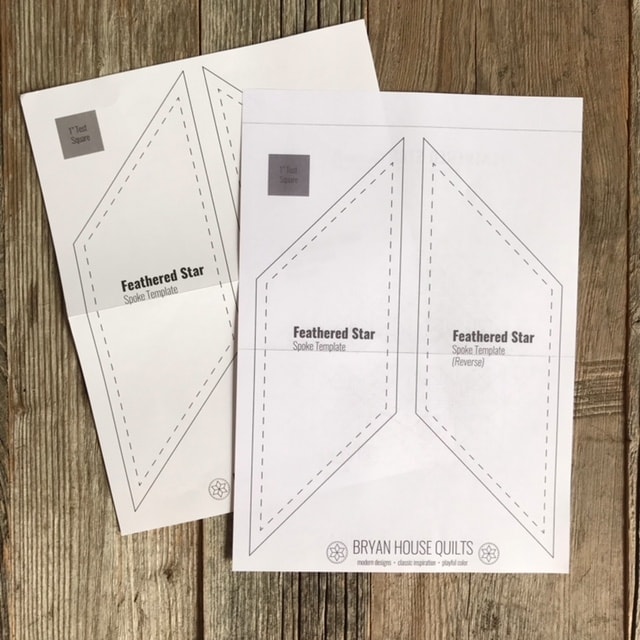
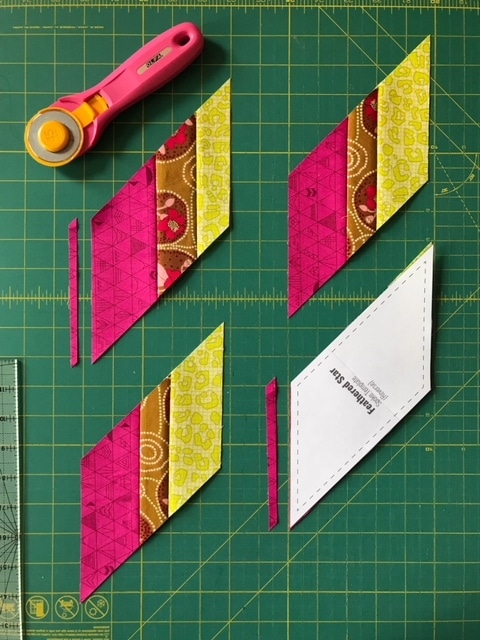
Now that the strip sets are sewn, let’s cut our star spokes. Caveat, everyone’s ruler is different. If you get stuck use the enclosed template as a check. Be sure to make a copy of the original.

On your cutting mat, lay two strips sets wrong side up. As you do this try to keep the seams aligned with the horizontal lines on your mat.

On top of those strip sets, lay the other two strip sets right side up.
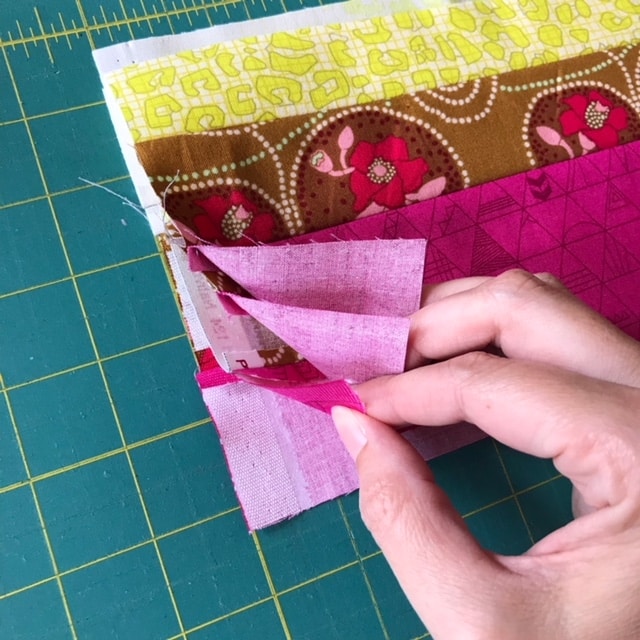
Here’s a close up.

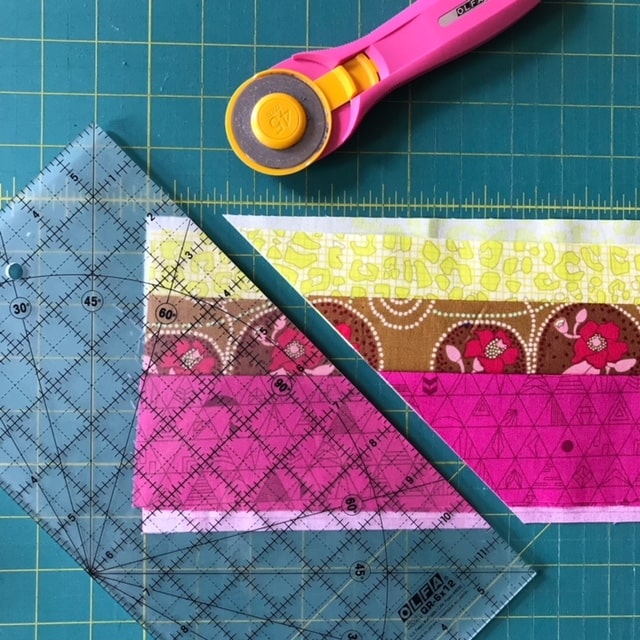
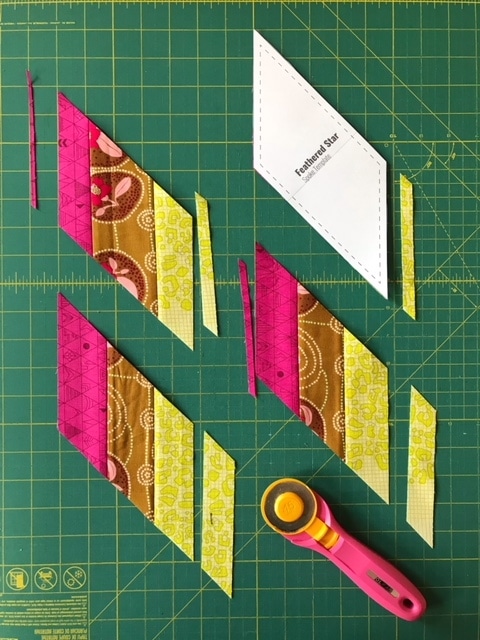
Our next step is to make our first cut at a 45 Degree angle. Above, I’m showing you how I do mine. (Remember your ruler may be different.) I’ve lined up my 45 Degree lines with the vertical and horizontal lines on my cutting mat. Once I have it lined up, then I make that angled cut.

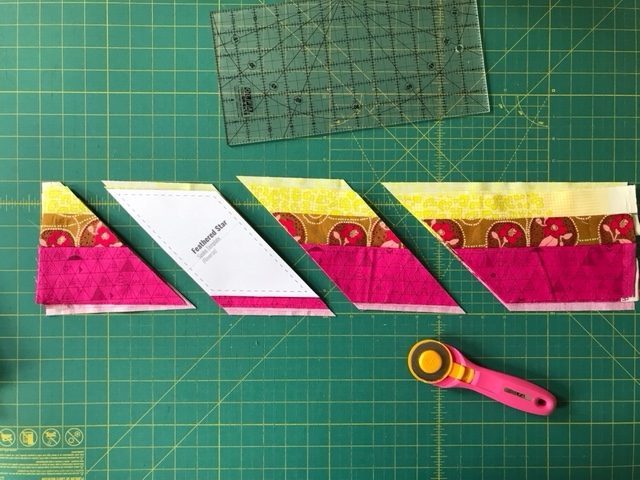
The next step is to cut the star spokes. If you get stuck, you can use the template as shown above to double check.

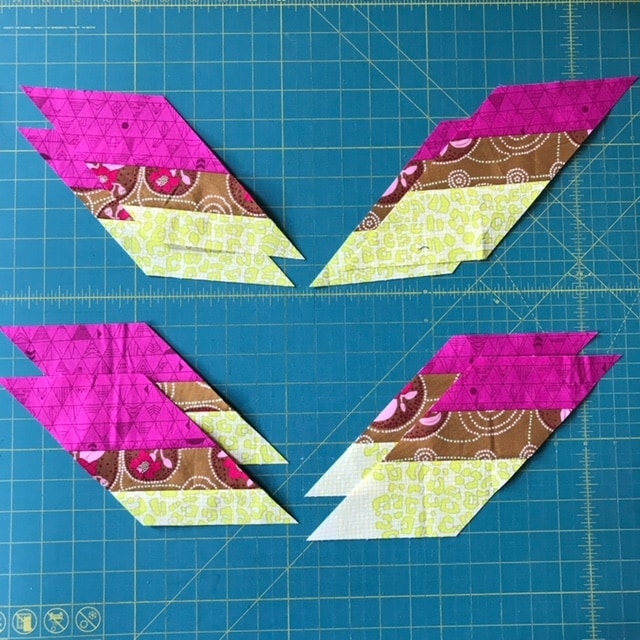
This will give you 4 and 4 reversed star spokes, Enough for 1 block.

Now we’ll need to cut the star spokes down to 4 3/4”. Again you can use the template if you need help.

Do this for both the 4 Star Spokes and 4 Reversed Star Spokes.

Ok, so that’s how you make the star spokes. Make 13 sets for the quilt, or 9 sets for the alternative layout.

Optional and New: Cut the Binding

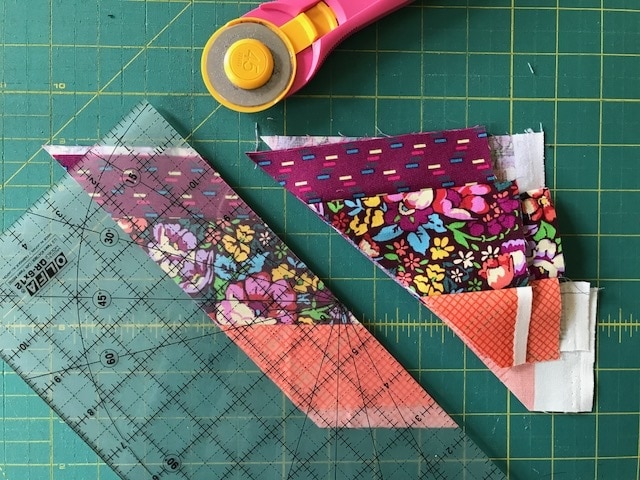
Oooooh, I don’t know why I didn’t think of this before…. oh … probably because I had that awesome stripe for binding! Anyhoo, you can cut your binding from the left over strip sets. Just simply cut additional strips using either a 2 1/4” or 2 1/2”, depending on how you wide you like your binding. In the pic, I’m showing 2 1/4”. You should be able to get 2 widths from the left overs. I’m only showing one because I goofed and made a cutting error.

I’ll show you how to piece these strip sets into binding when we get to the quilting step.

This week’s sponsor

This week, Aurifil is offering a prize to one lucky participant. So let’s give them a big ole’ quilty thank you for sponsoring our fun!

How to participate

We’re going to be doing most of our interaction on Instagram. To enter, post a pic of process (any step!) this week on Instagram with the #bhqFeatheredStarQAL. I’ll choose a winner at random next Tuesday!

You’ll need a public Instagram account.

By the way, for general chatter and ongoing discussion, you can also join my Facebook group “Quilting with Bryan House Quilts”.

Next Week

Next week we’ll start assembling the star blocks. Enjoy this week!


Previous Post: « Feathered Star Quilt Along {Week 2 – Cutting}
Next Post: Introducing the Splendid Sampler 2: Block 2 Milk and Cookies »

Reader Interactions

Comments

  1. Beverly says

    June 27, 2018 at 10:40 am

    I love your site and find it very interesting. However the font is so ljght I really have trouble reading it. If other sites were hard to read I would think it is on my side. But this is not tne case. Is there some way you can use a darker font?

    • rebeccabryan says

      July 4, 2018 at 4:11 am

      Hmmmm! I don’t know! I haven’t heard this issue before? Have you tried viewing it in reader mode?

      Up at the address bar, there should be an icon just to the left of the web address. It looks like a page from a book. If you click it, you can view websites in reader mode, which also removes any ads on the page. 🙂

Primary Sidebar

New 2026 Block of the Month!

Graphic of Alchemy Quilt

Join the 2026 Block of the Month Program

Get my Modern Triangles Quilt Book

Get my Modern Rainbow Quilts Book

Image shows cover of the book "Modern Rainbow Quilts"

Make the Solstice Quilt!

Solstice Block of the Month by Bryan House Quilts

Get Your Invite!

Make Modern Triangles Logo

Make the Sparkler Quilt!

Image Shows Sparkler Quilt Top by Rebecca Bryan

Make the Echo (Echo!) Quilt

Echo BOM now open to join

Make the Wildflower Quilt!

Wildflower Block of the Month by Bryan House Quilts

Make the Stargazer Quilt!

Anne's Stargazer BOM

Make the Rainbow Triangles Quilt!

Rainbow Triangle BOM, modern triangle quilt, Rebecca Bryan

About

Hey there! I’m Rebecca, an author and teacher and freezer paper piecing evangelist. I’m also the founder of the Make Modern Triangles Quilt Club.

Disclosure

Just so you know, my site includes affiliate links from which I (it’s me! Rebecca!) receive payment or compensation. Something to consider as you peruse my website. Thanks!

Latest on Instagram

You can’t just go buy fabric like this. 👀 Because You can’t just go buy fabric like this. 👀

Because we live in a time where it’s becoming harder and harder to tell what was made by a person and what was created by a computer.

This is something worth talking about. 👇

For people who aren’t quilters, it’s easy to see any beautiful quilt in today’s world and think that the pattern must have been made by AI, or that the fabrics just come that way. 

These triangles weren’t generated in seconds. The fabrics don’t just come that way. 

They were cut one piece at a time, sewn one seam at a time, pressed, trimmed, arranged, rearranged, and stitched together over hours and hours spent in the sewing room, one day at a time. 

Each and every quilt represents DAYS spent in the sewing room, taking time for myself, creating instead of scrolling on the internet. 

And that’s one reason why I fell so deeply in love with the process. Because it’s not something you can just go buy. Quilting encourages us to slow down, learn something new, take time for ourselves, and use our hands. and create something that didn’t exist before. 

Take this as your nudge to get offline and go do something that you love today. Tell me what you’re doing in the comments. ✨ ⬇️

#modernquilting #quiltingtechnique #quiltpattern #quiltdesign #quiltersofig
👉 I refuse to spend hours ripping paper bits from 👉 I refuse to spend hours ripping paper bits from my seams from foundation paper piecing. 
👉 I ALWAYS attach the binding to the BACK first. 
👉 MAKE A TEST BLOCK... every single time. 
👉 I make notes on my foundations. 
👉 I make time for myself to be in my sewing room. 
👉 I buy pretty fabrics that make me go “Oooohhh, Aahhh!” 
👉 I don’t do Y seams. 

What would you add to the list? Tell us your quilting secrets in the comments. ⬇️

#quiltteacher #quiltingtutorial #quiltingtips #modernquilting
Comment ‘FREEZER’ for my free class to learn this Comment ‘FREEZER’ for my free class to learn this amazing paper piecing technique! 🌟

If your freezer paper is not sticking to your fabric, your iron might not be hot enough. 🔥

But be warned... 👇

You don’t want it to be TOO hot either. 

Use a HOT dry iron, and that should help your freezer paper stick to your fabric! 

The freezer paper needs enough heat to grip the fabric properly.

I also love using a wool pressing mat because it helps hold heat longer and makes the freezer paper stick even better.

When it comes to the quilting techniques, sometimes even a tiny adjustment can make a huge difference. 🙌

Quilters, do you ever struggle with this? Let me know in the comments and drop a ‘FREEZER’ below if you want to take my free class! 💌
Which personality type are you in the quilting gro Which personality type are you in the quilting group? 👀

That’s a part of what makes the Make Modern Triangles Club so much fun. 

We have ALL types of quilters. All ages, all skill levels, some brand-new, and some who have been in the club for years. 🙌

There are always new members joining, new projects started, and plenty of projects being finished and celebrated, too. 

It’s a community full of people who just get all the quirks of being a quilter. ✨

We’d love to have you join us and bring your personlity to the club. Comment ‘CLUB’ for details to join and I’ll send them your way. 💌

#quiltteacher #quiltingtutorial #quiltingtips #modernquilting
Comment ‘SUMMIT’ for your free ticket for the Quil Comment ‘SUMMIT’ for your free ticket for the Quilter’s Paradise Summit June 8th - 15th! ✨

One of my favorite things about quilting is how there’s always something new to try.

✨ A new technique.
✨ A new color combination.
✨ A new project that makes you think, “Okay, wait… that’s actually adorable.”

That’s the energy of the Fast-N-Easy Quilters Paradise Summit.

For an entire week, you’ll get to learn from 30 quilting experts sharing projects that are fun, practical, beginner-friendly, and completely inspiring.

Think quilted bookmarks, fabric boxes, mini quilts, coaster sets, bags, placemats, appliqué, freezer paper piecing, and so much more.

Basically… a very good excuse to spend the week sewing! 🪡

And it’s FREE. I’d love for you to join us. Comment ‘SUMMIT’ and I’ll Dm you the link to register. 💌 

#quiltteacher #quiltpattern #quilttop #quiltingtips #quiltingtutorial
Freezer Paper Piecing Tip number ONE! ⬇️ We’re st Freezer Paper Piecing Tip number ONE! ⬇️

We’re starting off strong with one of my absolute favorite things about the freezer paper piecing technique. 

And it’s that you can reuse your foundations!! I’ve had a foundation that I used 20 or more times... 😅

I know it doesn’t seem possible, but this is proof that it is! 

Why make a new foundation for every single block when you just reuse ONE for them all? 

That’s the magic of freezer paper piecing. ✨

Follow along for the rest of my tips that make paper piecing way easier, and comment ‘FREE’ if you want to sign up for my free class! 💌

#modernquilting #paperpiecing #foundationpaperpiecing #quiltingtechnique #quiltteacher
Follow on Instagram

Browse by Category

Archives

  • Instagram
  • Facebook
  • Pinterest
  • email
You can’t just go buy fabric like this. 👀 Because You can’t just go buy fabric like this. 👀

Because we live in a time where it’s becoming harder and harder to tell what was made by a person and what was created by a computer.

This is something worth talking about. 👇

For people who aren’t quilters, it’s easy to see any beautiful quilt in today’s world and think that the pattern must have been made by AI, or that the fabrics just come that way. 

These triangles weren’t generated in seconds. The fabrics don’t just come that way. 

They were cut one piece at a time, sewn one seam at a time, pressed, trimmed, arranged, rearranged, and stitched together over hours and hours spent in the sewing room, one day at a time. 

Each and every quilt represents DAYS spent in the sewing room, taking time for myself, creating instead of scrolling on the internet. 

And that’s one reason why I fell so deeply in love with the process. Because it’s not something you can just go buy. Quilting encourages us to slow down, learn something new, take time for ourselves, and use our hands. and create something that didn’t exist before. 

Take this as your nudge to get offline and go do something that you love today. Tell me what you’re doing in the comments. ✨ ⬇️

#modernquilting #quiltingtechnique #quiltpattern #quiltdesign #quiltersofig
👉 I refuse to spend hours ripping paper bits from 👉 I refuse to spend hours ripping paper bits from my seams from foundation paper piecing. 
👉 I ALWAYS attach the binding to the BACK first. 
👉 MAKE A TEST BLOCK... every single time. 
👉 I make notes on my foundations. 
👉 I make time for myself to be in my sewing room. 
👉 I buy pretty fabrics that make me go “Oooohhh, Aahhh!” 
👉 I don’t do Y seams. 

What would you add to the list? Tell us your quilting secrets in the comments. ⬇️

#quiltteacher #quiltingtutorial #quiltingtips #modernquilting
Comment ‘FREEZER’ for my free class to learn this Comment ‘FREEZER’ for my free class to learn this amazing paper piecing technique! 🌟

If your freezer paper is not sticking to your fabric, your iron might not be hot enough. 🔥

But be warned... 👇

You don’t want it to be TOO hot either. 

Use a HOT dry iron, and that should help your freezer paper stick to your fabric! 

The freezer paper needs enough heat to grip the fabric properly.

I also love using a wool pressing mat because it helps hold heat longer and makes the freezer paper stick even better.

When it comes to the quilting techniques, sometimes even a tiny adjustment can make a huge difference. 🙌

Quilters, do you ever struggle with this? Let me know in the comments and drop a ‘FREEZER’ below if you want to take my free class! 💌
Which personality type are you in the quilting gro Which personality type are you in the quilting group? 👀

That’s a part of what makes the Make Modern Triangles Club so much fun. 

We have ALL types of quilters. All ages, all skill levels, some brand-new, and some who have been in the club for years. 🙌

There are always new members joining, new projects started, and plenty of projects being finished and celebrated, too. 

It’s a community full of people who just get all the quirks of being a quilter. ✨

We’d love to have you join us and bring your personlity to the club. Comment ‘CLUB’ for details to join and I’ll send them your way. 💌

#quiltteacher #quiltingtutorial #quiltingtips #modernquilting
Follow on Instagram
© 2026 Bryan House Quilts