• About
    • Privacy Policy
  • Teaching
    • Member/Student Login
    • Online Programs
  • Shop
  • Member/Student Login
  • Blog
    • Free Quilt Patterns – Scrappy Whirligig Quilt

Bryan House Quilts

How to Press Flat Quilt Seams Like a Pro

Playful Color Theory· Quilting and Stitching· Quilting Tools and Notions· Tutorial

28 Feb

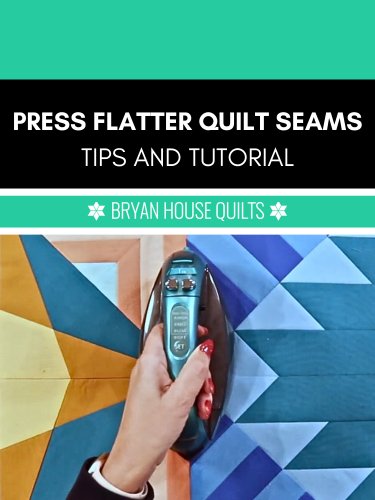
Press flat quilt seams to transform your quilts from good to great. Use my techniques to immediately improve your quilt’s finish. I promise!

How to Press Flat quilt seams like a pro tips and YouTube tutorial

Key Highlights

  • Learn why you should press flat quilt seams.
  • Discover the difference between ironing and pressing
  • Essential tools and setting up a pressing station
  • Troubleshoot common pressing problems

Introduction

Pressing is about more than erasing wrinkles: it creates a smooth block for trimming, improves accuracy and provides an even surface for stitching the quilt top. I’m a huge fan of pressing and I’m sharing tips here on my blog to help you press your best!

Why are flat seams so important for quilting?

Understanding the Basics of Pressing Quilt Seams

You’ve painstakingly pieced together your quilt top, carefully choosing fabrics and patterns, but you find lumps where the seams meet. NOT what you were striving for, right?

Press flat quilt seams and blocks with proven techniques to make flatter quilt blocks, sharper points, and a finished quilt with that professional “wow” factor.

The Difference Between Pressing and Ironing

Iron pressing to press flat quilt seams

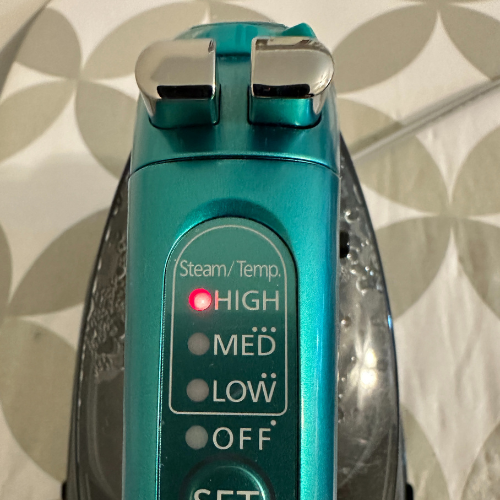
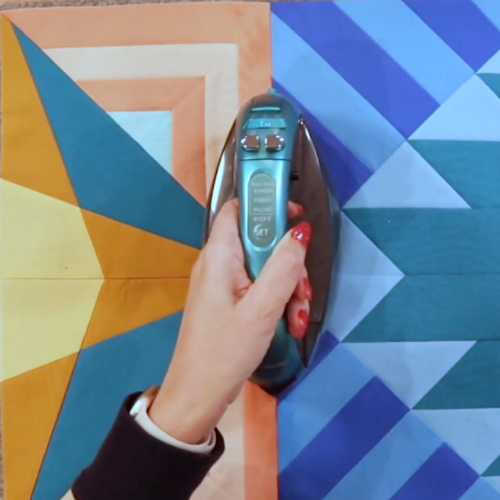
Pressing is not the same as ironing your clothes. We’re not chasing wrinkles away with a sliding motion. Use a hot, dry iron (no steam) and a gentle up-and-down motion. Think of it as a gentle pat, encouraging seams to lie flat without distorting the fabric.

What do I mean by distorting the fabric? Quilting fabric is woven in two directions – vertically and horizontally. Pulling or pushing the fabric moves the woven threads off-grain or out of alignment.

Why a dry iron instead of steam, you wanna know? Well, moisture and heat can actually shrink your fabric and thread, or cause it to stretch out of shape – trust me, that’s not a quilting problem you want!

Plus, pressing without steam “sets” the stitches into the fabric, melding them together for a longer-lasting hold. Picture the threads burrowing deeper into the fabric, making it stronger. Remember, in quilting, we want those seams to stay put for a loooong time.

Essential Pressing Tools TO PRESS FLAT QUILT SEAMS

Press flat quilt seams like a pro with a few essentials tools:

  • Sturdy ironing board and/or a pressing mat.
  • Good quality, clean iron
  • Tailor’s or quilter’s clapper.
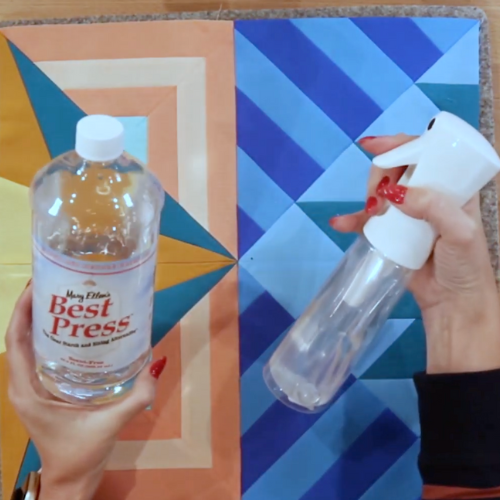
  • Quilter’s spray starch
  • Optional: Seam roller and rubber mallet

Quilter Pressing Station

Setting up a dedicated pressing station right next to your sewing machine can streamline your workflow and save you precious time. Consider adding a small table or using a rolling cart to store your tools.

Make sure the ironing board is stable and the cover is smooth and clean.

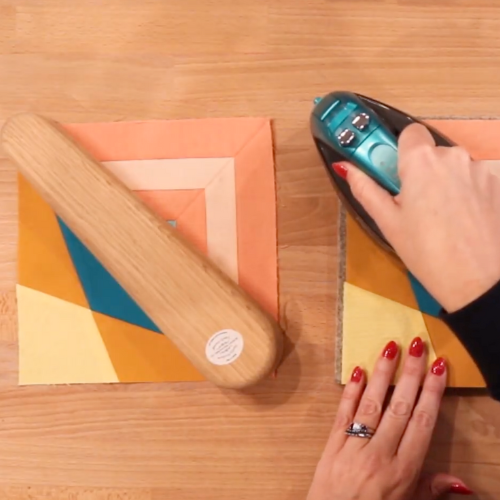
Clapper, 10-inch wool mat, and Best Press

My 10-inch wool mat is a constant quilting companion. It keeps the underside of the block warm while pressing heat on top. Mats are available in different sizes which work for small spaces or cutting tables.

A tailor’s clapper for quilting is a block of wood that you lay on top of fabric after pressing it. The clapper holds the fabric flat while it cools and sets in place.

Mary Ellen’s Best Press starch is my newest go-to for flattening. I use it in between my first and second pressing round for extra staying power. The lavender scented option is NICE.

Read on below for the process I use or watch the video tutorial on YouTube.

How I Press Flat Quilt Seams

1: Set the seam

Setting seams is a technique used to press the seam right after stitching it, before pressing to one side or opening up the seam allowances. Your thread settles and sinks into the fabric, making the seam stronger. It also flattens the thread itself, which adds bulk to seams.

2: Press and nest seams to the side.

Nesting means that you butt the edges of stitching together, while the raw edges face in opposite directions.

Nested seams to make flat quilt seams

It’s best to press your seams towards the darker fabric or to the “dark side” (hehe). This helps prevent any shadowing or show-through on the quilt top, especially when using lighter fabrics.

3: Grading seam allowances

Grading a seam allowance to press flat quilt seams better

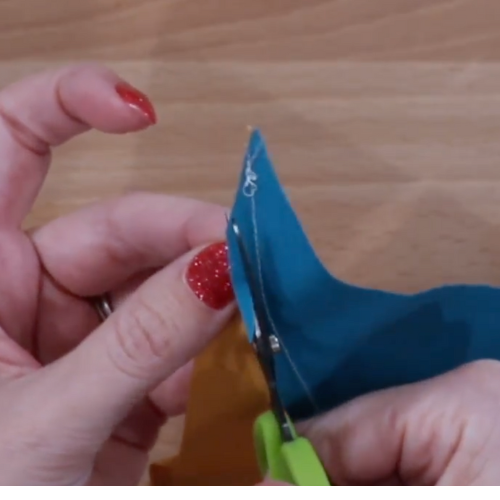
After pressing the fabric to the side, I grade the seam allowances to get rid of bulk where the fabric joins. When many layers of fabric are sewn together, they become thick and difficult to press flat, especially in the center of a block. Grading is simply trimming away slivers of the seam to create a slope. I know, I know…I’m trimming to less than a quarter inch allowance, but it’s absolutely fine in this case! (Is bulky bumps a quilt emergency? Maybe!) See how to easily grade seam allowances on my blog.

4: Press fabrics on the hottest possible setting. Test the heat on a scrap piece first.

Iron on highest heat setting to press flat quilt seams

5: Use quilter’s spray starch after the first pressing and then press again for flatter seams.

Quilters best press starch to press flat quilt seams
Iron pressing after spray starch applied

6: Use a tailor’s clapper or wood clapper to set the seam while the fabric cools.

I set aside the pressed blocks under a clapper and press the next one to speed up the process.

Pressing blocks while tailor's clapper cools blocks.

7: Improvise!

You’ll be surprised what you can use as a pressing tool. A seam roller is a great alternative for pressing open seams, especially in tight spaces. It applies pressure to the seam without distorting the fabric, resulting in a smooth, even finish. And believe it or not, our Make Modern Triangles members have used a rubber mallet to beat out lumpy intersections!

Advanced Tips for Perfect Flat Seams

Now that you’ve mastered how to press flat quilt seams, there are more techniques to try when the lumps and bumps won’t flatten. One technique is “spinning” or “twirling” your seams. This involves pressing the seams in opposite directions at each intersection, which helps to distribute the bulk more evenly.

Another tricky area is little points on your squares and triangles. After sewing your pieces together, gently press the whole block flat without opening it up. This helps to set the stitches and prevent any stretching. Once it’s cooled slightly, then you can flip it over and press the seam open or to one side.

Conclusion

Achieving perfectly pressed quilt seams is a crucial step in quilting. Understanding the difference between pressing and ironing, and why flat seams matter, sets the foundation for professional-looking quilts. Having the right tools and techniques, such as handling bulky seam junctions and using a clapper, improves your quilt’s overall appearance, including the stitching. Follow the steps and you’ll be amazed on how nice your quilt top looks!

Frequently Asked Questions

Is it always better to press seams open or to one side?

It depends! Pressing open reduces bulk but can sometimes make seam intersections a tad trickier. Pressing to one side can create nesting seams, helpful for aligning blocks. The best method often depends on your project. And you can always mix open and pressed to the side in the same project when needed.

What can I do if my seams won’t stay flat?

A light spray of starch can work wonders for achieving a crisp seam, especially when dealing with stubborn fabrics. Just be sure to test a scrap first to ensure it doesn’t leave any unwanted residue.

Apply a light mist to the seam allowance, press, and let it dry completely before handling it. This will give those seams extra staying power.

Resources on the Blog

Tame Triangles with a 5-Step Process

See how to easily grade seam allowances on this post.

Previous Post: « Reduce Bulky Seams by Grading Seam Allowances
Next Post: Echo BOM Progress in Pictures »

Reader Interactions

Comments

  1. Carol G Kerr says

    March 3, 2025 at 9:06 am

    Thank you for the perfect tutorial on pressing and setting seams. I just started a new quilt and look forward to applying each step! The only tool I need is a clapper.

Primary Sidebar

New 2026 Block of the Month!

Graphic of Alchemy Quilt

Join the 2026 Block of the Month Program

Get my Modern Triangles Quilt Book

Get my Modern Rainbow Quilts Book

Image shows cover of the book "Modern Rainbow Quilts"

Make the Solstice Quilt!

Solstice Block of the Month by Bryan House Quilts

Get Your Invite!

Make Modern Triangles Logo

Make the Sparkler Quilt!

Image Shows Sparkler Quilt Top by Rebecca Bryan

Make the Echo (Echo!) Quilt

Echo BOM now open to join

Make the Wildflower Quilt!

Wildflower Block of the Month by Bryan House Quilts

Make the Stargazer Quilt!

Anne's Stargazer BOM

Make the Rainbow Triangles Quilt!

Rainbow Triangle BOM, modern triangle quilt, Rebecca Bryan

About

Hey there! I’m Rebecca, an author and teacher and freezer paper piecing evangelist. I’m also the founder of the Make Modern Triangles Quilt Club.

Disclosure

Just so you know, my site includes affiliate links from which I (it’s me! Rebecca!) receive payment or compensation. Something to consider as you peruse my website. Thanks!

Latest on Instagram

👉 I refuse to spend hours ripping paper bits from 👉 I refuse to spend hours ripping paper bits from my seams from foundation paper piecing. 
👉 I ALWAYS attach the binding to the BACK first. 
👉 MAKE A TEST BLOCK... every single time. 
👉 I make notes on my foundations. 
👉 I make time for myself to be in my sewing room. 
👉 I buy pretty fabrics that make me go “Oooohhh, Aahhh!” 
👉 I don’t do Y seams. 

What would you add to the list? Tell us your quilting secrets in the comments. ⬇️

#quiltteacher #quiltingtutorial #quiltingtips #modernquilting
Comment ‘FREEZER’ for my free class to learn this Comment ‘FREEZER’ for my free class to learn this amazing paper piecing technique! 🌟

If your freezer paper is not sticking to your fabric, your iron might not be hot enough. 🔥

But be warned... 👇

You don’t want it to be TOO hot either. 

Use a HOT dry iron, and that should help your freezer paper stick to your fabric! 

The freezer paper needs enough heat to grip the fabric properly.

I also love using a wool pressing mat because it helps hold heat longer and makes the freezer paper stick even better.

When it comes to the quilting techniques, sometimes even a tiny adjustment can make a huge difference. 🙌

Quilters, do you ever struggle with this? Let me know in the comments and drop a ‘FREEZER’ below if you want to take my free class! 💌
Which personality type are you in the quilting gro Which personality type are you in the quilting group? 👀

That’s a part of what makes the Make Modern Triangles Club so much fun. 

We have ALL types of quilters. All ages, all skill levels, some brand-new, and some who have been in the club for years. 🙌

There are always new members joining, new projects started, and plenty of projects being finished and celebrated, too. 

It’s a community full of people who just get all the quirks of being a quilter. ✨

We’d love to have you join us and bring your personlity to the club. Comment ‘CLUB’ for details to join and I’ll send them your way. 💌

#quiltteacher #quiltingtutorial #quiltingtips #modernquilting
Comment ‘SUMMIT’ for your free ticket for the Quil Comment ‘SUMMIT’ for your free ticket for the Quilter’s Paradise Summit June 8th - 15th! ✨

One of my favorite things about quilting is how there’s always something new to try.

✨ A new technique.
✨ A new color combination.
✨ A new project that makes you think, “Okay, wait… that’s actually adorable.”

That’s the energy of the Fast-N-Easy Quilters Paradise Summit.

For an entire week, you’ll get to learn from 30 quilting experts sharing projects that are fun, practical, beginner-friendly, and completely inspiring.

Think quilted bookmarks, fabric boxes, mini quilts, coaster sets, bags, placemats, appliqué, freezer paper piecing, and so much more.

Basically… a very good excuse to spend the week sewing! 🪡

And it’s FREE. I’d love for you to join us. Comment ‘SUMMIT’ and I’ll Dm you the link to register. 💌 

#quiltteacher #quiltpattern #quilttop #quiltingtips #quiltingtutorial
Freezer Paper Piecing Tip number ONE! ⬇️ We’re st Freezer Paper Piecing Tip number ONE! ⬇️

We’re starting off strong with one of my absolute favorite things about the freezer paper piecing technique. 

And it’s that you can reuse your foundations!! I’ve had a foundation that I used 20 or more times... 😅

I know it doesn’t seem possible, but this is proof that it is! 

Why make a new foundation for every single block when you just reuse ONE for them all? 

That’s the magic of freezer paper piecing. ✨

Follow along for the rest of my tips that make paper piecing way easier, and comment ‘FREE’ if you want to sign up for my free class! 💌

#modernquilting #paperpiecing #foundationpaperpiecing #quiltingtechnique #quiltteacher
You know what I think a lot of quilters need more You know what I think a lot of quilters need more of? 👇

Small wins. 🧵✨

Not every project has to be a king-sized quilt that takes six months to finish. Sometimes the most joyful sewing happens when you sit down, make something fun in an afternoon, and actually get to enjoy the “ta-da!” moment quickly.

That’s exactly why I’m so excited to be co-hosting the Fast-N-Easy Quilters Paradise Summit this month.

We’ve gathered 30 incredible quilting teachers to share projects that are creative, approachable, and genuinely doable. Think: 

👉 Scrappy projects
👉 Gift-able makes
👉 Home décor
👉 Bags
👉 Coasters
👉 Mini quilts
👉 Freezer paper piecing

And so many techniques you can immediately use in your own sewing room. It’s free, it’s online, and it’s packed with inspiration.

It’s like a week-long quilting retreat without leaving your house. 😉

Comment ‘SUMMIT’ to get your free ticket! We kick off next week! 🎟️

#quiltteacher #quiltingtutorial #quiltingtechniques #quiltingtips #modernquilting
Follow on Instagram

Browse by Category

Archives

  • Instagram
  • Facebook
  • Pinterest
  • email
👉 I refuse to spend hours ripping paper bits from 👉 I refuse to spend hours ripping paper bits from my seams from foundation paper piecing. 
👉 I ALWAYS attach the binding to the BACK first. 
👉 MAKE A TEST BLOCK... every single time. 
👉 I make notes on my foundations. 
👉 I make time for myself to be in my sewing room. 
👉 I buy pretty fabrics that make me go “Oooohhh, Aahhh!” 
👉 I don’t do Y seams. 

What would you add to the list? Tell us your quilting secrets in the comments. ⬇️

#quiltteacher #quiltingtutorial #quiltingtips #modernquilting
Comment ‘FREEZER’ for my free class to learn this Comment ‘FREEZER’ for my free class to learn this amazing paper piecing technique! 🌟

If your freezer paper is not sticking to your fabric, your iron might not be hot enough. 🔥

But be warned... 👇

You don’t want it to be TOO hot either. 

Use a HOT dry iron, and that should help your freezer paper stick to your fabric! 

The freezer paper needs enough heat to grip the fabric properly.

I also love using a wool pressing mat because it helps hold heat longer and makes the freezer paper stick even better.

When it comes to the quilting techniques, sometimes even a tiny adjustment can make a huge difference. 🙌

Quilters, do you ever struggle with this? Let me know in the comments and drop a ‘FREEZER’ below if you want to take my free class! 💌
Which personality type are you in the quilting gro Which personality type are you in the quilting group? 👀

That’s a part of what makes the Make Modern Triangles Club so much fun. 

We have ALL types of quilters. All ages, all skill levels, some brand-new, and some who have been in the club for years. 🙌

There are always new members joining, new projects started, and plenty of projects being finished and celebrated, too. 

It’s a community full of people who just get all the quirks of being a quilter. ✨

We’d love to have you join us and bring your personlity to the club. Comment ‘CLUB’ for details to join and I’ll send them your way. 💌

#quiltteacher #quiltingtutorial #quiltingtips #modernquilting
Comment ‘SUMMIT’ for your free ticket for the Quil Comment ‘SUMMIT’ for your free ticket for the Quilter’s Paradise Summit June 8th - 15th! ✨

One of my favorite things about quilting is how there’s always something new to try.

✨ A new technique.
✨ A new color combination.
✨ A new project that makes you think, “Okay, wait… that’s actually adorable.”

That’s the energy of the Fast-N-Easy Quilters Paradise Summit.

For an entire week, you’ll get to learn from 30 quilting experts sharing projects that are fun, practical, beginner-friendly, and completely inspiring.

Think quilted bookmarks, fabric boxes, mini quilts, coaster sets, bags, placemats, appliqué, freezer paper piecing, and so much more.

Basically… a very good excuse to spend the week sewing! 🪡

And it’s FREE. I’d love for you to join us. Comment ‘SUMMIT’ and I’ll Dm you the link to register. 💌 

#quiltteacher #quiltpattern #quilttop #quiltingtips #quiltingtutorial
Follow on Instagram
© 2026 Bryan House Quilts