• About
    • Privacy Policy
  • Teaching
    • Member/Student Login
    • Online Programs
  • Shop
  • Member/Student Login
  • Blog
    • Free Quilt Patterns – Scrappy Whirligig Quilt

Bryan House Quilts

Reduce Bulky Seams by Grading Seam Allowances

Uncategorized

21 Feb

Reduce bulky seams by grading seam allowances

Where intersecting seams meet in a quilt top, fabric layers often make bulky, lumpy bumps! And they are not easy to sew through, and sometimes, impossible to sew through! Learn simple techniques to reduce bulky seams and lumpy bumps by grading seam allowances. Read on or watch the video tutorial here.

Key Highlights

  • Grading seam allowances is a must for flatter, smoother quilt tops.
  • It involves trimming a portion of a seam of one or more layers.
  • Each seam is trimmed to a different width, slightly smaller than the other.
  • Reducing bulk is especially important for star blocks where many blocks join in the center.
  • Don’t be afraid to grade! The minimal reduction in seam strength is worth the improved appearance and ease of pressing.

Why should you grade seam allowances?

Ever wondered why seam grading is such a big deal for quilting? Let’s break it down.

The main reason is simple: it eliminates bulky seam allowances. When multiple layers of fabric are sewn together, the seam allowance can become thick and difficult to press flat. This is especially noticeable with heavier fabrics or where seams intersect. These lumps and bumps are difficult to press flat and sew through, no matter how large your needle or how strong your sewing machine motor!

By trimming each layer of the seam allowance to a slightly different width, you’re essentially stairstepping the bulk into tiny increments. This creates a smoother, more professional finish on the right side of your quilt, and a much easier time when it comes to pressing those seams open or to the side. Trust me, your finished project will thank you!.

Why is grading seam allowances important in QUILTING?

Grading seam allowances is crucial in sewing to reduce bulkiness, create smoother seams, and stitches over the quilt top more easily. By grading seam allowances, lumpy bumps are less visible and the quilt top is smoother. Stitching is more consistent and this makes a tremendous difference.

Step-by-Step Guide to Grading Seams

Grading is a simple technique where you trim each layer of the seam allowance to a slightly different width, like stair steps. Now let’s gather our tools for the job.

Sewing Tools Needed for Effective Seam Grading

Before you start grading, you’ll need a few essential tools:

  1. Sharp Fabric Scissors: A good pair of fabric scissors is a must-have for any sewing project. I use Karen Kay Buckley Perfect Scissors 4-inch size – and worth every penny. Make sure to use scissors with sharp, pointed blades that can cleanly cut through multiple layers of fabric.
  2. Duckbill Scissors (applique): These scissors have one blade shaped like a duckbill, which helps to lift the top layer of fabric away from the seam allowance you’re trimming. They’re particularly helpful with delicate fabrics or curves.
  3. Seam Ripper: Use a seam ripper to pick out stitches at the ends of the seam lines where they overlap.

Techniques for Grading Different Types of Seams

Grading techniques vary depending on the type of seam you’re working with. Here’s a quick rundown:

  1. Press the seams to one side.
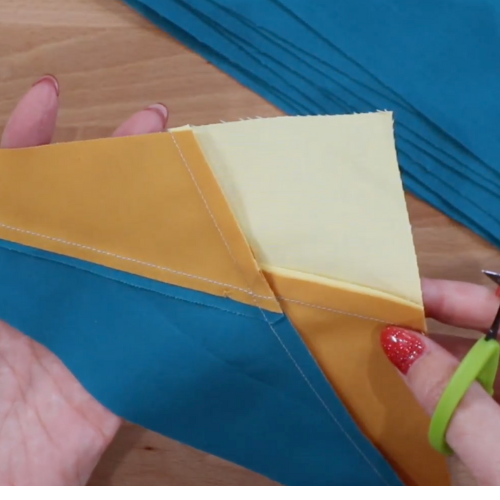
  2. For straight seams – pressed to one side: On the wrong side, trim the first layer facing closest to you by ⅛-inch while the innermost layer stays ¼ -inch wide. Notice how the gold fabric layers of the seam are narrower in the photo below.
Straight seams pressed to one side are the first step in grading seam allowances.
Cutting off 1/8 inch toward the intersection of seams

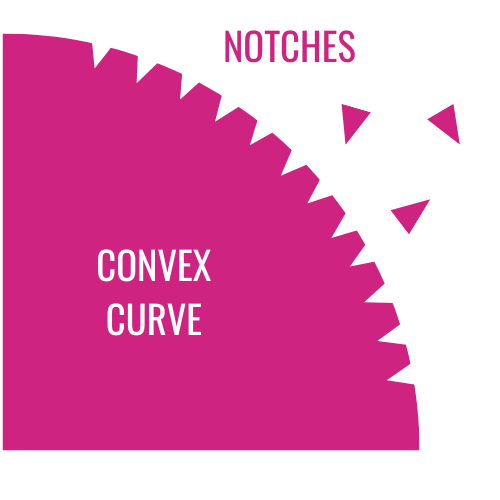
3. Convex Curves: These curves need a little extra room to lay flat. After grading, make small “V” clips or notch into the seam allowance to allow for easing. The notch helps the spread the fabric open so it lays flat. Notch seam allowances when both are pressed to the side of the seam outside of the curve.

Convex curve uses notches for grading seam allowances.
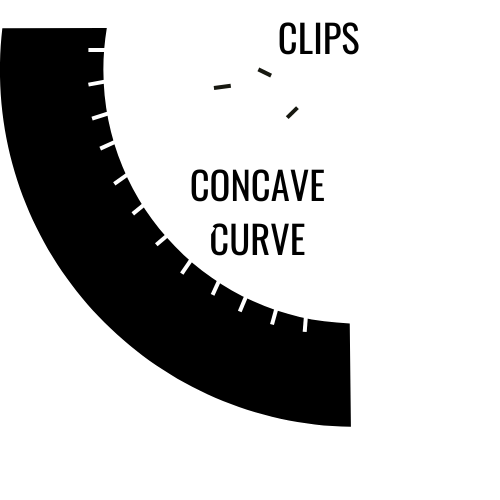
  • Concave Curves: Clip into the seam allowance every ½” or so to allow the tiny fabric sections to slightly overlap each other. Concave curve allowances are pressed away from the curve, not into it.
Concave curves use clips to flatten seams

Always refer to your pattern instructions for specific grading recommendations for your project.

Quick Tips Make the Grade

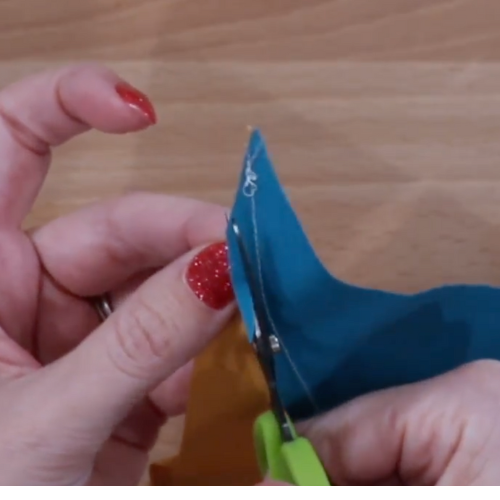
  • When seams overlap, pick out a few stitches at the ends to open up the seams which helps make a clean cut.
  • You might have smaller than ⅛-inch allowances where many points meet and that’s okay.
  • Open seams need grading sometimes, depending on the block type.

Conclusion

Grading seam allowances enhances the overall look and feel of your quilts by reducing bulk and ensuring smooth edges and curves. Understanding the importance of seam grading and using the right tools and techniques can take your sewing skills to the next level. Remember, personal preference is key for precision, and practice makes better to sew professional-looking seams. By following these steps and tips, you’ll be on your way to creating beautifully finished quilts. Happy sewing!

Frequently Asked Questions

What is the difference between grading and trimming seam allowances?

Trimming means simply cutting off excess fabric from the seam allowance. Grading involves trimming each layer of the seam allowance to a different width, creating a stepped effect that reduces bulk.

How can I prevent bulky seams in quilt tops?

Press your seam allowances open when possible. At seam intersections, trim the excess fabric from each seam allowance close to the joining point if turning both to one side.

  • Use sharp scissors and trim small amounts
  • Don’t backstitch at the beginning and end of each seam, which adds extra thread.

MORE RESOURCES

  • How to sew a scant quarter inch seam allowance
  • Beginners Guide: Use a walking foot for quilting
  • Rainbow Quilt Designs: 9 Ways to Make Inspired Rainbow Quilts
Previous Post: « First Month, First Block, First TA DA!
Next Post: How to Press Flat Quilt Seams Like a Pro »

Primary Sidebar

Join “12 Days of Merry Modern Trees”

Join the 2026 Block of the Month Program

Get my Modern Triangles Quilt Book

Get my Modern Rainbow Quilts Book

Image shows cover of the book "Modern Rainbow Quilts"

Save your Spot: Free Class

Make the Solstice Quilt!

Solstice Block of the Month by Bryan House Quilts

Get Your Invite!

Make Modern Triangles Logo

Make the Sparkler Quilt!

Image Shows Sparkler Quilt Top by Rebecca Bryan

Make the Echo (Echo!) Quilt

Echo BOM now open to join

Make the Wildflower Quilt!

Wildflower Block of the Month by Bryan House Quilts

Make the Stargazer Quilt!

Anne's Stargazer BOM

Make the Rainbow Triangles Quilt!

Rainbow Triangle BOM, modern triangle quilt, Rebecca Bryan

About

Hey there! I’m Rebecca, an author and teacher and freezer paper piecing evangelist. I’m also the founder of the Make Modern Triangles Quilt Club.

Disclosure

Just so you know, my site includes affiliate links from which I (it’s me! Rebecca!) receive payment or compensation. Something to consider as you peruse my website. Thanks!

Latest on Instagram

WOULD YOU RATHER... ⬇️ Bind a quilt or vacuum? 🧐 WOULD YOU RATHER... ⬇️

Bind a quilt or vacuum? 🧐

Apparently, on this day I chose vacuum. 😂

Don’t get me wrong, I LOVE to sew. 

But sometimes, when you have that one thing to sew that isn’t a part of quilting that gets you super excited, you find everything else to do instead! 

And on this day, it was vacuuming all the rugs in my sewing room. 

So if you’ve ever felt like you’d rather do pit chores over sewing chores, you’re not alone! Tell me in the comments, would you rather bind a quilt or vacuum? 👇

#quilterslife #quiltinginspiration #quiltingproblems
Just a bit of color inspiration for you to fall in Just a bit of color inspiration for you to fall in LOVE with!!! 💕

Which color is speaking to you most? 😍

Red, pink, purple, peach, something in between, or completely different? ✨

Comment your color below! 🫶

#colorplay #colorinspiration #quiltinginspiration
Here’s what I’ve learned after 15+ years of quilti Here’s what I’ve learned after 15+ years of quilting... 🫶

I hear things like these all the time... ⬇️

And honestly, I get it.

Quilting isn’t the problem. The way we’re taught to approach it is.

Quilting doesn’t have to mean:

❌ Marathon sewing sessions
❌ Perfectly matching everything
❌ Fancy tools or silly rules
❌ Finishing an entire quilt before trying something new

It can mean:

✨ Small, doable steps
✨ Using what you already have
✨ Letting the design do the thinking
✨ Finding joy in the process (not just the finish)

If quilting has ever felt “too much,” I promise, there’s another way.

And it’s a whole lot more fun!

Comment “CLUB” if you’re curious to try something new. 👇

#quiltingccommunity #quiltingproblems #quiltingforbeginners #quilter
Month TWO already!? 🤯 As soon as we start batchin Month TWO already!? 🤯

As soon as we start batching blocks, the months seem to go by WAY too fast! 

And as soon as we are done with the block of the month, we’re already waiting to start stitching the next one...

Here’s our block for month TWO of the Dutch Summer block of the month! SWIPE for block one! ✨

Comment “CLUB” if you’re interested in joining us in this one-of-a-kind quilting community filled with quilters from all over the world, and at all skill levels. 

We’re all creating, celebrating, and connecting over something that brings us all joy! It’s a wonderful place to be, and you’re invited to join us if you’d like. 💕
.
.
.
#blockofthemonth #quiltblock #modernquilting #beginnerquilter #quiltingtips
WARNING: This might steal your heart. 🤭 I made th WARNING: This might steal your heart. 🤭

I made this cutie-patootie, heart-shaped modern triangle as a little love note to quilters who want to try something new without committing to a whole quilt.

It’s fast, playful, and stash-friendly. It’s designed to give you that magical “TA-DA!” moment almost immediately. ✨

This free pattern is your invitation to:

💕 Play with modern triangles
💕 Use what you already have in your stash
💕 Create something joyful just because
💕 See how one simple shape can unlock endless design possibilities

In this freebie, you get not just one, but TWO different heart designs, because I KNOW quilters like to have options!

If you’ve ever been curious about modern quilting, or just want a cozy Valentine’s sewing project, this one’s for you.

Grab the FREE heart triangle and start stitching today. Comment “HEART” and I’ll send it your way! 💌

#quiltblocks #freequiltpattern #quiltingfreepattern
All these triangles come together to make one STUN All these triangles come together to make one STUNNING quilt! 🤩

The Echo was such a fun, unique design that was unlike anything I had made with triangles yet. 

It felt bold and different, yet symmetrical. ✨

And of course, made with modern traingles blocks, some were simple, and some were challenging. 

But the whole process from start to finish is so much fun! If you want to learn as you go and make your own version of the Echo, comment ‘ECHO’ and I’ll send you the details to my Block of the Month program, where you get ALL the tools, tutorials, and resources to make this quilt! 🫶

All you have to do is pick your color plan, shop your fabric stash, and get ready to start sewing! 🪡

#moderntrainglequilts #modernquilting #quiltpattern
Follow on Instagram

Browse by Category

Archives

  • Instagram
  • Facebook
  • Pinterest
  • email
WOULD YOU RATHER... ⬇️ Bind a quilt or vacuum? 🧐 WOULD YOU RATHER... ⬇️

Bind a quilt or vacuum? 🧐

Apparently, on this day I chose vacuum. 😂

Don’t get me wrong, I LOVE to sew. 

But sometimes, when you have that one thing to sew that isn’t a part of quilting that gets you super excited, you find everything else to do instead! 

And on this day, it was vacuuming all the rugs in my sewing room. 

So if you’ve ever felt like you’d rather do pit chores over sewing chores, you’re not alone! Tell me in the comments, would you rather bind a quilt or vacuum? 👇

#quilterslife #quiltinginspiration #quiltingproblems
Just a bit of color inspiration for you to fall in Just a bit of color inspiration for you to fall in LOVE with!!! 💕

Which color is speaking to you most? 😍

Red, pink, purple, peach, something in between, or completely different? ✨

Comment your color below! 🫶

#colorplay #colorinspiration #quiltinginspiration
Here’s what I’ve learned after 15+ years of quilti Here’s what I’ve learned after 15+ years of quilting... 🫶

I hear things like these all the time... ⬇️

And honestly, I get it.

Quilting isn’t the problem. The way we’re taught to approach it is.

Quilting doesn’t have to mean:

❌ Marathon sewing sessions
❌ Perfectly matching everything
❌ Fancy tools or silly rules
❌ Finishing an entire quilt before trying something new

It can mean:

✨ Small, doable steps
✨ Using what you already have
✨ Letting the design do the thinking
✨ Finding joy in the process (not just the finish)

If quilting has ever felt “too much,” I promise, there’s another way.

And it’s a whole lot more fun!

Comment “CLUB” if you’re curious to try something new. 👇

#quiltingccommunity #quiltingproblems #quiltingforbeginners #quilter
Month TWO already!? 🤯 As soon as we start batchin Month TWO already!? 🤯

As soon as we start batching blocks, the months seem to go by WAY too fast! 

And as soon as we are done with the block of the month, we’re already waiting to start stitching the next one...

Here’s our block for month TWO of the Dutch Summer block of the month! SWIPE for block one! ✨

Comment “CLUB” if you’re interested in joining us in this one-of-a-kind quilting community filled with quilters from all over the world, and at all skill levels. 

We’re all creating, celebrating, and connecting over something that brings us all joy! It’s a wonderful place to be, and you’re invited to join us if you’d like. 💕
.
.
.
#blockofthemonth #quiltblock #modernquilting #beginnerquilter #quiltingtips
Follow on Instagram
© 2026 Bryan House Quilts