Learn how to sew a scant ¼ inch seam allowance and watch your accuracy improve quickly on your quilts. Not to mention, they will be the right size!
In this post, learn what a scant quarter inch seam allowance is, when and why to use it, and how to master the technique.
Key Highlights
- A scant 1/4″ seam is one or two threads width narrower than a quarter inch seam allowance.
- Folds create fabric bulk which often result in smaller blocks and quilts.
- How to get a precise seam with tools with a variety of presser feet, quilting rulers, seam guides and needle positions.
- When and why to use a scant quarter inch technique.
Introduction
In this post, learn what a scant quarter inch seam allowance is, when and why to use it, and how to master the technique. When a quilt pattern requires a scant quarter inch seam allowance, it makes a difference in the final finish, especially the size. When seams aren’t matching up….it’s a ripper rodeo! Consistent seam allowances result in accurately sized blocks and quilt top.
So why do quilt making instructions tell us to sew a quarter inch seam when sewing a scant ¼ seam improves accuracy?
Good question. I haven’t always been a fan of scant quarter inch seams because many machine feet and markings are made and set at a quarter inch, not a scant. But…guessing isn’t a technique! Scant quarter inch presser feet are available to purchase for machines now.
Consistency is the secret to sewing well made quilts. A consistent scant ¼ inch seam allowance will improve your accuracy by leaps. Read on for all the tips and tools I use to make a scant ¼ inch seam.
Understanding the Scant ¼ Inch Seam
Tiny differences in seam widths create a bigger problem when bunches of blocks are sewn together. One of the lesser known reasons for mismatched seams and corners is the fabric fold where the seams meet. Those tiny folds take up a thread or two width out of joined pieces. When both seam allowances are pressed to one side, a little titch (or a lotta!) of fabric is folded with it. A scant or smaller than ¼ inch seam allowance easily corrects this.
What is a scant quarter inch seam allowance?
A scant ¼ inch seam allowance is sewn one or two thread widths shy of a quarter inch.
How do you sew a scant quarter inch seam allowance?
Achieving that impeccable scant 1/4″ seam is a combination of skill and using handy tools.
Several sewing notions make a big difference in your quilt finishes. Invest in these tools to improve your accuracy and make the entire sewing process more enjoyable.
I will cover:
- machine presser feet
- needle position
- rulers
- seam guides
- taping
Tools for Perfect Seams and Techniques for Sewing a Scant ¼ Inch Seam
1/4-inch Piecing Foot and Needle Positioning
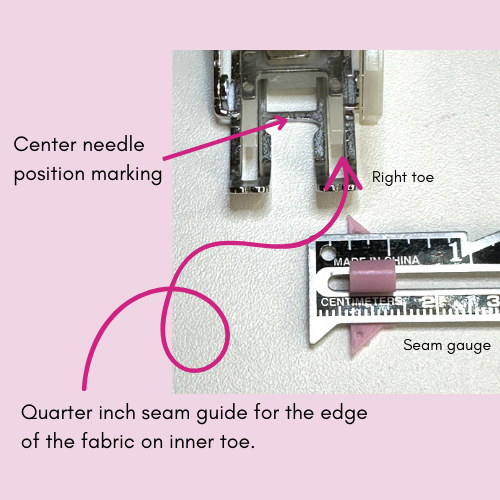
A 1/4-inch piecing foot is specially designed with a guide edge that helps you maintain a consistent 1/4″ seam allowance. Look for presser feet labeled as “1/4 inch” or “piecing”. Then, I adjust the needle position slightly.
Many sewing machines offer adjustable needle positions, which gives you control over where your needle lands besides the center position. You can fine-tune the seam’s width by a thread’s width by moving the needle slightly to the right to narrow the seam.
Quick Tips
- First thing, check your stitch plate. Switch out a single hole needle plate for a zig zag needle plate with an oblong hole, which will accommodate a needle moved off of center.
- Raise your needle to the highest position before adjusting the position. You could bend or break the needle by placing it in the down position when changing its position.
- Measure a quarter inch from the center needle position. Move the needle slightly right of center. Measure to make sure it’s a thread width narrower than a ¼ inch.
- Check your sewing machine manual for instructions.
Scant ¼ Inch Foot
You have options! You can purchase a scant ¼ inch foot to make a scant 1 4 inch seam allowance hassle-free! Adjusting your needle to the right is an option with this Janome foot. Generic and manufacturer brands are available, like Babylock, Juki and Singer.
Walking Foot or Regular Foot (All Purpose Foot)?
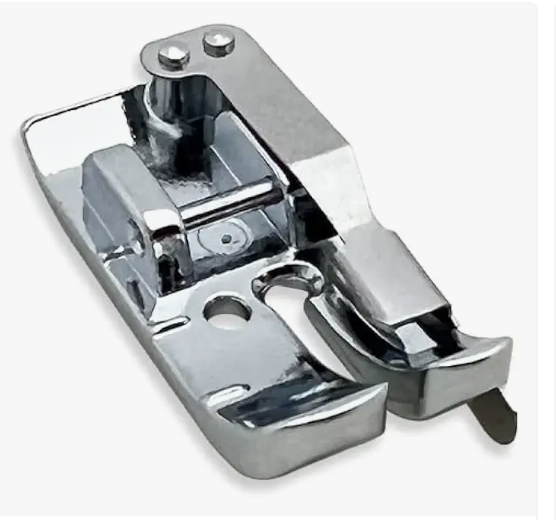
A walking foot makes a huge difference with accuracy. By moving both layers of fabric together – unlike regular feed dogs – you have more control over shifting fabric and the seam line stitching. A walking foot can be used for sewing an entire quilt: seams, basting and quilting.
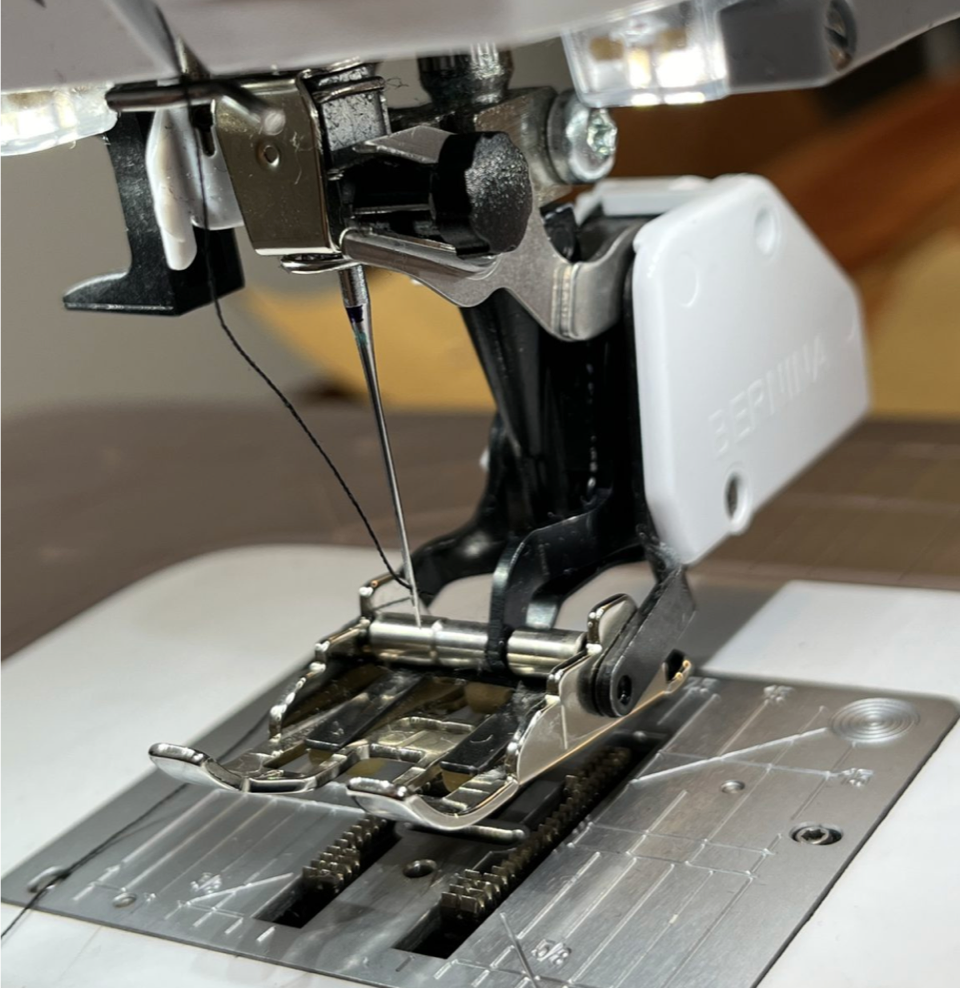
A walking foot has a built-in ¼ inch guide on each toe, usually just inside the toe. I sew in the opening between the metal guides for a scant ¼ inch seam (see photo below). The seam gauge shows where a quarter inch in relation to the foot.
Just make sure your walking foot has an oblong zigzag opening – or you won’t be able to adjust the needle position to the right.
Ready for a walking foot? Read my beginner’s guide to using a walking foot and visit your local sewing machine dealer to find the right one for your machine.
A regular foot may have a marking or quarter inch width on the right “toe” edge of the foot, however, sewing a straight line, never mind a scant one, isn’t guaranteed. That’s where guides are useful.
DIY and Magnetic Fabric Guides for a Scant 1 4 Seam
Quilting rulers are essential for accurate cutting, but did you know they’re also invaluable for checking your seam allowance? A clear quilting ruler makes it simple to double-check your accuracy. Mark a scant allowance with painters tape with a small 6 to 10-inch ruler. A smaller ruler is easier to use for checking your stitching lines. Simply align the edge of the fabric with the tape scant line on the ruler and inspect your seam.
Create a DIY guide using painters tape. Line up a square ruler with the machine bed’s left and bottom edges to determine the stitching line. Then place a vertical strip of tape from the machine’s needle plate to the front of the machine bed. I like a longer taped guide which keeps the edge aligned as the fabric moves forward.
A common magnetic guide also works but it’s not my go-to. Yes, it creates a perfect width and doesn’t move a peep on your metal needle plate, but it gives you only an inch or two of guidance, unlike taping. You might like it so give it a try.
This longer, fancier version gives you a longer edge.
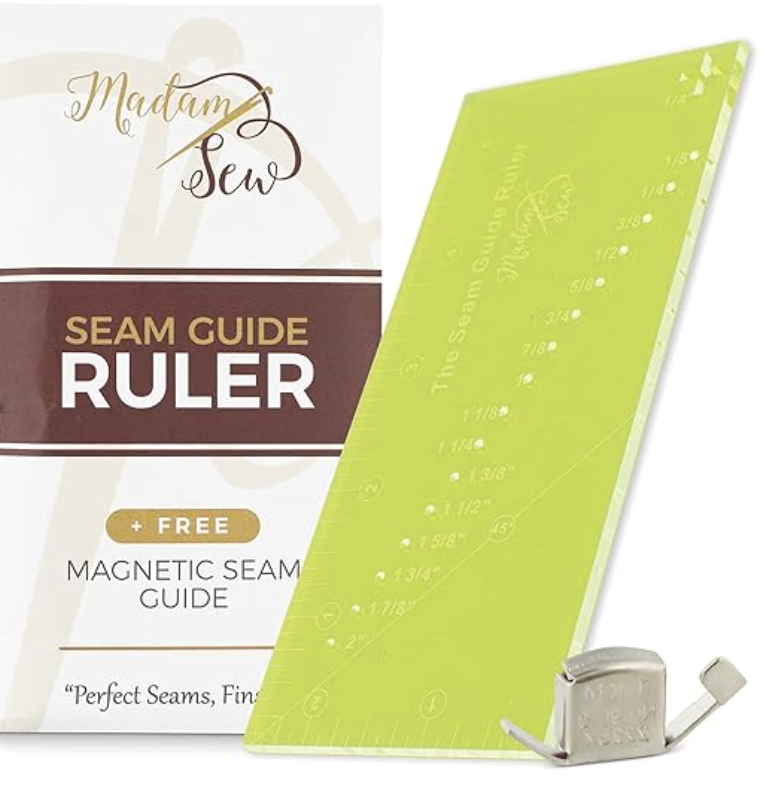
Seam Gauges and Scant Quarter Inch Ruler Guides
Triple threat! This seam guide ruler and magnetic guide set includes a scant quarter inch measurement for marking fabric and checking seal allowances.
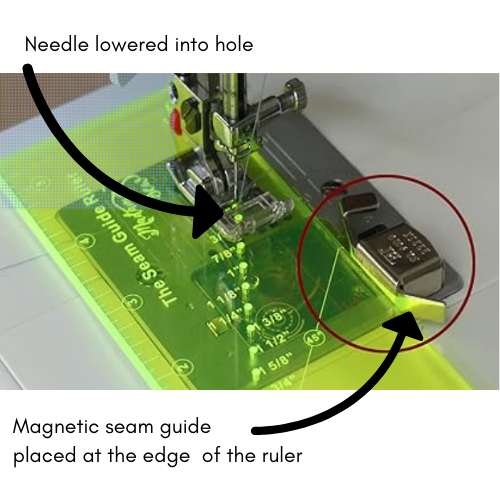
Here’s the how-to:
- Slide the ruler under the presser foot with the needle up.
- Line up the hole with the quarter inch seam width.
- Lower the needle through the hole.
- Place the magnetic seam guide along the edge of the ruler.
- Raise the needle and adjust the position slightly to the right.
- You are set to sew the no-longer-mysterious scant quarter seam.
Make a habit of checking your allowances often using a seam gauge. Run the adjustable slide along the fabric edge to check the stitching line.
Step-by-Step Guide to Sewing a Scant 1/4 Inch Seam
Like any new skill, practice, practice and test your results. I’ll break down the process into easy-to-follow steps.
Preparing and Cutting Fabric
Did you know that seam allowances smaller than a 1/4 inch are more prone to fraying? Starching fabric minimizes fraying. Some quilters starch fabric before cutting, especially if prewashed. I use Best Press and press with an up-and-down motion without steam.
Starch holds the grainline in check a bit while cutting out the blocks. Check your cuts for accuracy, taking time to cut them precisely. A rotary cutter with a fresh blade and quilting ruler are fast and accurate tools.
Stitch Length for Scant ¼ Inch Seam Allowance
Before you begin sewing, set your stitch length to a shorter stitch, anywhere from 1.8 to 2 mm. A shorter stitch length reduces bulky folds and shifted fabric.
Align Fabric
With your fabric prepped, it’s time to bring everything together at your sewing machine. Line up the fabric edges with the presser foot guide or seam guide (masking tape or magnetic guide). Align the edge of your fabric with the right side of the presser foot guide, or if using a standard foot, use the needle plate markings as a guide. In addition, a painters tape guide helps to keep seams straight while the fabric is moving. Remember that for a scant seam, your fabric edge should be a thread’s breadth to the left of the 1/4″ mark.
Sewing Techniques for Precision
As you begin sewing, maintain a steady, controlled speed. Let the feed dogs or walking foot move the fabric to avoid pulling or pushing the fabric.
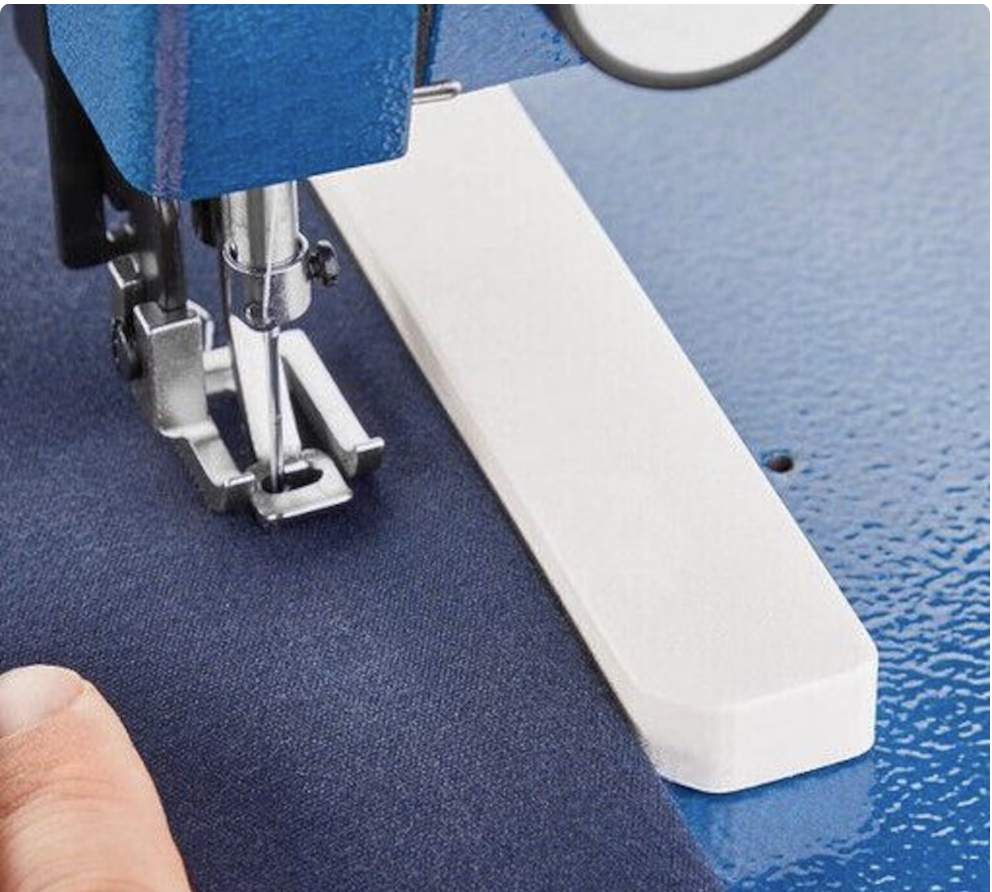
Take a moment to see if your fabric is feeding smoothly and hasn’t shifted during this step. A handy tip: using a finger to gently hold the fabric behind the presser foot can prevent fabric from shifting and puckering.
Uneven results? Try stitching slowly at first to get your bearings. Speed up when you’re comfortable, taking time to align your fabric properly along the right side running along the magnetic guide or painters tape.
Troubleshooting Common Issues
Adjusting for Inaccurate Seam Allowances
We’ve all been there: you sew a seemingly endless seam, only to discover it’s not quite the 1/4″ seam you thought you stitched. Frustrating? Absolutely! But easily fixable? You bet! A seam ripper is a quilter’s best friend, allowing you to undo those less-than-perfect seams.
Once you’ve unpicked the seam, press the fabric again so you’re starting over with flat fabric. Remove any stray or cut threads.
Reassess your seam allowance guide. If you’re using a 1/4″ foot, double-check that your fabric is aligned with the edge of the guide. If using masking tape or another guide, ensure it’s positioned correctly on your needle plate.
Sewing with precision takes practice.
Test Blocks are Perfect Practice
Don’t hesitate to sew a test block. A test block will determine whether you need a scant 1/4 inch seam. A block with lots of pieces has more seams and more bulk so test one out first.
Fabrics are different weights and finishes, including quilting cottons. Tightly woven, long staple cottons can be very thin and less bulky in seams. Cottons with more weight, usually create more fabric bulk as well.
Checking your Allowances with Rulers
After sewing a few inches, pause and lift your presser foot (with the needle in the down position) to check your seam allowance. Simply slide the gauge over the seam, and the markings will indicate whether your seam is the correct width.
If you find your seam allowance is slightly off, don’t fret! This is where those adjustable needle positions or trusty masking tape guides come in handy. Adjust as needed, sew a test seam, and re-measure. Remember, practice makes nearly perfect!
Make a habit of checking your seam allowance while you piece is an easy habit to implement and will save you from headaches down the road. Accurate seam allowances from the start equals beautifully pieced blocks and quilts.
Mastering the Use of Seam Guides
Seam guides, those trusty tools designed to make our lives easier, come in various forms and can be easily attached to your sewing machine. Many sewing machines include a seam guide, often a small metal flange that can be adjusted to the desired distance. The guide acts as a visual and tactile aid, helping you maintain a consistent seam allowance as you sew.
A seam guide becomes particularly useful when working on larger projects or when multiple seams intersect at a single point (think star points, anyone?). By aligning your fabric with the guide, you can be sure that your seam allowances are consistent. This level of precision ensures your points match perfectly, and your blocks lie flat.
Remember, utilizing a seam guide can greatly simplify your piecing, allowing for greater accuracy and a more professional-looking finished quilt. It’s one of those small details that makes a huge difference.
Conclusion
The Importance of Practice and Patience
Mastering the scant 1/4″ seam, like any sewing skill, boils down to consistent practice and a healthy dose of patience. As you repeatedly engage in this technique, your muscle memory will develop, ultimately leading to increased precision and more accurate results.
Building Muscle Memory for Sewing Scant 1/4 Inch Seams
Think of it like learning to play an instrument or mastering a sport. The repetitive motions involved with sewing a scant seam will gradually become more intuitive through practice. The more you do it, the better you’ll become at achieving that consistent seam, making proper fabric alignment and technique second nature!
Mastering the art of sewing a scant 1/4 inch seam is crucial for precision quilting. By understanding the technique, selecting the right tools, and practicing patience, you can achieve beautifully accurate seams. Remember to align your fabric correctly, adjust your machine settings, and check your seam size for perfection. Troubleshoot any issues that arise and embrace advanced tips like using starch for crisper seams and mastering seam guides. With practice and dedication, you’ll soon be sewing impeccable scant 1/4 inch seams like a pro. Happy quilting!

Frequently Asked Questions
How do I know if my seam allowance is scant?
A scant seam allowance is a little bit less than a true 1/4 inch. To check for a scant seam allowance, use measuring tools to measure your seam. If the stitch width is slightly less than 1/4 inch, your seam allowance is likely correct. You can also experiment with adjusting your needle position for accurate stitching.
What should I do if my sewing machine doesn’t have a 1/4 inch foot?
If your sewing machine doesn’t come with a specialized 1/4″ presser foot, don’t worry—you can easily create a guide. One great tip is to use masking tape directly on your sewing machine bed as a fabric guide. Alternatively, you can use a seam guide, if your machine has one.
Is it possible to sew a scant 1/4 inch seam on any sewing machine?
While achieving a scant 1/4″ seam may be simpler with specialized presser feet, it’s definitely possible on most machines! Check if your machine has adjustable needle positions or use the markings on the throat plate as a guide alongside a standard presser foot. Adjust your stitch settings as needed, and you’ll be on your way!
More Resources for Quilting
Eager to expand your quilting knowledge and unlock new techniques? We’ve got an exciting lineup of quilting resources to fuel your passion. From innovative piecing methods to beginner-friendly guidance, explore these avenues to refine your skills and ignite your quilting creativity.
Freezer Paper PiecinG
Have you tried freezer paper piecing, THE game changer for foundation piecing? It involves adhering your fabric pieces to freezer paper templates, which provides remarkable fabric stabilization and allows for exceptionally precise cutting and sewing.
The beauty of freezer paper piecing lies in its ability to effortlessly wrangle even the most challenging shapes into submission. It’s particularly well-suited for achieving sharp points and intricate designs, ensuring every element of your block aligns seamlessly.
Ready to give a whirl?
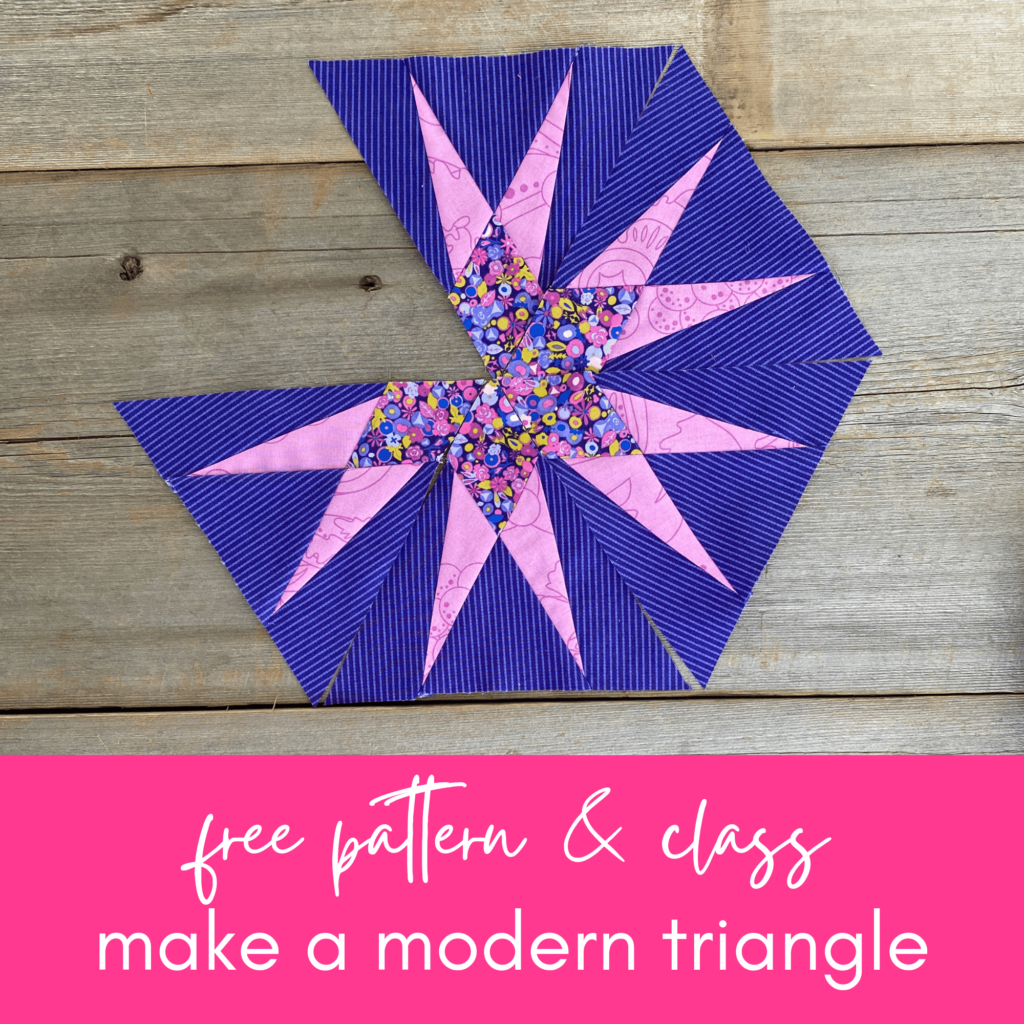
Take my free class and learn how to make a modern triangle block.
Make Modern Triangles Club
Modern quilting often features clean lines, bold colors, and a fresh take on traditional designs. Triangles are a cornerstone of modern quilting, offering endless possibilities for striking geometric compositions. If you’re drawn to the aesthetic of modern quilting, learn more about becoming a member who makes exciting modern triangle quilts. Take my free class and get your invite to the club.
Join our Block of the Month programs
Finish Echo this year, in just 4 hours a month!

Ready to embark on a year-long quilting adventure? Join our exciting Block of the Month programs, where you’ll receive a new quilt block pattern each month, guiding you step by step through the creation of a stunning quilt! It’s a fantastic way to learn new quilting techniques, experiment with different color palettes, and connect with a community of passionate quilters.
Make your own beautiful Echo in this virtual Block Of The Month program! Learn how freezer paper piecing and modern triangle blocks go better together.
Whether you are an experienced quilter or just starting out, you’ll love these stunning step-by-step patterns. Perfect for busy quilters – complete a whole quilt in a year, with just 4 hours of sewing each month!!
Plus, get expert guidance and support from our amazing community of quilters. Stay motivated from the first stitch to the last, and feel the excitement of “I just finished a quilt!!!”
Throughout the year, you’ll develop your quilting skills, expand your block repertoire, and enjoy the anticipation of a new block each month. Our Block of the Month programs cater to all skill levels, from enthusiastic beginners to seasoned quilters.
Free Valentine’s Day Modern Triangle Block PATTERN
Ready to put your newfound scant 1/4″ seam skills to the test? We’re excited to offer a FREE modern triangle quilt block pattern just in time for Valentine’s Day.