
Key Highlights
- DIY any size pin cushion with a Dresden Plate template or machine cutting die
- Choose the best option for wedge sizes and cutting tools.
- Use scraps from a finished project.
- Cut fabric in less time with more accuracy with die cutting machines.
- Filling options, include crushed walnut shells, fabric scraps, sawdust and polyester stuffing for texture and weight.
DIY Pin Cushion Tutorial
Learn how to make a DIY pin cushion in this simple my step-by-step photo tutorial with detailed instructions. Making a pincushion is a great way to learn a new technique without making an ENTIRE quilt.
I’ll show you how I used one template to make dresden and tumbler blocks to complete the DIY pincushion.
Plus, DIY pincushions show your quilty personality! They are a true statement piece when you make it with your favorite fabrics and quilt style.
DIY Pin Cushion: Easy Cutting Options
You’ve got cutting options!
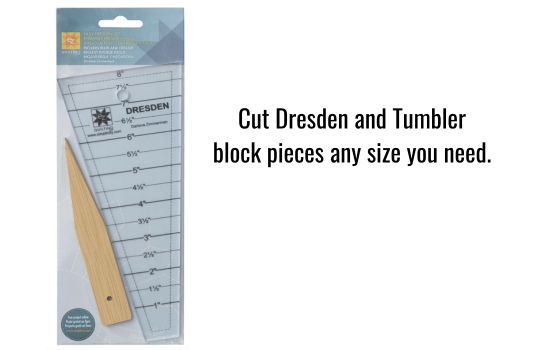
A dresden plate ruler with multiple size markings is a great way to go for small projects. Line up the edge of fabric with the height you need and cut away the sides. The flip the template upside down and make one cut on the side for another piece. It’s more like a free pattern with endless options!
I used my Sizzix Big Shot machine with the 30 Degree Fan Blade die to cut my fabric. Even though the fabric dies have been discontinued (keep reading for more cutting options below), you might find them online on through resellers, Ebay, and Etsy.
For Cricut Maker machines, you can find a dresden wedge shape in the Canvas space, Resize it and cut out in cardstock for a template or into fabric wedges.
How big will your dresden plate finish? How many fans do you need? Check out this Dresden Plate Calculator.
Materials & Tools
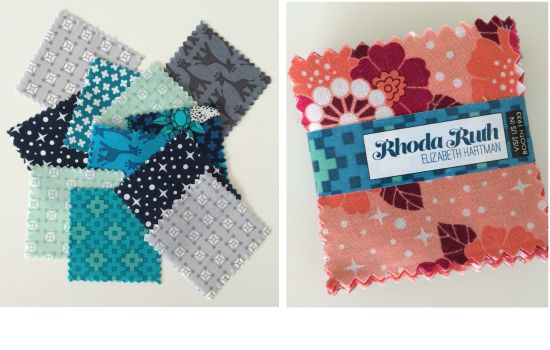
- Fabric scraps sized at least 2.5 x 2.5 inches (a mini chart pack is perfect)
- 12 fan blades for the pincushion top
- 18 tumbler blocks for the back
- 2 – 8″ x 8″ squares for background fabric
- 2″ circle
- Scissors or rotary cutter
- Fan blade or dresden plate template/die that accommodates a 2.5-inch wide fabric.
- A circle template – 2″ diameter
- Pins and plastic clips
- Hand sewing needle
- Iron and pressing mat
- Best Press starch
- Sewing machine
- 40 weight thread and an 80/12 sewing machine needle, quilting or Microtex.
- Filling – I prefer walnut shells.
Step-by-Step Guide: DIY Pincushion
1: Cutting and Preparing Your Fabric
First, choose contrasting prints and solids for the top with lots of pop. Then prep your fabric by spritzing with Best Press spray starch and pressing with a hot, dry iron.
The mini charms, or 2 1/2” squares, aren’t big enough to cover the whole shape on the die. So by shifting the placement you will get a slightly different shape or size. I laid the pieces on the cutting die above the curved ends. Fitting three fabrics at a time on the die was easy.
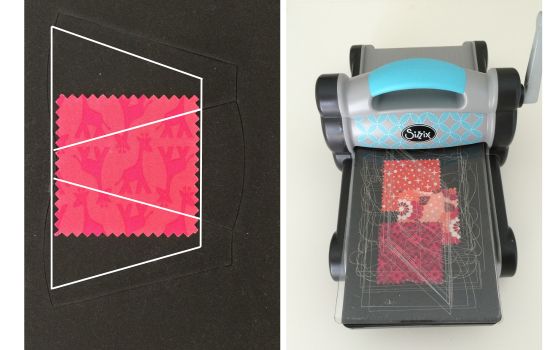
When you place the mini charm at the widest part of the die shape you will get a wider wedge. The wider wedge gives you a larger center circle, which I love.
Or place the mini charm at the narrow end of the wedge for a narrower wedge and smaller center circle.
Since their twinnie is a tumbler block, I also cut 18 pieces for the back of my pincushion.

2: Stitch Blades and Tumblers
First, set your stitch length to 1.5mm. For fan blades, fold them in halves right sides together and chain sew the pieces at the wider edges in a ¼ inch seam allowance. Consider using leaders and enders with these small pieces – it keeps them running smoothly under the presser foot. Snip them off when you cut the pieces apart.
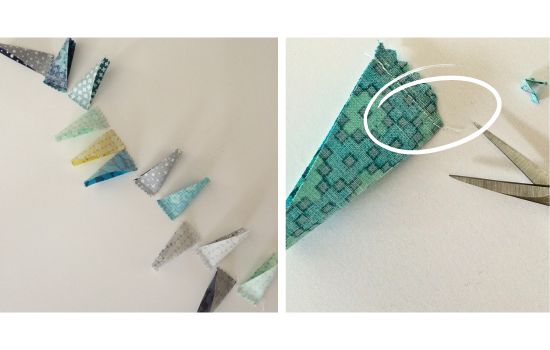
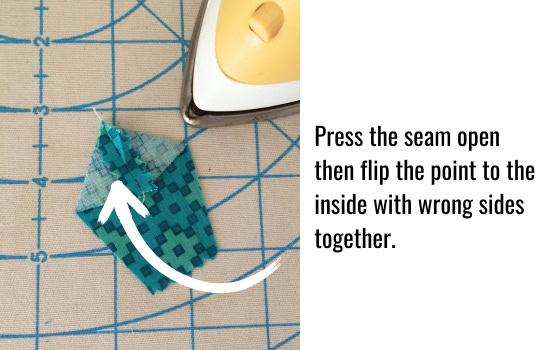
Clip off the corner at the fold for a pretty pointy tip, then turn right side out. Press the seam open then flip the point over to the inside. Push out the point with a pencil. Press again on the right side.

3: Stitch Seams and Add Stuffing
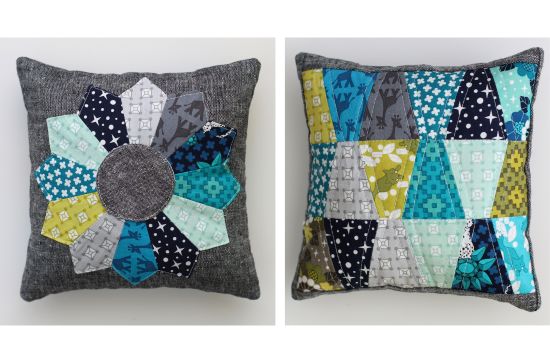
Pincushion Top
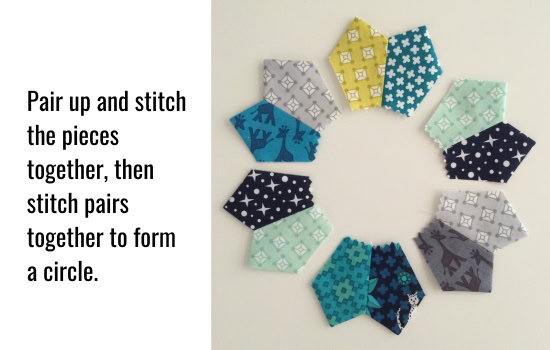
Place the fan blade wedges with right sides facing each other. Use a running stitch and keep a ¼-inch seam allowance. Press seams open or to the darker side if light fabrics are used with a dark background fabric.
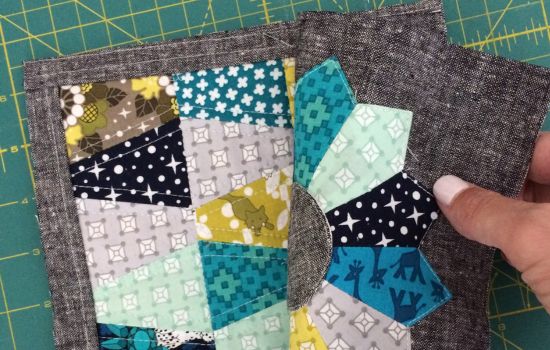
Put a few dabs of fabric glue on the wrong side of each blade. Flip over and center it on the background fabric. Edgestitch around the points and edges to secure it.
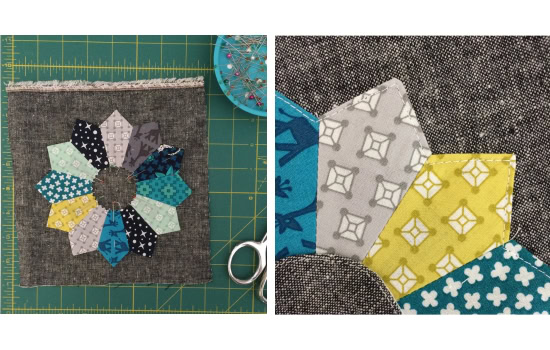
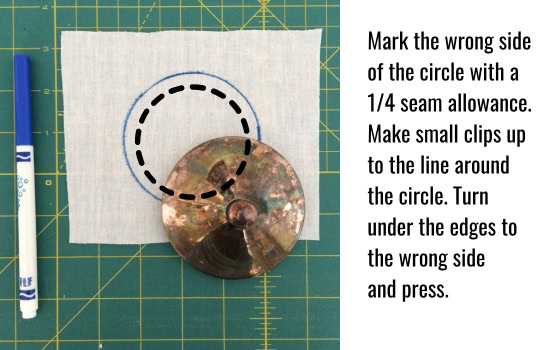
Mark the wrong side of the circle with a 1/4 seam allowance. Make small clips up to the line around the circle. Turn under the edges to the wrong side and press.
Position it on the top side of the pin cushion and edgestitch around it.
Pincushion Back
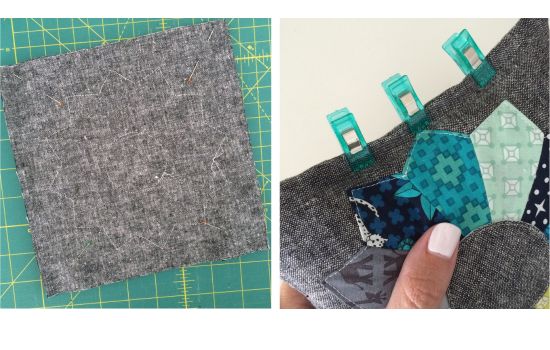
Join the tumbler blocks in three horizontal rows of six blocks, then sew the rows together.
Pin or clip the mini tumbler “quilt” to the background fabric at the edges. Topstitch near the edges of the blocks.
Joining the Sides and Stuffing
Put the right sides together, matching edges, then stitch a ¼ seam allowance, leaving a 2″ opening in the middle of one side.
Turn right sides out and press.
Fill the DIY pin cushion with a funnel when using walnuts or sand. Poke polyester fiberfill through the hole with a pencil or chopstick. Clip to close the hole while stitching it closed
Close the hole with a tightly spaced blind stitch or whip stitch done by hand. If you use a sewing machine, you’ll risk getting dust and tiny pieces in the machine.
I hope you’re excited to try out this endless block of possibilities for your very own DIY pin cushion!
xo Rebecca
More Quilting Resources

Make Better Flying Geese Tutorial
How Many Times Can You Use a Freezer Paper Foundation?
Frequently Asked Questions
What kinds of filling should I use for a pin cushion?
There are a few ways you can stuff your pin cushions, and it really depends on what you like. Walnut shells add more weight which keeps it sturdier and less shifty. Sawdust and fabric scraps are options, too.
