• About
    • Privacy Policy
  • Teaching
    • Member/Student Login
    • Online Programs
  • Shop
  • Member/Student Login
  • Blog
    • Free Quilt Patterns – Scrappy Whirligig Quilt

Bryan House Quilts

Pickle Dish Tips and Resources {Possibly it’s a tutorial?}

finished quilts· Tutorial

12 Jun

As promised this post will be all about how I pieced my Pickle Dish quilt top and the helpful resources I found. I completely bumbled my way through this quilt, so this isn’t a tutorial. Consider this a non-tutorial tutorial. I’ve tried my best to recall and explain what I did. 🙂

(Here’s a link to a PDF of this post.)

Pickle Dish Top

I set out originally to make a Double Wedding Ring quilt because of the DWR challenge, which at that time had just been announced. In planning my quilt, there were a few design elements I knew I wanted to incorporate: thick arcs with fewer and thicker wedges, paper pieced arcs, an entirely pieced quilt top (no applique!), and big scalloped edges. I was also hoping to not have seams in my background pieces.

(Please start laughing at me now because you probably already know that I actually wanted a Pickle Dish and not a DWR. I spent a lot of time trying to make a DWR and running into issues because I couldn’t see the difference. I know the difference now…. )

My first resource to share is this DWR pattern. I actually started a red and white DWR using this pattern but I didn’t get too far. If you are making a pickle dish quilt, you would find that pattern helpful in how it explains the cutting of the background pieces.

Once I brushed up on that pattern, I set about drafting my own pattern pieces using my newly acquired Adobe Illustrator skillz.

72 Wedding Ring Segments

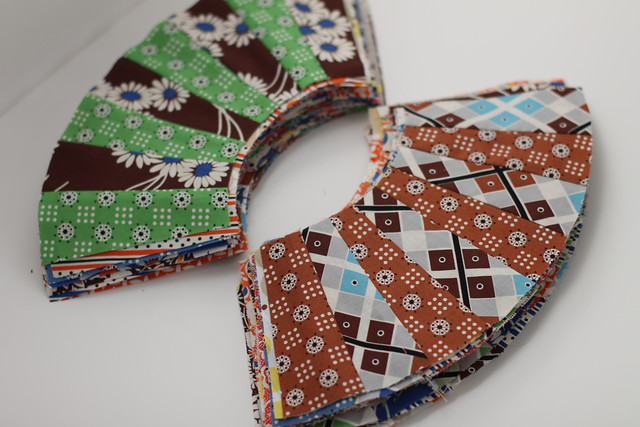
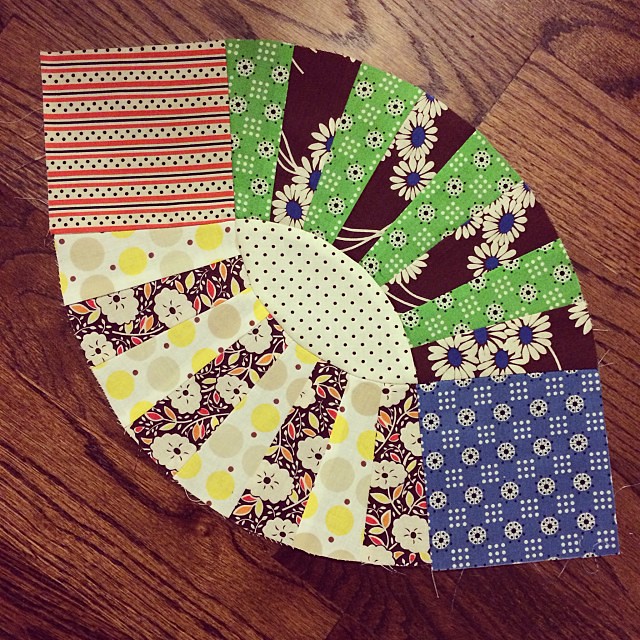
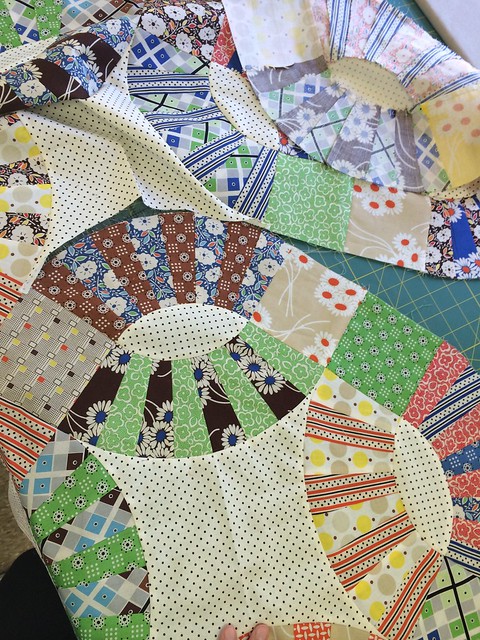
Once the arcs were all pieced and trimmed and de-papered, I sewed the arcs and squares into the oval units.  This tutorial is pretty much what I did except I pressed my seams toward the center background (football or oval) piece. I clipped some of my seams thinking it would make the curved seams lay flatter, but I couldn’t tell a difference between the units with clipped seams and unclipped seams. So I abandoned the clipping.

Test eyelash block thingy.

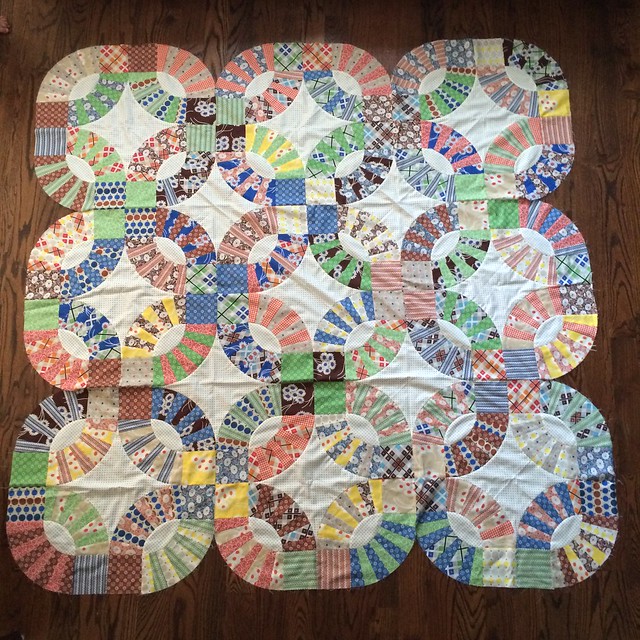
Then, once I had all my oval units pieced I laid them out into blocks. This is about the time when I figured out maybe I wasn’t making a DWR because my piecing was not going to resemble any of the DWR tutorials or patterns I found.

To be honest this was when I kinda had an “oh crap” moment.

Here’s when I realized an important difference between the DWR pattern and the Pickle Dish pattern. The arcs in the DWR point up and down and side to side. The arcs in the Pickle Dish pattern are set on the diagonal.

Oops. Here I thought they just had philosophical differences as to the thickness of the arcs.

Well, I didn’t have enough fabric to make more arcs to finish the quilt as a DWR so, I set it aside for months. That’s what you do when completely puzzled and bit tired of yourself.

At a quilt retreat trying to figure out this beast. Think I'll use @anellahoey tutorial... Hold me. #widrn tagged by @thefooshe . Tagging @thequiltengineer @maryonlakepulaski @kristastitched

So, finally at my quilt retreat a few weeks ago I laid out my blocks again. And after reading Aneela’s Pickle Dish quilt along in it’s entirety, I decided that the blocks could at least be pieced with a whole center and pieced outer parts, like so.

But, not being one for giving up, I decided first to give a go without a pieced background. It’s only fabric right? *fans self*

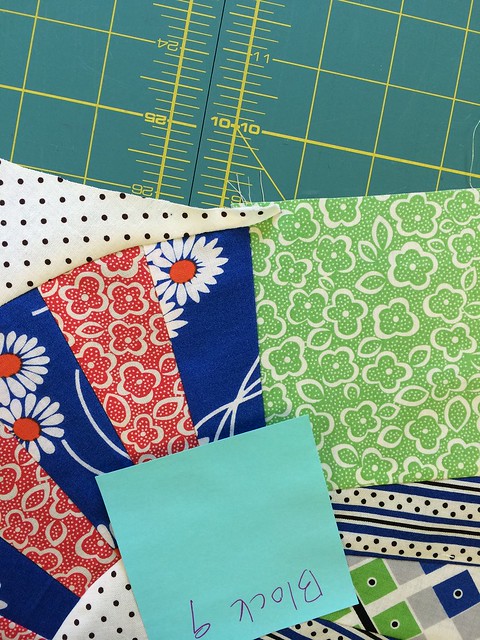
So first I pieced each block.

PickleDishBlockAssembly

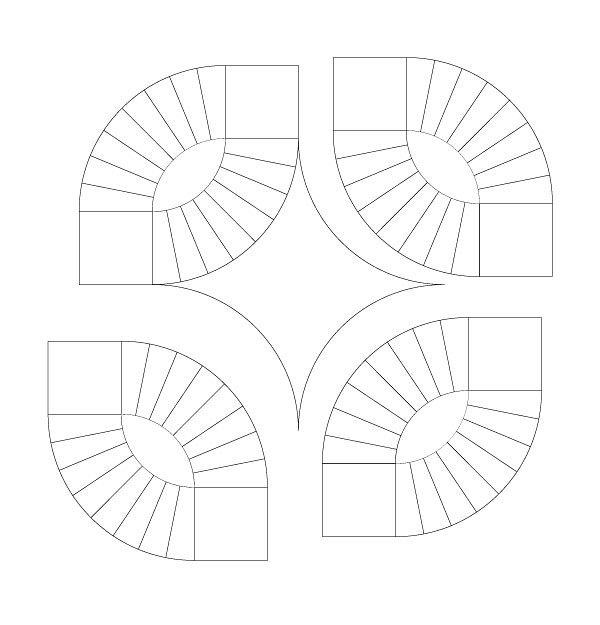
I pieced it like so working with one oval unit at a time and clockwise. The key here is to keep the seam allowances free, as you would with a Y-seam. In other words, start and stop at the seam intersections. Be sure to back stitch. Then, I pressed the free seam allowance out of the way a bit.

Free seam allowance

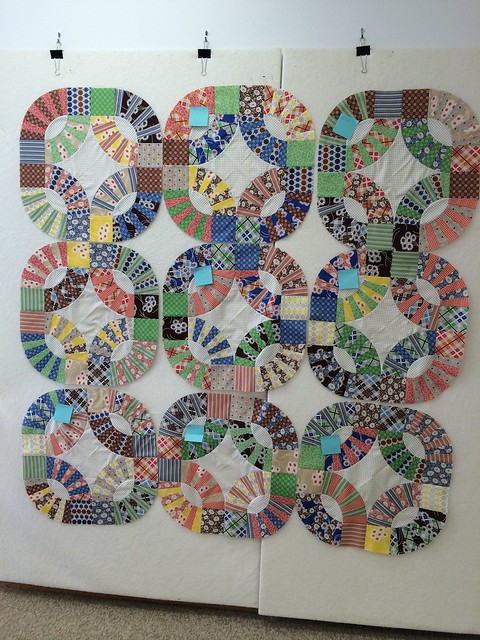
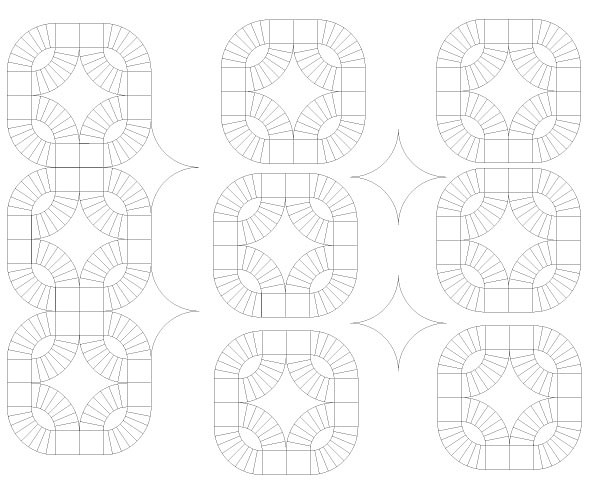
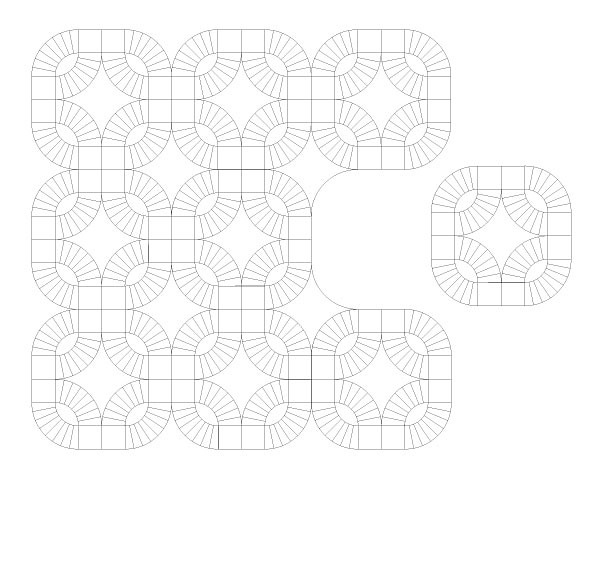
Then I laid my 9 blocks out again.

Untitled

Moment of truth the 4 remaining background pieces needed to be sewn to make this baby a quilt top. Still bubbling through, this is what I did.  First I sewed the left blocks together.

PickleDishTopAssembly1

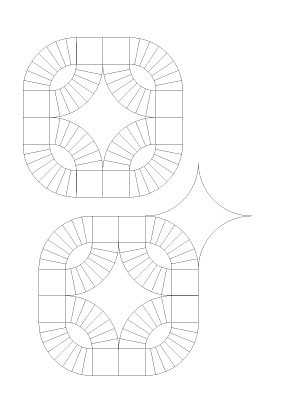
Below is how I pieced the blocks together. First I sewed a block to the lower left of a background piece. Leave the seam allowances free again. Then sew a block to the upper left. Seam allowances free. LACES OUT DAN! 

PickleDishTopAssembly0

For the middle row, I pieced the top and bottom blocks first. Then I pieced the middle block with a continuous seam, no stopping and starting.

PickleDishTopAssembly2

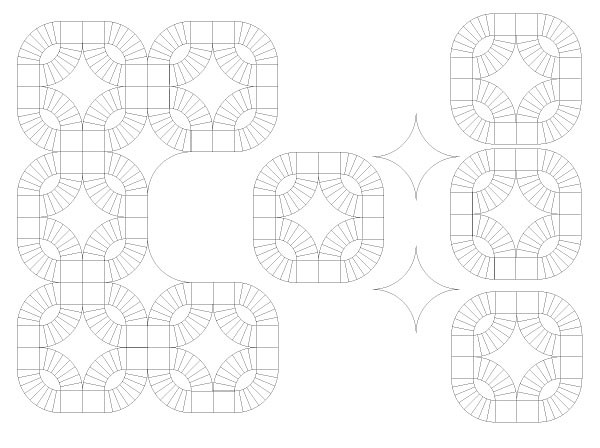
I can’t remember the exact order I pieced the final row in, but for me it involved 2 true curved Y-Seams.

Last seam!!

Here’s a picture of my last seam. See how the 4-patch on the left is already sewn together backstitching at the seam?

Perhaps piecing the last row like I pieced the middle row would have been better?

PickleDishTopAssembly3
Then you have a quilt top! If you don’t want scalloped edges, you could fill in the background pieces on the edges.

Pickle Dish Top

Ok, my biggest tips are 1) mark the center lines of each piece for easier pinning, 2) leave the seam allowances free and 3) when joining the blocks, pin the free seam allowance out of the way.

Although making this quilt top intimidated me greatly, I would love to make another. Then maybe I could more accurately describe with pictures what I did!  First though, I *should* quilt this one. I’m thinking I’d like to hand quilt it, so I’m back at the intimidation phase. But this quilt deserves a great investment of time.

And hopefully I can bind the darn thing, those scallops may be a bit too severe. It’s only fabric right? 😉

I’ll answer questions in the comments.

Thank you!

(Here’s a link to a PDF of this post.)
Previous Post: « Pickle Dish Quilt Top {A Finish!}
Next Post: Flower Pouch {small finishes are finishes!} »

Reader Interactions

Comments

  1. Charlotte says

    June 12, 2014 at 10:57 am

    it's really lovely, but the piecing has given me a headache 😉

  2. shilsenbeck says

    June 12, 2014 at 12:30 pm

    Becca — this turned out really cool looking. You did a great job with the piecing!

    Such a deep V on the edge will certainly make binding a challenge. Alternatives might be a facing or even a pillow-case approach (sew, turn, then quilt). Most of the images I've seen square things off with more background and then some add a piano key border, or scallop the additional background (more undulating with no sharp corners). Yours is certainly unique.

    For quilting, you might consider combining machine quilting (ditching around the arcs, etc), and hand quilting (nice visible motifs in the backgrounds) where it will show.

    Thanks for sharing.

  3. Kristy says

    June 12, 2014 at 1:12 pm

    I have totally pinned this for future reference whenever I decide to tackle one. Thanks for including all of the previous posts and tutorial references, that is super helpful too.

    I do agree with the commenter above about the deep V's; but I know that you will rise to the occasion and figure out something wonderful.

  4. Jenny says

    June 12, 2014 at 8:07 pm

    I've fawned over this quilt all along, so I'll just say, Well Done, You.

  5. Taryn says

    June 12, 2014 at 8:35 pm

    Awesome quilt – I'm thinking about doing a DWR so your advice is great! 🙂

  6. LethargicLass says

    June 12, 2014 at 8:49 pm

    this kind of makes you my quilting heroine 🙂

  7. Ben says

    July 3, 2014 at 6:03 pm

    Thanks for sharing your tips; I hope to make use of them someday.

  8. Ben says

    March 14, 2015 at 2:20 pm

    Well, I tried to give this a go, without piecing the background. I thought I had worked out a method to press my seams in a consistent manner, but I'm running into issues. There are places where it seems I must press a seam first in one direction, then another; except there's no good place to make the transition. I'm thinking I may need to clip the seams. Did you run into that?

  9. Mary Ellen says

    March 30, 2015 at 1:11 pm

    I think this was the quilt you were handquilting on Saturday at Janie Lou? I wish you lived closer as you have a lot to share. I read your book cover to cover. I have the idea to combine your rainbow coloring in a Sujata Shah (Cultural Fusion book) type rail fence quilt. I would also like to make your circular hexie color wheel one but it kinda intimidates me.

  10. Mary Ellen says

    March 30, 2015 at 1:12 pm

    I think this was the quilt you were handquilting on Saturday at Janie Lou? I wish you lived closer as you have a lot to share. I read your book cover to cover. I have the idea to combine your rainbow coloring in a Sujata Shah (Cultural Fusion book) type rail fence quilt. I would also like to make your circular hexie color wheel one but it kinda intimidates me.

  11. Cecilia says

    June 10, 2016 at 11:35 am

    I’m starting to do a pickledish quilt and this information has been very helpful. The only part I haven’t figured out is how to do sew the cornerstones. Is it a Y seam? Every link I’ve come across to the Comfort Stitching Blog sew-along comes up blank so I think she has taken the post down. Any tips? Thank you!

    • rebeccabryan says

      June 13, 2016 at 1:18 pm

      Yes, I think they are y-seams. At least mine are. I want to say that the Comfort Stitching version is a little different than mine though. Hope that helps!

Trackbacks

  1. Flower Pouch {small finishes are finishes!} – Bryan House Quilts says:
    June 14, 2016 at 12:26 pm

    […] sharing a tutorial earlier this week, I thought a small finish would be nice to share. These open wide pouches […]

  2. Local Quilt Shop Challenge – or how I research a quilt pattern « Red Patch Designs says:
    March 20, 2018 at 3:49 am

    […] I can figure out the basic construction, but wanted to research a bit more. I came across this blog post on Bryan House Quilts and this one on Mommy by Day, Crafter by Night. Both of them were really […]

Primary Sidebar

New Classes for March 2026

Join the 2026 Block of the Month Program

Get my Modern Triangles Quilt Book

Get my Modern Rainbow Quilts Book

Image shows cover of the book "Modern Rainbow Quilts"

Save your Spot: Free Class

Make the Solstice Quilt!

Solstice Block of the Month by Bryan House Quilts

Get Your Invite!

Make Modern Triangles Logo

Make the Sparkler Quilt!

Image Shows Sparkler Quilt Top by Rebecca Bryan

Make the Echo (Echo!) Quilt

Echo BOM now open to join

Make the Wildflower Quilt!

Wildflower Block of the Month by Bryan House Quilts

Make the Stargazer Quilt!

Anne's Stargazer BOM

Make the Rainbow Triangles Quilt!

Rainbow Triangle BOM, modern triangle quilt, Rebecca Bryan

About

Hey there! I’m Rebecca, an author and teacher and freezer paper piecing evangelist. I’m also the founder of the Make Modern Triangles Quilt Club.

Disclosure

Just so you know, my site includes affiliate links from which I (it’s me! Rebecca!) receive payment or compensation. Something to consider as you peruse my website. Thanks!

Latest on Instagram

Spring is in the AIR! (and in the sewing room!) 🌸 Spring is in the AIR! (and in the sewing room!) 🌸 🪡

Here’s a photo dump of some of my favorite quilts that feel like spring. 😍

This season is always so inspiring, as everything starts to come back like, you can open the windows in the sewing room, and the whole world just gets more colorful and bright. ✨

Let me know which one of these quilts is your favorite in the comments! 💕
.
.
.
#springquilting #quiltpatterns #springhobby #quiltinginspiration #quiltinghobby
There’s so much pressure on us in the quilting wor There’s so much pressure on us in the quilting world to finish what we started. 👇

But if you’re stuck staring at a stack of unfinished blocks, and it’s keeping you out of the sewing room because it’s the last thing you want to sew right now, this is the advice that I would give you. 

It’s okay to put a project down for a while. 🫶

I’ve had projects and quilts that sat folded up for weeks… months… even longer. Projects I avoided because I got stuck, or lost momentum, or honestly just wasn’t in the mood to sew that anymore. AND IT’S OKAY! 🙌

Every single time I came back to them after putting them down for a while, I felt that spark for sewing again. I felt the inspiration that I started the project with, and I started ENJOYING it again. ✨

So if you have something that you’re avoiding sewing, let this be your permission slip to just put it down and know that you’ll come back to it when the time is right. 

Put your favorite emoji in the comments if you needed to hear this. 💕

#quiltingadvice #quiltinginspiration #quiltingtips #quiltingforbeginners
Another month, another Dutch Summer block! 🤩 SWIP Another month, another Dutch Summer block! 🤩

SWIPE through to see them all so far, and comment ‘DUTCH’ if you want to sew along with us! 💌

#quiltblock #quiltinginspiration #quiltingforbeginners #blockofthemonth
You came for one quilt… …but then you saw the res You came for one quilt…

…but then you saw the rest of them. 😅

Inside the Make Modern Triangles Club, you get access to the full, growing library of Block of the Month programs along with many other bonuses and patterns! 🙌

Which means you can make one, or make them all! Which one is your favorite? Tell me in the comments. 💕

Comment ‘CLUB’ if you want to join and make your very own beautiful quilt!

#quiltpattern #modernquilting #quiltblock #quiltcommunity #quiltinghobby
I’m not even exaggerating when I say that I probab I’m not even exaggerating when I say that I probably would have saved hundreds of hours if I knew the magic of freezer paper piecing when I first started quilting. 😅

There was a time when I almost gave up quilting altogether because I HATED paper piecing so much, and it took me so long. 

Having to sew through your foundations, spend countless hours ripping paper from the seams, having sore fingers, and not even wanting to do it anymore... That’s where I was with the whole paper piecing thing. Ready to just throw in the towel. 

And then a friend introduced me to Freezer Paper Piecing, and it changed my life forever. I have never looked back, and now I LOVE paper piecing. 🙌

Instead of tearing paper out of every seam, I could just peel it off… and use it again... and again... and again! 

It was like magic. And it still feels like magic every time I do it! 🪄

Comment “FREEZER” if you want to take my free class and experience the magic yourself. 💕

#foundationpaperpiecing #freezerpaperpiecing #quiltingbeginner #modernquilting
What are you currently sewing??? Tell me in the co What are you currently sewing??? Tell me in the comments! ✨ ⬇️

#sewingasmr #quiltingasmr #quiltinginspiration #quiltinglife #quiltinglifestyle
Follow on Instagram

Browse by Category

Archives

  • Instagram
  • Facebook
  • Pinterest
  • email
Spring is in the AIR! (and in the sewing room!) 🌸 Spring is in the AIR! (and in the sewing room!) 🌸 🪡

Here’s a photo dump of some of my favorite quilts that feel like spring. 😍

This season is always so inspiring, as everything starts to come back like, you can open the windows in the sewing room, and the whole world just gets more colorful and bright. ✨

Let me know which one of these quilts is your favorite in the comments! 💕
.
.
.
#springquilting #quiltpatterns #springhobby #quiltinginspiration #quiltinghobby
There’s so much pressure on us in the quilting wor There’s so much pressure on us in the quilting world to finish what we started. 👇

But if you’re stuck staring at a stack of unfinished blocks, and it’s keeping you out of the sewing room because it’s the last thing you want to sew right now, this is the advice that I would give you. 

It’s okay to put a project down for a while. 🫶

I’ve had projects and quilts that sat folded up for weeks… months… even longer. Projects I avoided because I got stuck, or lost momentum, or honestly just wasn’t in the mood to sew that anymore. AND IT’S OKAY! 🙌

Every single time I came back to them after putting them down for a while, I felt that spark for sewing again. I felt the inspiration that I started the project with, and I started ENJOYING it again. ✨

So if you have something that you’re avoiding sewing, let this be your permission slip to just put it down and know that you’ll come back to it when the time is right. 

Put your favorite emoji in the comments if you needed to hear this. 💕

#quiltingadvice #quiltinginspiration #quiltingtips #quiltingforbeginners
Another month, another Dutch Summer block! 🤩 SWIP Another month, another Dutch Summer block! 🤩

SWIPE through to see them all so far, and comment ‘DUTCH’ if you want to sew along with us! 💌

#quiltblock #quiltinginspiration #quiltingforbeginners #blockofthemonth
You came for one quilt… …but then you saw the res You came for one quilt…

…but then you saw the rest of them. 😅

Inside the Make Modern Triangles Club, you get access to the full, growing library of Block of the Month programs along with many other bonuses and patterns! 🙌

Which means you can make one, or make them all! Which one is your favorite? Tell me in the comments. 💕

Comment ‘CLUB’ if you want to join and make your very own beautiful quilt!

#quiltpattern #modernquilting #quiltblock #quiltcommunity #quiltinghobby
Follow on Instagram
© 2026 Bryan House Quilts