• About
    • Privacy Policy
  • Teaching
    • Member/Student Login
    • Online Programs
  • Shop
  • Member/Student Login
  • Blog
    • Free Quilt Patterns – Scrappy Whirligig Quilt

Bryan House Quilts

Girl Friday Sews {Traveling in Circles Tote}

Tutorial

3 Apr

Fabric Mutt

Hi there, I’m so excited to share this tutorial as part of the Girl Friday Sews Blog Hop with you today.
But first a little peak of where I work.
Our living room is where we (all four kids, mommy and daddy) work and play. It is also the first room you see when you walk into our home. Naturally this room has to serve its purpose but also look the part. So, housed in every drawer, door, and basket are supplies. For example, in the baskets on the lower part of the bookshelves pictured are blocks and puzzles and other toddler friendly goodies. Our home school supplies are kept in containers and live in closets or on shelves until our home school days.
The piano is a recent addition. It belonged to my husband’s Granny Mary.
In the picture below, you can see our computer armoire opened up. This is where I can pull up a chair and use the computer to blog and goof off get ready for our school days. Continuing with the container theme, the red milk crates housed in the armoire hold curriculums for my older daughter (1st grade) and my middle daughter (preK). When these things are not in use, I can safely and neatly shut the armoire door, for a clean look.


My mother made the quilt on the wall as our wedding gift. It is a signature quilt.
You see, some people are container gardeners. They grow their tomatoes and flowers in pots on patios or in other found places.  I am a container organizer, which basically means I organize my mess in containers.  Sometimes the containers are cute. Sometimes they are rubbermaid. I’m aiming for cute with the tutorial I’m sharing today!

I made the “Traveling in Circles Tote” in the hopes of having a cute place to organize my hand sewing things. I’d love to have it so that I can pick up this pouch and sew while watching the kiddos play or conducting a quiet part of our homeschool days. (I’m thinking English Paper Piecing! My fav!)
Pockets filled with paper templates, perle thread, regular thread,  and needles.

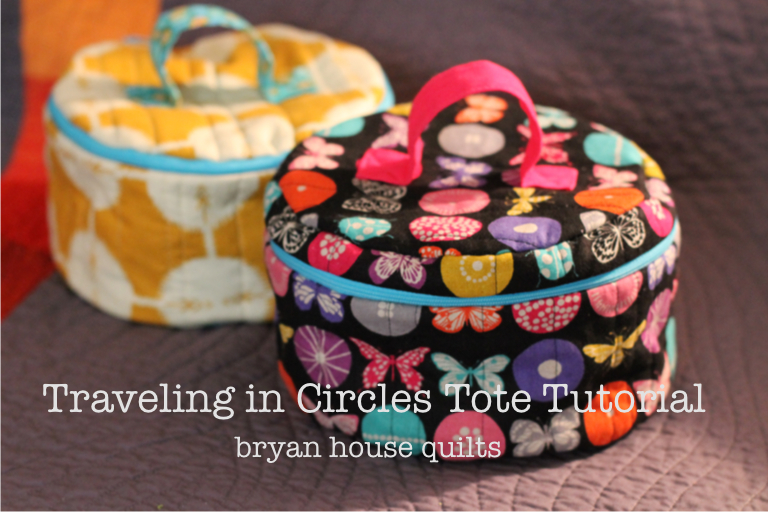
The Traveling in Circles Tote has a place for everything with customizable interior pockets and two zippered pockets on the inside of the lid. You may find this design familiar if you are a fan of Vera Bradley. I have a Vera Bradley bag of a similar design. It’s one of my favorites but instead of buying a new one, I wanted to make one displaying some of my favorite fabrics. I’m in love with the results and I’m happy to share how to make one for yourself.

A few notes before we get started. This tutorial is very long. I don’t know if I’ve ever seen one longer! So pack a snack. The project isn’t hard, but it is a multi-step project.  Hence the length. If you have any questions please let me know in the comments. I will answer back in email form as well as in the comments if I feel other readers would benefit.

Thank you for reading and thank you to Heidi for including me in the Girl Friday Sews Blog Hop.

* * *

Traveling in Circles Tote Tutorial
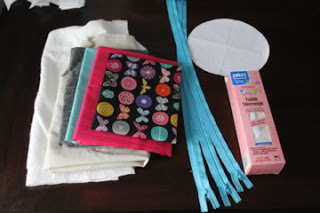
Materials:

* one half yard print (I used an Echino print)
* one half yard solid (I used Essex hot pink linen)
* 3 zippers: {1} 22 inch non separating,  2 at least 6 inches non separating
* Lightweight muslin
* Batting scraps
* 8 inch Circle Template (download here)
* Optional: light weight interfacing (Pellon 906F is shown and used on my yellow version pictured above.)

Cutting:

Print and cut out the downloaded circle template.
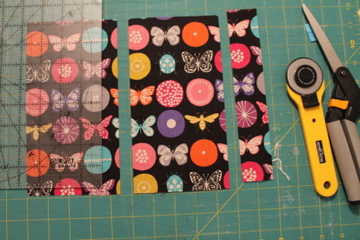
(Link above.) Fold your paper template into quarters. During the side panel assembly and bag assembly steps, you will need to mark your circular and cylindrical pieces at each quarter.

From the print cut:

      {2} 8.5 inch squares (pouch body)*
      {1} 6 inch by 26 1/8 inch rectangle (pouch body)*
      {1) 4 inch by WOF strip (pocket)
      {1} 10.5 inch by 8.5 inch rectangle (top, double zipped pocket)
      {5} 4 1/8 inch by 1.5 inch strips (zipper tabs)
Not pictured: handle pieces
*Interfacing recommended if you use plain ole’ cotton. Cut equivalently sized interfacing and apply to wrong side of these pieces per manufacturers directions.
From the solid cut:
      {2} 8 inch circles from Circle Template (bottom lining, top double zipped pocket lining)
      {1} 6 inch by 26 1/8 inch rectangle (inside panel and pocket lining)
      {1} 4 1/8 inch by 1.5 inch strip (zipper tab that shows from the lining)
      {1} 3 inch by 8 inch strip (handle)
From the muslin cut:
      {2} 8.5 inch squares (pouch body)
      {1} 6 inch by 26 1/8 inch rectangle (pouch body)
From the batting cut:
      {2} 8.5 inch squares (pouch body)
      {1} 6 inch by 26 1/8 inch rectangle (pouch body)
      {1} 1 inch by 6 inch strip

Quilting:

Make three quilt sandwiches:

Makin’ sammiches
    {2) 8.5 inch squares sandwiches = muslin + batting + print
(Note: I did this wrong in my pictures, I didn’t use muslin. It wasn’t the end of the world, but I wasted a good chunk of my Echino and pink fabrics that are hidden now. Sad face.)
    {1} 6 inch by 26 1/8 inch sandwich = muslin + batting + print
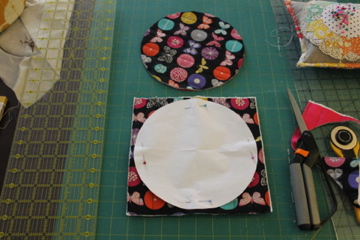
Cutting circles from quilted squares
Quilt sandwiches as desired. I did random straight lines.
From the now quilted squares, cut two 8 inch circles using the circle template.

Now you have your exterior top and bottom and side panels. Set these three quilted pieces aside.

Inside Pockets:

Now for making the inside side pockets.
First, take your inside lining piece (6 inches by 26 1/8 inches) and cut 1.5 inches off. Now you will have two pieces: {1} 4.5 inches by 26 1/8 inches and {1} 1.5 by 26 1/8 inches. Set the 1.5 inch strip aside for now.
With your pocket fabric (4 inches by WOF), you will need to do two things: 1) Hem the top edge. I used a rolled hem, which didn’t go so well with the linen. So fold and press the top edge under 1/4 inch. Repeat. Then top stitch using a 1/8 inch seam allowance from the top edge. 2) Leaving 6 inch thread tails on both ends, run two long basting/gathering stitches 1/8 and 1/4 inch from the bottom of your pocket piece. (I only used one stitched at 1/4 inch.)
Preparing pocket piece
Using the prepared pocket piece and the lining piece mark the center of each and pin them together at the center.
Pocket and lining centered and pinned.
(so bummed my pocket is turned upside down!)
Now, you will make your pockets. Working with the right side of the pocket, pull on one thread tail (or both bobbin tails if you sewed two lines of basting stitches) to gather the pocket fabric until you reach your desired pocket depth. You will pin to mark your pocket seams. Be sure to pin your fabric so it is resting straight and not pulled in one direction. Also be sure to pin in a straight line. In the picture below, the pin pair on the right is pinned correctly (straight) and the pin pair on the left is incorrect (not lined up, fabric misaligned).
Pin to mark where to sew your pocket seams.
Play with your gathers and notions to see 1) how big you want your pockets and 2) how many pockets you want. I ended up with 8 pockets of varying size. I also had about 5 inches of pocket fabric hanging off the lining fabric on both sides.


I’m happy with these pockets and I’m ready to do the other side.


Repeat to make the left half of your pocket.

Once you are satisfied with your pockets, stitch along the bottom edges using a 1/8 inch seam allowance.


Next, sew your pocket seams. Starting at the bottom edge of your pocket, begin sewing vertically, backstitch, and continue stitching.


It’s like connect the dots for sewing.


Keep sewing until you reach the top of the pocket being sure to backstitch to secure the top edge of the pocket to the lining.


The picture below shows one finished pocket seam. Sew all of your pockets seams being sure to also sew along the two sides using a 1/8 inch seam allowance.

A pocket seam

Once you are finished, turn your pocket and lining over and trim off the excess pocket fabric.

Excess pocket fabric trimmed.
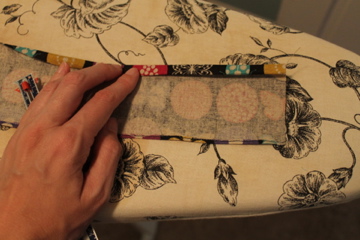
Side assembly:

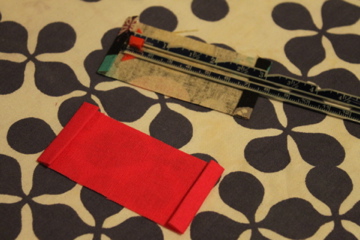
In this step you will make the side panel of the carrying case. You will need your inside side pocket sewn in the previous step and the quilted side panel.First, take the quilted exterior side panel (6 inches by 26 1/8 inches) and cut 1.5 inches off. Now you have two pieces: {1} 4.5 inches by 26 1/8 inches and {1} 1.5 by 26 1/8 inches.

Next you will make your zipper tabs. Choosing {2} 1.5 inches by 4 1/8 inch strips, fold each short side under 1/4 inch, press, repeat. Note: both sides of the zipper tabs will show; so one should match the exterior and the other should match the lining.

Making sure the zipper is not twisted, sandwich zipper ends in between zipper tabs and pin in place.

Sew along each short end using a 1/8 inch seam allowance.

Grab your four lining pieces. Matching the short ends together, fold in half with right sides facing together. Stitch along the sides using a 1/2 inch seam allowance. When sewing the piece with the pockets, make sure the pockets don’t accidentally get sewed.

Press each seam open.

Note: I used pins to mark each quarter of the circle.

Using the circle template, mark each quarter of a circle for each piece. I used pins. You can see them in the above picture.

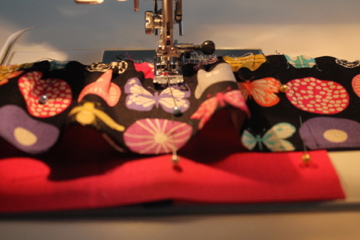
Using the bottom exterior panel right side facing out and the zipper right side facing in. Match the top edges together, matching first the quarter circle marks, and pin in place. Stitch along the upper edge using a 1/8 inch seam allowance.

Next, turn the lining piece with pockets inside out and right side up (pockets down).  Place it over the exterior piece (with zipper still at the top). Match the quarter circle marks first and then pin around the circle. Sew along the top edge using a 1/4 inch seam allowance.

Flip the piece right side out matching the bottom of the lining piece to the bottom of the exterior piece. Press. Pin the bottom edges together and baste together using a 1/8 inch seam allowance.

baste raw edges together

Next you will sew the upper portion of the side panel. First turn your bottom exterior inside out and right side up (pockets down). With your upper exterior piece right side out (right side – to – right side) line up the upper edges of these pieces, matching quarter circle marks first, and pin in place. Sew along the upper edge using a 1/8 inch seam allowance.

Leaving the upper exterior piece in place, turn the skinny upper lining piece inside out. Putting the upper lining piece over the circle, matching quarter circle marks first pin in place. Sew along the upper edge using a 1/4 inch seam allowance.

lining pieces should be right side to right side in the step

Turn the side panel right side out and press upper portion of the tote. Match and pin the upper edges together and baste using a 1/8 inch seam allowance.

Match and pin the raw edges of the upper portion together

Good job! Set the side panel aside for now.

Top, Double Zipped pocket:

In this step you will make the pockets inside the top lid.Take your remaining {4} 1.5 inch by 4 1/8 inch strips, fold in half and press.

Taking the last two zippers, pin a zipper tab (folded side toward the zipper) in place at the top of each zipper. Top stitch along the folded edge using a 1/8 inch seam allowance.

Pin the remaining two zipper tabs about 6 inches from from the top of the zippers. Sew along the folded edge using a 1/8 inch seam allowance.

Trim the zipper tails to a 1/2 inch.

Taking the 8.5 by 10.5 inch rectangle, cut {1} 1.5 by 8.5 inch strip and {2} 4.5 inch by 8.5 inch strips.

Lay your pieces out like so. This is where we are headed.

Pin the zipper on the right (in the above picture; in the below picture, it is the top zipper) to the center piece. Stitch in place.

Press seam to the side. Do NOT top stitch. Repeat with the zipper on the bottom.

Press and trim excess fabric. This piece will be your center divider.

Pin and sew the side pieces on to the corresponding zipper (e.g. right side to right zipper). Press seams to the side.

Top stitch only on the side (not along the center divider).

Only top stitch on the side and not in the center.

Repeat with the other side.

Pin your circle template to this piece being sure to center the zippers. Cut out.

Match your zippered circle to your lining circle (right side up, right side up). Pin in place.

Baste the circles together using a 1/8 inch seam allowance. Top stitch both zippers along the center divider. These top stitched seams will create each pocket.

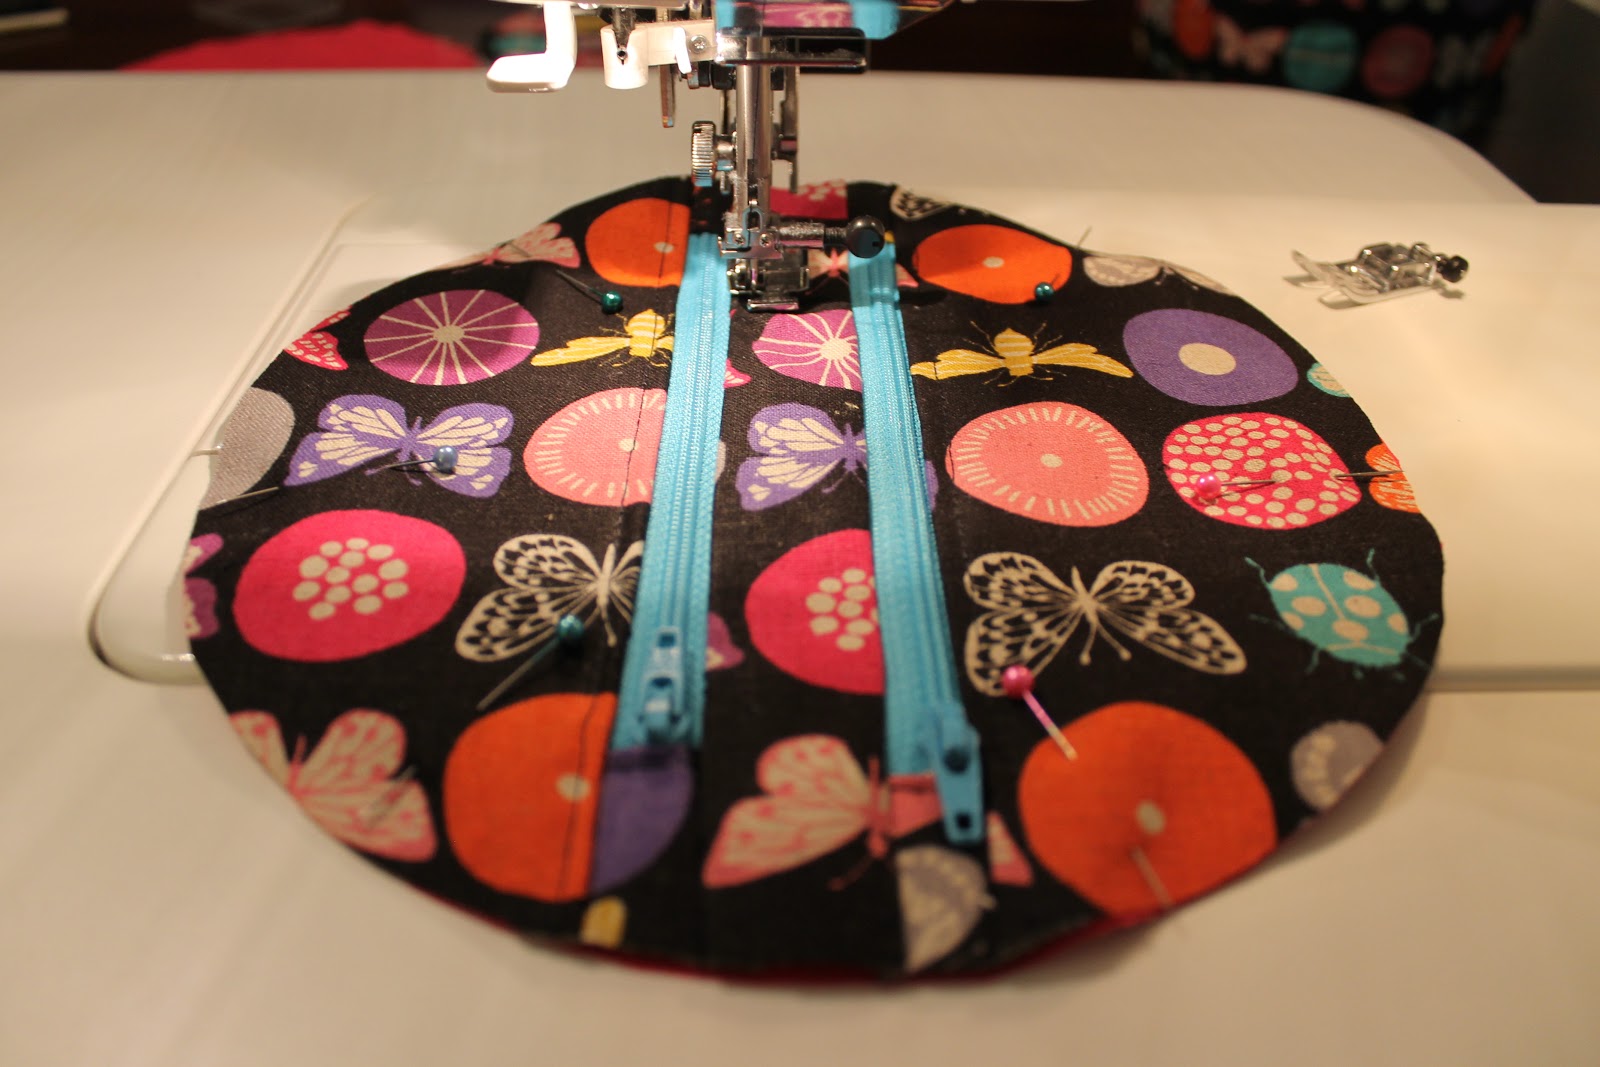
This is what the back (wrong side) will look like when you are finished.

Handle:

This is the last step before assembly! To make the handle you will need the 3 inch by 8 inch strip, the 1 inch by 6 inch piece of batting, as well as the top exterior circle panel.
Fold each long edge under by 1/4 inch. Press.
Fold the handle piece in half, matching folded edges together. Press. Unfold the piece and center and tuck the batting under one folded edge. Fold it back together, and press. Top stitch along each long edge using a 1/8 inch seam allowance.
I could have done a better job centering, but no big deal.
On the right side of your top exterior circle, along the center line place a mark at 2 inches and 6 inches. These marks indicate where the handle begins.
Line up one raw edge of the handle along the mark and pin in place. Stitch along the raw edge using a 1/8 inch seam allowance.
Match the other raw edge of the handle to the other mark and pin in place.
Stitch along the raw edge using a 1/8 inch seam allowance.
Next, on each side of the handle, pin one inch of the handle material flat against the top. Stitch parallel to each pin (or perpendicular to the handle). Stitch along the now folded edges where the handle begins and stitch an “X” to secure the handle to the top. Repeat for the other side.
Stitching the “X”
Handles secure. Note there is a line of stitching where the pin is.

Assembly:

Almost done! While not necessary, a heavy duty needle and wonder (or binder) clips will help tremendously with assembly.
Before pinning pieces together be sure to mark each piece at each quarter circle.
ready for assembly!
First, you will need the side panel turned inside out and right side up (pockets down) and the top exterior, upside down.

Match the quarter circle marks first and pin all around the edges.

Sew along the pinned edges using a 1/4 seam allowance.

Voila.

Second, turn this piece upside down (pockets up) and get your top lining, zipper side down and half way open.

Matching the quarter circle marks together first, pin all around the edges. Take care to squish everything out of the seam line ensuring you won’t accidentally sew a stray pocket. Leave a good chuck unsewn for turning right side out. I left an entire quarter of the circle open.

Kinda looks like a scared turtle at this point.

Sew along the edge using a 1/2 inch seam allowance.

Carefully clip seams so the circle will lay flat. Gingerly turn it right side out. You will need to hand stitch the opening closed.

Ok, two more then done.

Now, turn your carryall right side out and upside down (pockets up). Take your lining fabric and place in right side down. Match quarter circle marks first and pin in place. Sew along the pinned edge using a 1/4 inch seam allowance.

Last! Turn the beast right side up (pockets down) and still right side out. Grab your bottom exterior.

Almost done!

Place your bottom exterior right side down on top. Match and pin first the quarter circle marks (mine are pins seen in the picture below) and then pin all around.

Place top right side down, my picture is deceiving because I used my exterior as the muslin.
It’s about to disappear. Sad face.
Mid pinning and clipping

Again, take care to squish everything away from the seam line. Also leave a quarter of the circle open (unstitched) for turning right side out.

Stitch around the edges using a 1/2 inch seam allowance. Carefully clip seam allowances and gingerly turn right side out.

Hand stitch the two openings closed and you are done my friend!

You may notice my prototype had a different construction.

The tote finishes at 8 inches across and 5 inches tall.


Finished! Celebrate!


Now, load up your new favorite tote.  Make one for your hand sewing projects.


Make one for your cosmetics.


I know I’m already planning at least one more. One of my daughters has already claimed the one made from Anna Maria Horner fabrics.
Once you’ve made and stuffed one, show it off to your friends! Heidi has created a Girl Friday Sews Flickr group.  Please add your picture to the pool. We’d love to see what you’ve made!
And tomorrow, be sure to check out Amanda’s Girl Friday Sews tutorial. I’m sure you’re in for a treat.

(Updated: Here’s the PDF.) 

Previous Post: « A duffle for mom
Next Post: Tote Bags {Finishes for Friday} »

Reader Interactions

Comments

  1. LJ says

    April 4, 2013 at 1:29 am

    What an amazing pouch! I was really interested in seeing your construction particularly adding the zipper around the pouch. Great tut; thanks.

  2. Nat at Made in Home says

    April 4, 2013 at 7:12 am

    This is just amazing! Wuld be really useful around my house!

  3. Charlotte says

    April 4, 2013 at 8:30 am

    that is incredible!!!!!! I am very VERY impressed!

  4. Deborah says

    April 4, 2013 at 12:10 pm

    Wow – amazing!

  5. Taryn says

    April 4, 2013 at 3:20 pm

    Fantastic project! I love any type of case and I really like all the zippers and storage space in this one. The butterfly fabric is so cute! Thanks for the tutorial. It is on my to-do list!

  6. Pam Quiltaholic Biswas says

    April 4, 2013 at 5:38 pm

    This is wonderful. I can't wait to try it. Thanks for the excellent pictures and tutorial.

  7. Kristy @ Quiet Play says

    April 4, 2013 at 10:56 pm

    Oh my goodness – that is the cutest tote!! Adding this to my to-do list! Thanks for the tute – fabulous!

  8. Beth says

    April 6, 2013 at 3:21 pm

    That is such a cute tote! And thanks for including the detailed tutorial!

  9. jmday says

    April 6, 2013 at 11:38 pm

    This looks SO much like my tutorial on SewMamaSew. http://sewmamasew.com/blog2/2012/06/readysetgo-round-travel-bag/

  10. Amira@littlemushroomcap says

    April 7, 2013 at 3:15 am

    Love this..love all the extra pockets and all..will be making one definitely someday!
    Thanks!

  11. Elsa says

    April 7, 2013 at 12:57 pm

    Here from Pink Chalk's blog ~ thanks so much for the wonderful tutorial! Love this little circle case!

  12. Julie C. says

    April 10, 2013 at 3:48 pm

    This is genius! All of my hand sewing work stored in one place! Thank you so much for sharing. I'm visiting from Fabric Mutt.
    Julie @ The Crafty Quilter

  13. Melissa says

    April 10, 2013 at 8:27 pm

    Very detailed tutorial and adorable bag, but I'm having a hard time picturing how big the final product is. Do you have finished dimensions?

    • rebeccabryan says

      April 11, 2013 at 2:31 pm

      Yes, great question and I've added the answer in the tutorial. It finishes at about 8 inches in diameter and 5 inches tall.

  14. Cheryl says

    April 11, 2013 at 5:55 pm

    I love this!

  15. Anita says

    April 12, 2013 at 11:12 pm

    Very cute, love it!

  16. Diane Quilts says

    April 15, 2013 at 4:00 pm

    So adorable and great instructions!

  17. quirky granola girl says

    April 15, 2013 at 9:15 pm

    that tutorial looks like a ton of work! thank you for sharing it. i'm definitely pinning it for later.

  18. Laura says

    April 16, 2013 at 12:11 pm

    I am currently making the tote and have a question about the final assembly. At the step where you are addind the top lining (the part that has the 2 zippers on it) you have the body of the bag turned inside out and pockets UP. This puts the top lining on the BOTTOM of the bag (I did this and had to remove it). So, I put the top lining, right side down on the other end (pockets DOWN) and when I turned it right side out I ended up with the entire bag stuck between the two top layers. Clearly I'm missing something crucial and would appreciate any help you could give. My little bag is starting to look sad and haggard with all the manhandling 🙁

    • rebeccabryan says

      April 16, 2013 at 1:56 pm

      I'm sorry for the frustration. That stinks. Hey I see you are in Boston, I hope you and your loved ones are safe. We have been praying for you guys.

      Anyways, I think I see the problem. When you attach the top lining, you initially had the set up correct – body of the bag turned inside out and pockets up. I think where the error occurred was in the pinning. It seems that you pinned the top lining to the bottom of the bag and found that to be wrong. Instead, make sure you pin the top lining circle to the upper part of the tote (which is upside down, so the top is at the bottom, close to the table in my picture.) You will have to crush the sides down and away from the seam line to pin. Once you pin it, it should look like a hiding turtle from all the crushing you will have to do.

      During the last step (when you attach the bottom exterior) the same mistake could occur. So be careful!

      I hope this helps. Let me know if it works out or if you have another question.

    • Laura says

      April 16, 2013 at 7:56 pm

      Yes! I was stuck in traffic this morning ruminating on this and suddenly realized the issue. I missed the part about pinning the top lining to the top by crushing everything in the middle. Your reply confirms this. I ended up doing the reverse of what I was supposed to do. I can't wait to get home and finish it. It is a super cute tote and despite my cognitive lapse, fun to make. Thanks!
      BTW, thanks for the positive thoughts. Boston is a sad place today.

  19. patternpile says

    April 30, 2013 at 8:19 pm

    You did a great job on this. Fabulous! I featured your tutorial at PatternPile.com today. 🙂

    • rebeccabryan says

      May 1, 2013 at 9:47 pm

      Thank you!

  20. Nilya says

    May 2, 2013 at 8:24 am

    Fantastic Pattern!!!

  21. yvette says

    May 2, 2013 at 9:08 am

    Thank so much for this great tutorial. I'm not sure to be able to make it, but I will try ! There are many pictures, that's so usefull to get it right. It's hard work to make a tutorial like this one, so really THANK YOU !!

  22. Emily's Mum says

    May 4, 2013 at 9:44 am

    Fantastic tutorial for a fantastic pouch. Thanks so much for sharing. This looks like a challenge but for a gorgeous result.

  23. kbzelazny says

    July 28, 2013 at 10:15 pm

    Laura
    Our brains must think alike because I had the same trouble that you did. Everything was perfectly clear up until that point. I really like the bag now that it's finished!! Also, I learned something about bag construction that I didn't know before-

  24. Unknown says

    September 12, 2013 at 10:30 pm

    Sorry for the naive question : do the measures include the seam allowance ?

    • rebeccabryan says

      September 13, 2013 at 2:00 am

      No problem. Yes, seam allowances are included.

  25. Tez says

    November 2, 2013 at 1:14 pm

    Love loved this. I modified the directions to make a longer bag without the quilting and added a cross body strap, for my daughter who travels every week with her volleyball team.
    Thank you so much for the tutorial. It's amazing.

  26. Kathleen Horn says

    November 22, 2013 at 2:26 am

    What is WOF?

    • rebeccabryan says

      November 22, 2013 at 4:08 am

      WOF is Width of Fabric or the measurement of the fabric from selvage to selvage.

      Hope that helps!
      Becca

    • Kathleen Horn says

      November 23, 2013 at 3:05 am

      Thanks! I'm new to sewing. Could ya tell?

    • rebeccabryan says

      November 23, 2013 at 4:36 am

      Well yah! I hope you enjoy it!

  27. mamita says

    January 7, 2014 at 12:33 am

    Thanks for sharing this beautiful project. Great tutorial, very well explained. Though it looks like a lots of work. Have a great week.

  28. A L says

    June 26, 2014 at 6:00 am

    Very nicely done tutorial. How is this bag different from the Sew Mama Sew 2012 Round Bag?
    http://www.sewmamasew.com/2012/06/readysetgo-round-travel-bag/

    • rebeccabryan says

      June 26, 2014 at 3:07 pm

      Hi there,

      The finished bags are quite similar. The construction is quit different. Among other things, the Sew Mama Sew tutorial finishes the raw seam allowances on the inside with bias tape. Which might be a bit more manageable than my tutorial. Also, how the bag body comes together is different too.

      Thanks for commenting!

  29. bluestripedroom says

    July 28, 2014 at 1:03 pm

    I absolutely LOVE this tutorial!!! Do you have it in a printer friendly version by any chance?

    • rebeccabryan says

      August 28, 2014 at 3:08 am

      Just adding a print friendly version in now…

  30. alix rapper says

    November 5, 2014 at 11:35 am

    I read your blog frequently and I just thought I’d say keep up the amazing work!
    the tao of badass review

  31. Tilkkuilo says

    December 27, 2014 at 10:22 am

    Thank you so much for this fabulous tutorial! I was able to build up the tote according to your good instructions, couldn't have done it without. If you like to see my version the address is http://tilkkuilo.blogspot.fi/2014/12/joulujuttuja.html. Sorry about the Finnish text but you can see the photo. Thank you and keep up the good work! I wish you all the best! Greetings from the North of Europe, Finland.

  32. Blanca says

    January 31, 2015 at 6:20 am

    Thank you very much! These will make great gifts.

  33. rrsims1 says

    February 6, 2015 at 8:47 pm

    I am interested to see if this can be altered to have a lingerie bag on the actual lid? Sort of a hinged bottom zippered bag?? I hope that makes sense…

    • rrsims1 says

      February 6, 2015 at 8:48 pm

      In what step would that be added? Any ideas?

  34. Regina says

    April 8, 2015 at 4:29 pm

    Thank you so much for the pdf for this pattern…it's very cute and will make a nice set for a Mother's Day gift. Happy Mother's Day to you Rebecca in case I miss you!! xo Regina

  35. Meggles says

    June 3, 2015 at 12:22 am

    Thank you for your generosity, sharing this sweet pattern .. xo meggles

  36. Carole-Jayne Watson says

    June 8, 2015 at 1:52 pm

    I just love this pattern, thank you. What I like best is that it would be so adaptable to so many people's needs – seniors for keeping their bibs and bobs, kids to keep their treasures, obviously anyone who does any kind of handiworrk, but also families for keeping the flipping remote controls and reading glasses! I see many in my future! Thank you.

  37. Color Holidays says

    July 13, 2015 at 11:42 am

    Good post….thanks for sharing.. very useful for me i will bookmark this for my future needs. Thanks.
    Kashmir Tour Package

  38. Megan Calista says

    August 17, 2015 at 5:02 am

    Mitra303 | Bola Online | Agen SBOBET | Agen Poker | Agen IBCBET | Agen Judi
    Agen Judi
    Bandar Judi
    Agen Bola Online
    Bandar Bola
    Agen SBOBET
    Agen Casino
    Agen Poker
    Agen IBCBET
    Agen Asia77
    Agen Bola Tangkas
    Prediksi Skor

    Prediksi Skor MANCHESTER

    UNITED VS CLUB BRUGGE KV 19 Agustus 2015
    Prediksi Skor RAPID VIENNE VS

    SHAKHTAR DONETSK 20 Agustus 2015
    Prediksi Skor DINAMO MINSK VS FC SALZBOURG 20 Agustus 2015

  39. Tya Dali says

    September 2, 2015 at 12:58 am

    Hi there.i get lost on the part of pocket fabric 4 inch by WOF. Wad is the meaning of WOF?
    Thanks

  40. LynnandScott Mitchell says

    October 7, 2015 at 9:02 pm

    The PDF link isn't working how can I get the printer friendly version?
    Thank you

  41. John Lee says

    October 26, 2015 at 6:49 am

    Good Halong Bay cruises deals those nobody can ever provide. Join us to enjoy the unlimited promotions provided by Vietnam Tour Company before 2016

  42. James Clifton says

    December 15, 2015 at 1:39 pm

    A free Manchester wedding venues finding service, helping you locate the best venue for your important event in the UK.Have a look on some of featured venues.

  43. tamknitting says

    January 10, 2016 at 8:55 am

    Thank you very much for this fantastic tutorial! I think I would try it. Best regards

  44. tamknitting says

    January 10, 2016 at 8:56 am

    Thank you very much for this fantastic tutorial! I think I would try it. Best regards

  45. Kristine says

    April 7, 2016 at 5:09 pm

    How much did this cost you?

  46. Kristine ortiz says

    April 7, 2016 at 5:10 pm

    How much did this cost you?

  47. Katie says

    May 15, 2016 at 5:55 pm

    Hi, just compketed this project. It took me about 2 days because I had to adjust some of the pattern to suit my needs as a makeup case but overall was very pleased with the outcome. I wish I could post to you a photo so you csn see my funky fabric choice 🙂 anyhow I think this is a pattern I will use more then once, thank you.

  48. gwhiskey says

    September 15, 2016 at 7:49 am

    Great tutorial!!!!

  49. saim says

    September 29, 2017 at 6:44 am

    wow beautiful images and nice post thanks

  50. Sandra says

    July 16, 2018 at 2:26 pm

    I have been sewing all my life and i love this pattern but, i have a silly question…. on the cutting out i am to cut 1 piece 4 inches by WOF i have no idea what WOF is. could you please explain?

  51. Cathy says

    July 2, 2020 at 10:56 am

    I love this design, can’t wait to get this one made! Thanks

Trackbacks

  1. QAYG Traveling in Circles Tote – Bryan House Quilts says:
    February 27, 2016 at 7:59 pm

    […] been wanting to make a quilt as you go (QAYG) Traveling in Circles Tote for quite sometime. When I found myself with a few more scraps of Florence, Denyse Schmidt‘s […]

  2. WIP Wednesday {Quiet Work} – Bryan House Quilts says:
    February 29, 2016 at 2:59 pm

    […] 10, 2013February 3, 2016 After the torrent of tutorial writing last week, this week calls for a bit more quiet time work. Also, I wanted an English Paper […]

  3. Tote Bags {Finishes for Friday} – Bryan House Quilts says:
    May 5, 2016 at 5:52 pm

    […] help me remember my things. It worked today!  And also I finished my tutorial for my “Traveling in Circles Tote” as part of the Girl Friday Sews Blog Hop. Pop over to the tutorial to get all the […]

  4. 10 Free Tote Bag Patterns – Linda Matthews: Digital Textile Art & Design says:
    June 29, 2016 at 3:39 pm

    […] Traveling in Circles Tote This cute Traveling in Circles Tote is the perfect bag to organize all your sewing […]

  5. Shirt Blog says:
    August 14, 2016 at 9:05 pm

    Manchester United Tote Bag

    […] ne. In the picture below, the pin pair on the right is pinned correctly (straigh […]

  6. Notion Blog says:
    August 18, 2016 at 8:53 am

    Allary Home And Travel Sewing Notions Case

    […] t is pinned correctly (straight) and the pin pair on the left is incorrect (not […]

  7. How to "Make Up" a DIY Makeup Bag - says:
    January 18, 2018 at 10:00 am

    […] Circle Tote Tutorial found on Bryan House Quilts […]

  8. Five for Friday – Travel Handmade – AURIbuzz says:
    May 3, 2019 at 3:57 pm

    […] 3 – Traveling in Circles Tote by Rebecca Bryan of Bryan House Quilts […]

Primary Sidebar

New Classes for March 2026

Join the 2026 Block of the Month Program

Get my Modern Triangles Quilt Book

Get my Modern Rainbow Quilts Book

Image shows cover of the book "Modern Rainbow Quilts"

Save your Spot: Free Class

Make the Solstice Quilt!

Solstice Block of the Month by Bryan House Quilts

Get Your Invite!

Make Modern Triangles Logo

Make the Sparkler Quilt!

Image Shows Sparkler Quilt Top by Rebecca Bryan

Make the Echo (Echo!) Quilt

Echo BOM now open to join

Make the Wildflower Quilt!

Wildflower Block of the Month by Bryan House Quilts

Make the Stargazer Quilt!

Anne's Stargazer BOM

Make the Rainbow Triangles Quilt!

Rainbow Triangle BOM, modern triangle quilt, Rebecca Bryan

About

Hey there! I’m Rebecca, an author and teacher and freezer paper piecing evangelist. I’m also the founder of the Make Modern Triangles Quilt Club.

Disclosure

Just so you know, my site includes affiliate links from which I (it’s me! Rebecca!) receive payment or compensation. Something to consider as you peruse my website. Thanks!

Latest on Instagram

Spring is in the AIR! (and in the sewing room!) 🌸 Spring is in the AIR! (and in the sewing room!) 🌸 🪡

Here’s a photo dump of some of my favorite quilts that feel like spring. 😍

This season is always so inspiring, as everything starts to come back like, you can open the windows in the sewing room, and the whole world just gets more colorful and bright. ✨

Let me know which one of these quilts is your favorite in the comments! 💕
.
.
.
#springquilting #quiltpatterns #springhobby #quiltinginspiration #quiltinghobby
There’s so much pressure on us in the quilting wor There’s so much pressure on us in the quilting world to finish what we started. 👇

But if you’re stuck staring at a stack of unfinished blocks, and it’s keeping you out of the sewing room because it’s the last thing you want to sew right now, this is the advice that I would give you. 

It’s okay to put a project down for a while. 🫶

I’ve had projects and quilts that sat folded up for weeks… months… even longer. Projects I avoided because I got stuck, or lost momentum, or honestly just wasn’t in the mood to sew that anymore. AND IT’S OKAY! 🙌

Every single time I came back to them after putting them down for a while, I felt that spark for sewing again. I felt the inspiration that I started the project with, and I started ENJOYING it again. ✨

So if you have something that you’re avoiding sewing, let this be your permission slip to just put it down and know that you’ll come back to it when the time is right. 

Put your favorite emoji in the comments if you needed to hear this. 💕

#quiltingadvice #quiltinginspiration #quiltingtips #quiltingforbeginners
Another month, another Dutch Summer block! 🤩 SWIP Another month, another Dutch Summer block! 🤩

SWIPE through to see them all so far, and comment ‘DUTCH’ if you want to sew along with us! 💌

#quiltblock #quiltinginspiration #quiltingforbeginners #blockofthemonth
You came for one quilt… …but then you saw the res You came for one quilt…

…but then you saw the rest of them. 😅

Inside the Make Modern Triangles Club, you get access to the full, growing library of Block of the Month programs along with many other bonuses and patterns! 🙌

Which means you can make one, or make them all! Which one is your favorite? Tell me in the comments. 💕

Comment ‘CLUB’ if you want to join and make your very own beautiful quilt!

#quiltpattern #modernquilting #quiltblock #quiltcommunity #quiltinghobby
I’m not even exaggerating when I say that I probab I’m not even exaggerating when I say that I probably would have saved hundreds of hours if I knew the magic of freezer paper piecing when I first started quilting. 😅

There was a time when I almost gave up quilting altogether because I HATED paper piecing so much, and it took me so long. 

Having to sew through your foundations, spend countless hours ripping paper from the seams, having sore fingers, and not even wanting to do it anymore... That’s where I was with the whole paper piecing thing. Ready to just throw in the towel. 

And then a friend introduced me to Freezer Paper Piecing, and it changed my life forever. I have never looked back, and now I LOVE paper piecing. 🙌

Instead of tearing paper out of every seam, I could just peel it off… and use it again... and again... and again! 

It was like magic. And it still feels like magic every time I do it! 🪄

Comment “FREEZER” if you want to take my free class and experience the magic yourself. 💕

#foundationpaperpiecing #freezerpaperpiecing #quiltingbeginner #modernquilting
What are you currently sewing??? Tell me in the co What are you currently sewing??? Tell me in the comments! ✨ ⬇️

#sewingasmr #quiltingasmr #quiltinginspiration #quiltinglife #quiltinglifestyle
Follow on Instagram

Browse by Category

Archives

  • Instagram
  • Facebook
  • Pinterest
  • email
Spring is in the AIR! (and in the sewing room!) 🌸 Spring is in the AIR! (and in the sewing room!) 🌸 🪡

Here’s a photo dump of some of my favorite quilts that feel like spring. 😍

This season is always so inspiring, as everything starts to come back like, you can open the windows in the sewing room, and the whole world just gets more colorful and bright. ✨

Let me know which one of these quilts is your favorite in the comments! 💕
.
.
.
#springquilting #quiltpatterns #springhobby #quiltinginspiration #quiltinghobby
There’s so much pressure on us in the quilting wor There’s so much pressure on us in the quilting world to finish what we started. 👇

But if you’re stuck staring at a stack of unfinished blocks, and it’s keeping you out of the sewing room because it’s the last thing you want to sew right now, this is the advice that I would give you. 

It’s okay to put a project down for a while. 🫶

I’ve had projects and quilts that sat folded up for weeks… months… even longer. Projects I avoided because I got stuck, or lost momentum, or honestly just wasn’t in the mood to sew that anymore. AND IT’S OKAY! 🙌

Every single time I came back to them after putting them down for a while, I felt that spark for sewing again. I felt the inspiration that I started the project with, and I started ENJOYING it again. ✨

So if you have something that you’re avoiding sewing, let this be your permission slip to just put it down and know that you’ll come back to it when the time is right. 

Put your favorite emoji in the comments if you needed to hear this. 💕

#quiltingadvice #quiltinginspiration #quiltingtips #quiltingforbeginners
Another month, another Dutch Summer block! 🤩 SWIP Another month, another Dutch Summer block! 🤩

SWIPE through to see them all so far, and comment ‘DUTCH’ if you want to sew along with us! 💌

#quiltblock #quiltinginspiration #quiltingforbeginners #blockofthemonth
You came for one quilt… …but then you saw the res You came for one quilt…

…but then you saw the rest of them. 😅

Inside the Make Modern Triangles Club, you get access to the full, growing library of Block of the Month programs along with many other bonuses and patterns! 🙌

Which means you can make one, or make them all! Which one is your favorite? Tell me in the comments. 💕

Comment ‘CLUB’ if you want to join and make your very own beautiful quilt!

#quiltpattern #modernquilting #quiltblock #quiltcommunity #quiltinghobby
Follow on Instagram
© 2026 Bryan House Quilts