• About
    • Privacy Policy
  • Teaching
    • Member/Student Login
    • Online Programs
  • Shop
  • Member/Student Login
  • Blog
    • Free Quilt Patterns – Scrappy Whirligig Quilt

Bryan House Quilts

Feathered Star Quilt Along {Week 2 – Cutting}

quilt along· quilt pattern

13 Jun

Hi again!

You know, I hafta be honest for a moment… without 90+ degree weather over here in The Hague, it really doesn’t feel like Summer! Now don’t you for a moment think I’m complaining about the lack of opressive weather… it just feels a bit off having a summer quilt along, ha!

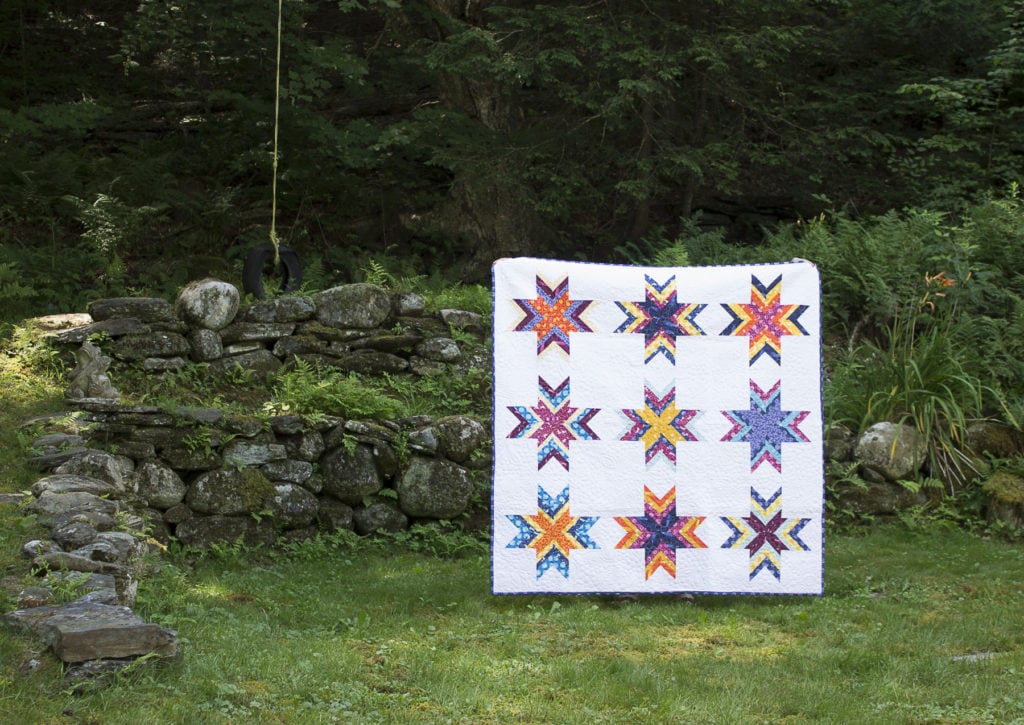
Anyhoo, welcome to Week 2 of our Feathered Star Quilt Along! Last week we talked about planning and over 300 of you RSVPed! Woo hoo! This week is our cutting week. In this post I’ll share my tips and tricks for cutting. You’ll need to purchase The Feathered Star quilt pattern for the exact measurements though.

Before we get into the meat of our post, I’d like to take a moment to thank this week’s sponsor Olfa. This week, Olfa is offering a 12×17 folding mat as well as the new 28mm Quick Blade Change cutter  to one lucky participant.

Last week’s winner of the $50 Stash Gift Certificate is @helensbsun on Instagram. Woo hoo!

How to follow along:

You have a few options to follow along:

  • Sign up for the weekly Quilt Along emails by clicking the RSVP button below.
  • Follow along on Instagram using the hashtag #BHQfeatheredstarQAL.
  • Every week, on Wednesday, I’ll be posting a quilt along blog post on my website.

RSVP HERE

Schedule of Events

First, let’s check out the schedule again…

Week 1 – June 6: Introduction and Planning

Week 2 – June 13: Cutting (you are here!)

Week 3 – June 20: Piece and Cut Strip Sets

Week 4 – June 27: Piece Blocks

(Mid QAL Break – Happy 4th of July!)

Week 5 – July 11: Piece Border Units

Week 6 – July 18: Assemble Quilt Tops

Week 7 – July 25: Quilting

Week 8 – August 1: Quilt Parade Link Up Party (Linky will close August 27th)

Closing Post – September 6

Materials

And let’s touch on the materials you’ll need:

  • 21 Fat Quarters for stars
  • 1 3/4 yards black-and-white stripe fabric
  • 3 yards black fabric for background
  • 5 yards backing
  • 84” x 84” batting
  • 5/8 yard black-and-white stripe fabric for binding

Alternative Layout Materials

Note: I’m working on adding the alternative instructions to the final Feathered Star pattern. If you’ve purchased a PDF pattern, you should have an updated version of the pattern in your inbox from my shop’s system. You’ll see the adapted pattern at the back. If you have a print pattern, email me and I’ll send you the alternative layout draft pattern. Please note that the alternative layout instructions is a draft. Hopefully by the time this quilt along is finished, those instructions will be tidied up!

For the alternative layout you’ll need:

  • 15 Fat Quarters for stars
  • 3 yards fabric for background
  • 4 yards backing
  • 70” x 70” batting
  • 1/2 yard fabric for binding

Cutting

You’ll need to purchase the pattern for the exact measurements, so be sure to purchase the pattern if you haven’t done so already. I do want to make sure I touch on a few potential modifications and road blocks in this post.

And one more note: If you arent’ sure about the background fabric you’ve chosen, then I would recommend making 1 test block first, before completing allllllll the cutting. Personally, this is my plan!

Tip: ALWAYS make a test block! Ask me how I know!

After making a test block, revisit this cutting post to complete the cutting.

Cutting the strips

Fat Quarter vs Quarter Yard

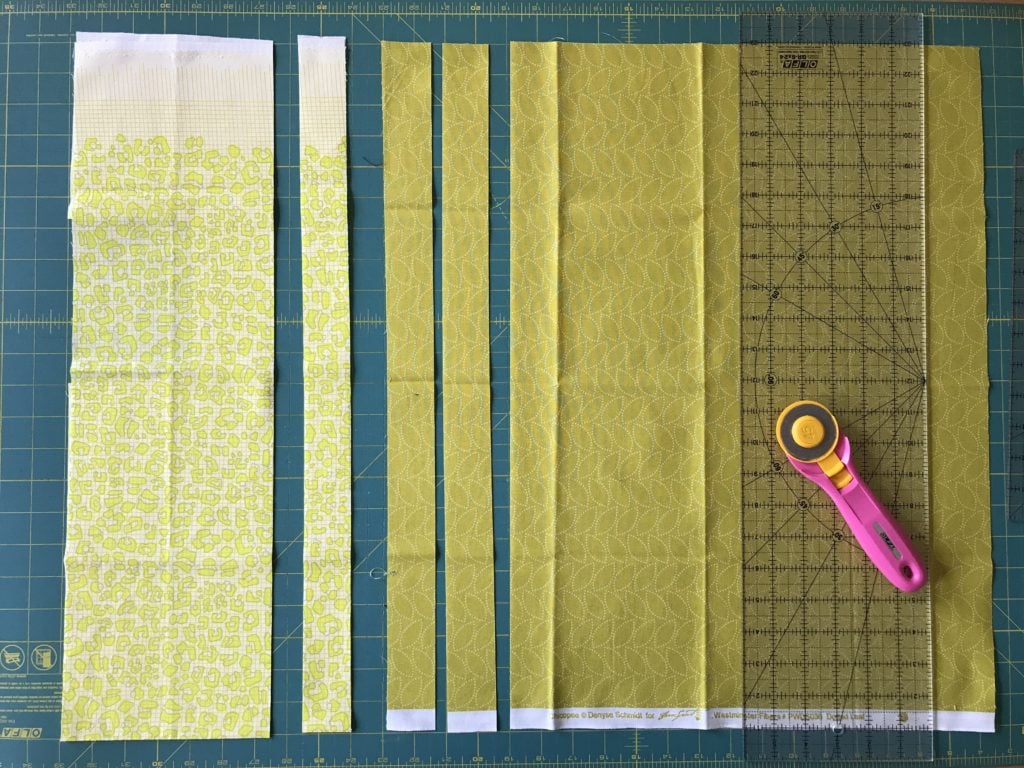
Quarter Yard on the left, Fat Quarter on the right

The pattern directions call for you to cut the strips for the stars from the Fat Quarters, but if you are using 1/4 yards you can cut strips from the 1/4 yards. If you are cutting from a quarter yard, instead of cutting 2 strips of each size, cut only one strip of each size

Also, If you know you will only be using a particular fabric in one star, only cut one strip of each size.

If you’re making a test block or just one block: Only cut one strip of each size from 3 fabrics.

Optional Layout

Only cut from 15 Fat Quarters.

Cutting the Stripe Fabric

If you are using stripe fabric, do pay special attention to the cutting directions and diagrams on page 2.

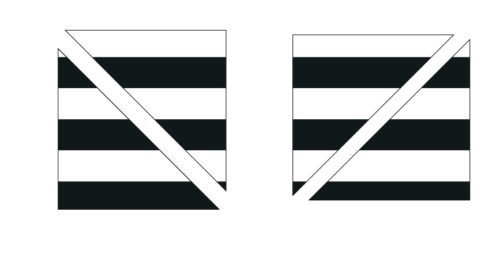
If you’re making a test block or just one block: Only cut 4 squares and then 8 triangles. But do mind the cutting orientation. Cut 2 squares diagonally in one direction and then the other 2 squares on the opposite diagonal as pictured above and on page 2.

Optional Layout

Instead of using stripe fabric, you’ll be cutting from your background fabric here. You’ll need to cut 36 of these triangles.

Cutting the Background

If you’re making a test block or just one block: Just cut 4 squares and then 8 triangles.

Optional Layout

Background Triangles: You’ll need to cut 72 of these triangles.

Sashing: You’ll also need to cut sashing. So from your background fabric, cut 11 strips 2 1/2” x WOF. From 3 strips cut 2 rectangles 2 1/2” x 18 1/2” for a total of 6 rectangles. Save the rest for the sewing the longer sashing strips.

This week’s sponsor

This week, Olfa is offering a 12×17 folding mat as well as the new 28mm Quick Blade Change cutter  to one lucky participant. So let’s give them a big ole’ quilty thank you for sponsoring our fun!

How to participate

We’re going to be doing most of our interaction on Instagram. To enter, post a pic of your cutting process this week on Instagram with the #bhqFeatheredStarQAL. Also, there are 300+ of you RSVPed, but I feel like I havne’t met anyone! I would love get to know you more, so be sure to introduce yourself in your post. I’ll choose a winner at random next Tuesday!

Fine print: This week’s prize can only be shipped to the USA or to Canada. You’ll need a public Instagram account.

By the way, for general chatter and ongoing discussion, you can also join my Facebook group “Quilting with Bryan House Quilts“.

Next Week

Next week, we’ll start grouping our strips into star groups, sewing the strip sets together, and making our star spokes! I will have a few tips and pointers to share with you to help you through that process.

Let’s get cutting! 🙂

Previous Post: « Feathered Star Quilt Along {Week 1 – Planning and Introductions}
Next Post: Feathered Star Quilt Along {Week 3 – Making the Star Spokes} »

Reader Interactions

Comments

  1. Angie T says

    June 14, 2018 at 1:50 pm

    I’m sorry to bother you, but I have a question. The original version has 3 different fabrics per spoke; however, the optional version and the coloring sheet show 4 different fabrics per spoke. I intend to make the optional version, and would prefer the 4 fabric spoke (plus the triangle). Should I cut my fabric per the optional instructions (which are the same as the original) and just sew together 4 strips rather than 3 as it says in the instructions? Will that alter the size of the triangles needed, and or the size of the block? Or if I want to use 4 fabrics per spoke should I cut my strips differently? I’m thinking the strips will need to be cut differently to use 4.

    I have another project to finish up today, if Ihave time, I may just play with some scraps and make a few sample blocks. If you have time, I’d love to hear your, or anyone else’s thoughts. Thank you.

    • rebeccabryan says

      June 15, 2018 at 1:32 pm

      Hey there!

      Yes, you can do 4 fabrics for sure, but you’ll want to cut the strips smaller. I don’t have the dimensions for those strips. I do know that you probably don’t want the strips wider than about 2inches. Also, try to aim to have the strips be at least 4.75 wide. You also might want to only cut a couple stars worth at first.

      Hope that helps!

      • Angie T says

        June 15, 2018 at 6:56 pm

        Thank you! That’s the direction I was heading. Hoping to get to playing with your pattern tomorrow ?

  2. Helen says

    June 15, 2018 at 2:28 am

    For the optional layout are the stars pieced the same as the layout with black background?

  3. Angie T says

    June 19, 2018 at 4:19 pm

    Did you see this? It’s a great color/layout option for your Feathered Star Pattern. I may just need to make another one (IF my first one turns out)
    https://instagram.com/p/BkOI_o4FuZo/

  4. Patricia Gallo says

    July 2, 2018 at 6:59 am

    Hello,
    I would like the instructions for the alternate layout of the Feathered Star quilt along. I will either use white or a cream color.
    Thank you
    Patricia Gallo
    grammys-girl@hotmail.com

    • rebeccabryan says

      July 4, 2018 at 4:08 am

      Hey there! No problem. Will you email me?

      bryanrp at gmail dot com

Primary Sidebar

New 2026 Block of the Month!

Graphic of Alchemy Quilt

Join the 2026 Block of the Month Program

Get my Modern Triangles Quilt Book

Get my Modern Rainbow Quilts Book

Image shows cover of the book "Modern Rainbow Quilts"

Make the Solstice Quilt!

Solstice Block of the Month by Bryan House Quilts

Get Your Invite!

Make Modern Triangles Logo

Make the Sparkler Quilt!

Image Shows Sparkler Quilt Top by Rebecca Bryan

Make the Echo (Echo!) Quilt

Echo BOM now open to join

Make the Wildflower Quilt!

Wildflower Block of the Month by Bryan House Quilts

Make the Stargazer Quilt!

Anne's Stargazer BOM

Make the Rainbow Triangles Quilt!

Rainbow Triangle BOM, modern triangle quilt, Rebecca Bryan

About

Hey there! I’m Rebecca, an author and teacher and freezer paper piecing evangelist. I’m also the founder of the Make Modern Triangles Quilt Club.

Disclosure

Just so you know, my site includes affiliate links from which I (it’s me! Rebecca!) receive payment or compensation. Something to consider as you peruse my website. Thanks!

Latest on Instagram

You can’t just go buy fabric like this. 👀 Because You can’t just go buy fabric like this. 👀

Because we live in a time where it’s becoming harder and harder to tell what was made by a person and what was created by a computer.

This is something worth talking about. 👇

For people who aren’t quilters, it’s easy to see any beautiful quilt in today’s world and think that the pattern must have been made by AI, or that the fabrics just come that way. 

These triangles weren’t generated in seconds. The fabrics don’t just come that way. 

They were cut one piece at a time, sewn one seam at a time, pressed, trimmed, arranged, rearranged, and stitched together over hours and hours spent in the sewing room, one day at a time. 

Each and every quilt represents DAYS spent in the sewing room, taking time for myself, creating instead of scrolling on the internet. 

And that’s one reason why I fell so deeply in love with the process. Because it’s not something you can just go buy. Quilting encourages us to slow down, learn something new, take time for ourselves, and use our hands. and create something that didn’t exist before. 

Take this as your nudge to get offline and go do something that you love today. Tell me what you’re doing in the comments. ✨ ⬇️

#modernquilting #quiltingtechnique #quiltpattern #quiltdesign #quiltersofig
👉 I refuse to spend hours ripping paper bits from 👉 I refuse to spend hours ripping paper bits from my seams from foundation paper piecing. 
👉 I ALWAYS attach the binding to the BACK first. 
👉 MAKE A TEST BLOCK... every single time. 
👉 I make notes on my foundations. 
👉 I make time for myself to be in my sewing room. 
👉 I buy pretty fabrics that make me go “Oooohhh, Aahhh!” 
👉 I don’t do Y seams. 

What would you add to the list? Tell us your quilting secrets in the comments. ⬇️

#quiltteacher #quiltingtutorial #quiltingtips #modernquilting
Comment ‘FREEZER’ for my free class to learn this Comment ‘FREEZER’ for my free class to learn this amazing paper piecing technique! 🌟

If your freezer paper is not sticking to your fabric, your iron might not be hot enough. 🔥

But be warned... 👇

You don’t want it to be TOO hot either. 

Use a HOT dry iron, and that should help your freezer paper stick to your fabric! 

The freezer paper needs enough heat to grip the fabric properly.

I also love using a wool pressing mat because it helps hold heat longer and makes the freezer paper stick even better.

When it comes to the quilting techniques, sometimes even a tiny adjustment can make a huge difference. 🙌

Quilters, do you ever struggle with this? Let me know in the comments and drop a ‘FREEZER’ below if you want to take my free class! 💌
Which personality type are you in the quilting gro Which personality type are you in the quilting group? 👀

That’s a part of what makes the Make Modern Triangles Club so much fun. 

We have ALL types of quilters. All ages, all skill levels, some brand-new, and some who have been in the club for years. 🙌

There are always new members joining, new projects started, and plenty of projects being finished and celebrated, too. 

It’s a community full of people who just get all the quirks of being a quilter. ✨

We’d love to have you join us and bring your personlity to the club. Comment ‘CLUB’ for details to join and I’ll send them your way. 💌

#quiltteacher #quiltingtutorial #quiltingtips #modernquilting
Comment ‘SUMMIT’ for your free ticket for the Quil Comment ‘SUMMIT’ for your free ticket for the Quilter’s Paradise Summit June 8th - 15th! ✨

One of my favorite things about quilting is how there’s always something new to try.

✨ A new technique.
✨ A new color combination.
✨ A new project that makes you think, “Okay, wait… that’s actually adorable.”

That’s the energy of the Fast-N-Easy Quilters Paradise Summit.

For an entire week, you’ll get to learn from 30 quilting experts sharing projects that are fun, practical, beginner-friendly, and completely inspiring.

Think quilted bookmarks, fabric boxes, mini quilts, coaster sets, bags, placemats, appliqué, freezer paper piecing, and so much more.

Basically… a very good excuse to spend the week sewing! 🪡

And it’s FREE. I’d love for you to join us. Comment ‘SUMMIT’ and I’ll Dm you the link to register. 💌 

#quiltteacher #quiltpattern #quilttop #quiltingtips #quiltingtutorial
Freezer Paper Piecing Tip number ONE! ⬇️ We’re st Freezer Paper Piecing Tip number ONE! ⬇️

We’re starting off strong with one of my absolute favorite things about the freezer paper piecing technique. 

And it’s that you can reuse your foundations!! I’ve had a foundation that I used 20 or more times... 😅

I know it doesn’t seem possible, but this is proof that it is! 

Why make a new foundation for every single block when you just reuse ONE for them all? 

That’s the magic of freezer paper piecing. ✨

Follow along for the rest of my tips that make paper piecing way easier, and comment ‘FREE’ if you want to sign up for my free class! 💌

#modernquilting #paperpiecing #foundationpaperpiecing #quiltingtechnique #quiltteacher
Follow on Instagram

Browse by Category

Archives

  • Instagram
  • Facebook
  • Pinterest
  • email
You can’t just go buy fabric like this. 👀 Because You can’t just go buy fabric like this. 👀

Because we live in a time where it’s becoming harder and harder to tell what was made by a person and what was created by a computer.

This is something worth talking about. 👇

For people who aren’t quilters, it’s easy to see any beautiful quilt in today’s world and think that the pattern must have been made by AI, or that the fabrics just come that way. 

These triangles weren’t generated in seconds. The fabrics don’t just come that way. 

They were cut one piece at a time, sewn one seam at a time, pressed, trimmed, arranged, rearranged, and stitched together over hours and hours spent in the sewing room, one day at a time. 

Each and every quilt represents DAYS spent in the sewing room, taking time for myself, creating instead of scrolling on the internet. 

And that’s one reason why I fell so deeply in love with the process. Because it’s not something you can just go buy. Quilting encourages us to slow down, learn something new, take time for ourselves, and use our hands. and create something that didn’t exist before. 

Take this as your nudge to get offline and go do something that you love today. Tell me what you’re doing in the comments. ✨ ⬇️

#modernquilting #quiltingtechnique #quiltpattern #quiltdesign #quiltersofig
👉 I refuse to spend hours ripping paper bits from 👉 I refuse to spend hours ripping paper bits from my seams from foundation paper piecing. 
👉 I ALWAYS attach the binding to the BACK first. 
👉 MAKE A TEST BLOCK... every single time. 
👉 I make notes on my foundations. 
👉 I make time for myself to be in my sewing room. 
👉 I buy pretty fabrics that make me go “Oooohhh, Aahhh!” 
👉 I don’t do Y seams. 

What would you add to the list? Tell us your quilting secrets in the comments. ⬇️

#quiltteacher #quiltingtutorial #quiltingtips #modernquilting
Comment ‘FREEZER’ for my free class to learn this Comment ‘FREEZER’ for my free class to learn this amazing paper piecing technique! 🌟

If your freezer paper is not sticking to your fabric, your iron might not be hot enough. 🔥

But be warned... 👇

You don’t want it to be TOO hot either. 

Use a HOT dry iron, and that should help your freezer paper stick to your fabric! 

The freezer paper needs enough heat to grip the fabric properly.

I also love using a wool pressing mat because it helps hold heat longer and makes the freezer paper stick even better.

When it comes to the quilting techniques, sometimes even a tiny adjustment can make a huge difference. 🙌

Quilters, do you ever struggle with this? Let me know in the comments and drop a ‘FREEZER’ below if you want to take my free class! 💌
Which personality type are you in the quilting gro Which personality type are you in the quilting group? 👀

That’s a part of what makes the Make Modern Triangles Club so much fun. 

We have ALL types of quilters. All ages, all skill levels, some brand-new, and some who have been in the club for years. 🙌

There are always new members joining, new projects started, and plenty of projects being finished and celebrated, too. 

It’s a community full of people who just get all the quirks of being a quilter. ✨

We’d love to have you join us and bring your personlity to the club. Comment ‘CLUB’ for details to join and I’ll send them your way. 💌

#quiltteacher #quiltingtutorial #quiltingtips #modernquilting
Follow on Instagram
© 2026 Bryan House Quilts