• About
    • Privacy Policy
  • Teaching
    • Member/Student Login
    • Online Programs
  • Shop
  • Member/Student Login
  • Blog
    • Free Quilt Patterns – Scrappy Whirligig Quilt

Bryan House Quilts

Mastering Improv Freezer Paper Piecing Techniques

Freezer Paper Piecing· Improv Quilting· Tutorial

21 Mar
Mastering improv with with freezer paper piecing techniques

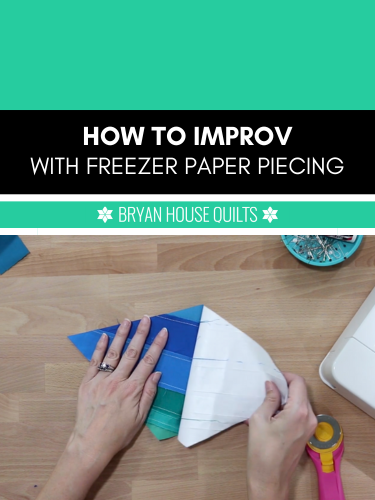
Improv and freezer paper piecing go together like birds of a…wait. Did I say improv and freezer paper in the same sentence? Yes, I did and it’s so doable.

99% of the time, I turn to freezer paper piecing to make modern triangles for accuracy and sharp points. After a marathon paper ripping session with traditional foundation paper piecing, I swore off all foundation paper piecing. Until…my friend intervened with a freezer paper piecing solution.

Now I use my favorite technique with improv piecing, even though perfect points aren’t the end game. It’s more about straight seams, efficiency and minimizing distortion. I get great results when I trim the blocks and you will, too. And you won’t need any fancy tools or materials.

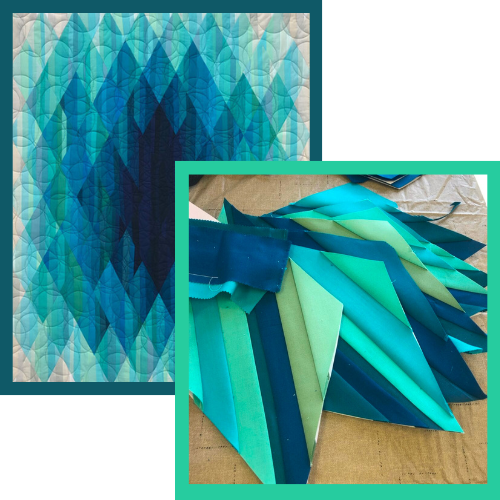
Watch the video tutorial or follow along below. I will show you how I used freezer paper piecing to make diamond blocks with strips for my Murmuration quilt.

Warning: This freezer paper piecing tutorial will change your quilting life. FOREVER.

Key Highlights

  • See how two very different techniques work together for great results.
  • Learn how freezer paper piecing creates a solid backing for your creations, especially strip piecing.
  • Say goodbye to torn papers and sore fingers—experience a smoother piecing process.
  • Use a versatile technique suitable for both beginners and experienced quilters.

Improv Freezer Paper Piecing Basics

TEMPLATES: In essence, freezer paper piecing involved using freezer paper templates as a guide.

SEAMS: Seams are straighter by stitching along the folded edge of the freezer paper on the fabric.

FOUNDATION: Pieces are lined up accurately with less chance for distortion AKA wonkiness. The freezer paper holds your pieces in place as you add more pieces. The shiny side sticks temporarily to the backside of the fabric when pressed with an iron.

NO RIPPING: Freezer paper is peeled away cleanly when the block is done – ripping little bitty bits of foundation paper off the backside is no longer YOUR nightmare.

MATERIALS AND TOOLS: You’ll need a few basic supplies including freezer paper, a rotary cutter, small cutting mat, fabric, an iron, wool pressing mat or ironing board, and basic sewing tools.

Optional items: Walking foot and add-a-quarter ruler.

The Unique Benefits of Using Freezer Paper for Piecing vs. Paper Foundations

The shiny side of the freezer paper adheres to the wrong side of the fabric, acting as a temporary adhesive that keeps your pieces perfectly aligned during sewing. This remarkable feature eliminates shifting and ensures accurate stitching, ultimately saving you time and effort. What’s more, unlike traditional foundation paper, freezer paper can be cleanly peeled away after stitching, leaving your fabric and stitches intact—no more picking out stubborn paper bits!

Freezper pieced blocks from Murmuration pattern using improv techniques

Tutorial

Setting up your the Sewing, Pressing and Piecing Stations

I like to set up three stations within arm’s reach to streamline the process:

  • Sewing Station: I like to use a walking foot because it feeds the fabric evenly. It’s optional but consider trying it out for even edges at the ends of seams. Keep a rotary cutter and a small cutting mat for trimming threads and making quick cuts. Set the stitch length to 2.2 mm.
  • Pressing Station: A clean dry (no steam) iron and a small wool pressing mat are ideal for this technique. Optional: I sometimes use a seam roller instead of finger pressing.
  • Piecing Station: Clear the deck! This is where you’ll assemble your blocks. Set your pieces in stacks on a clean work surface next to your machine. Having a design wall nearby can also be beneficial for visualizing your layout as you piece.

Preparing your template for improv paper piecing

If you have an inkjet printer, you can print your templates directly onto the dull side of freezer paper. See my tips on choosing freezer paper and how to print foundations.

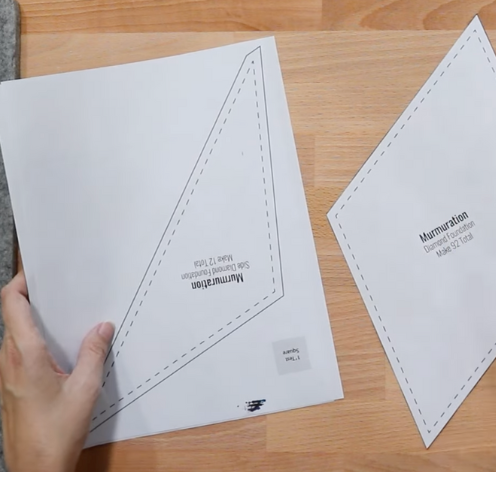
After printing (or drawing) your design, carefully cut out the template pieces using sharp scissors.

  • Transfer any markings or notes onto the freezer paper template itself. These markings show the fabric placement and stitching order.

Step-by-step guide to ADDING sewing strips

Pressing fabric onto a template

1. Check to make sure your fabric piece is larger than the template by at least a ¼ inch. In this case, I compared the strip length with the diamond template.

selecting strips, pressing freezer paper onto fabric and folding techniques for improv freezer paper piecing.

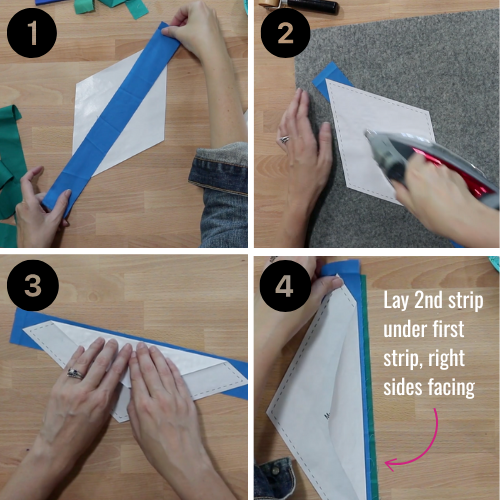
2. Always position your fabric piece wrong side up and lay the template’s shiny, waxy side face down over it. The matte paper side will be facing you – press your iron on it for a few seconds.

3. Next, fold your paper back on the first section fold line. Remember that your stitching line will be along the edge of the folded paper, not a quarter inch away. This ensures that your seam allowances will be accurate when you press your fabric open.

For better accuracy, use a stiletto or a seam ripper to help you keep your fabric aligned with the edge of the paper as you stitch.

4. Place the second fabric strip underneath the first strip, right sides together and aligning the straight edges. The template will be on top, guiding your stitching.

Slowly stitch along the fold.

If your seam allowance is larger than a quarter inch, use a rotary cutter and an add-a-quarter ruler to trim away the excess fabric.

Unfold the paper over the stitched pieces. Press on the matte paper side.

Improv freezer paper piecing techniques for adding fabric strips

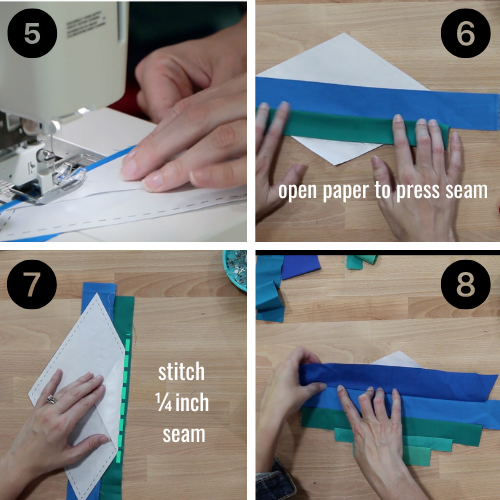
5. Slowly stitch along the fold.

If your seam allowance is larger than a quarter inch, use a rotary cutter and an add-a-quarter ruler to trim away the excess fabric.

6. Open/unfold the paper over the stitched pieces. Press on the matte paper side.

7. Continue by folding the paper back at the next line, aligning the edges of the third strip under the second one, right sides together. Stitch along the fold line to complete the seam.

8. I started in the center of the template and added strips to cover one side. Next, I turned the template around and repeated the process on the other half.

Tips for Pressing Seams

Pressing is a crucial step in freezer paper piecing. Proper pressing ensures crisp seams and a flat, professional-looking block, so let’s discuss the best practices.

9. Always press your seams on the back of your block, with the matte papery side of the freezer paper facing up. This helps to avoid any unwanted creases or marks on your fabric’s right side.

Pressing tips with freezer paper and peeling back the foundation after stitching

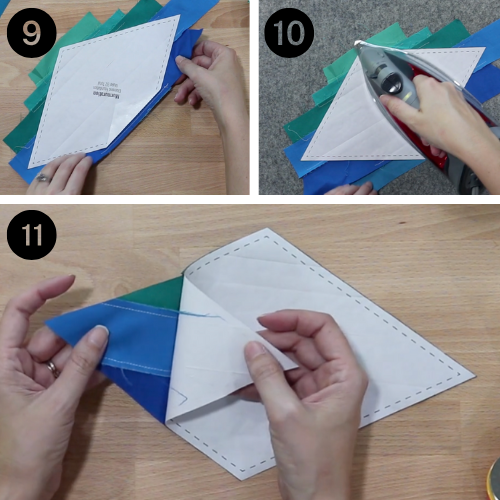
10. Using a hot, dry iron, gently press up and down on your seams. Avoid sliding the iron, as this can stretch and distort your fabric. Allow your seams to cool before moving on to the next step so the adhesive on the paper sets in place.

Remember, the key is to take your time, press carefully, and enjoy the process of bringing your unique creative vision to life!

Finishing Touches

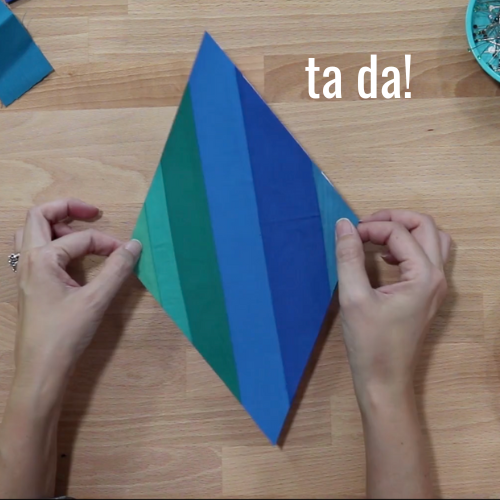
You’ve finished the blocks and it’s time for the reveal!

11. Gently peel the paper away from your fabric. Avoid fraying the raw edges by peeling toward the seams versus the raw edges. Works like a charm!

Give your block one final press. This time, press from the front side. This final press helps to set the stitches and gives your block a polished look.

Trimming and Squaring Up Your Pieced Work

Trimming and squaring up your pieced blocks are essential steps for achieving professional-looking results. Use a sharp rotary cutter to make accurate cuts.

Carefully align your ruler with the markings on your trimming template. Apply gentle pressure to the ruler to prevent it from slipping as you trim. Remember to trim all sides of your block evenly. A squared-up block ensures that your pieced units fit together seamlessly when assembling your quilt top.

finished diamond block

Best Practices for Improv Freezer Paper Piecing

In mastering improv freezer paper piecing techniques, you’ve unlocked a world of creative possibilities. By understanding the benefits of using freezer paper and mastering its application in your quilting projects, you can elevate your piecing game. Remember to set up your stations thoughtfully, prepare your templates meticulously, and sew with precision using the tips shared. Embrace the freedom of improvisation while maintaining a structured approach for stunning results. With practice, patience, and attention to detail, your pieced works will reflect your unique style and expertise. Get ready to embark on a quilting journey filled with innovation and artistry!

Frequently Asked Questions

Can freezer paper be reused for piecing more than once?

Yes, you can often reuse regular freezer paper for piecing a couple of times. After removing the excess fabric, smooth out the paper and store it for future use. However, the adhesive may lose its effectiveness after multiple uses.

More Quilting Resources

  • Press Flatter Quilt Seams Like a Pro
  • Paper Piecing Using Freezer Paper: 12 Expert Tips
  • How to Choose Types of Batting for Quilt Projects
Previous Post: « Echo BOM Progress in Pictures
Next Post: Echo BOM Month 3 Blocks…Blocks…Blocks! »

Primary Sidebar

New Block of the Month!

Join the 2026 Block of the Month Program

Get my Modern Triangles Quilt Book

Get my Modern Rainbow Quilts Book

Image shows cover of the book "Modern Rainbow Quilts"

Make the Solstice Quilt!

Solstice Block of the Month by Bryan House Quilts

Get Your Invite!

Make Modern Triangles Logo

Make the Sparkler Quilt!

Image Shows Sparkler Quilt Top by Rebecca Bryan

Make the Echo (Echo!) Quilt

Echo BOM now open to join

Make the Wildflower Quilt!

Wildflower Block of the Month by Bryan House Quilts

Make the Stargazer Quilt!

Anne's Stargazer BOM

Make the Rainbow Triangles Quilt!

Rainbow Triangle BOM, modern triangle quilt, Rebecca Bryan

About

Hey there! I’m Rebecca, an author and teacher and freezer paper piecing evangelist. I’m also the founder of the Make Modern Triangles Quilt Club.

Disclosure

Just so you know, my site includes affiliate links from which I (it’s me! Rebecca!) receive payment or compensation. Something to consider as you peruse my website. Thanks!

Latest on Instagram

I’ve just recently got all of these quilts back fr I’ve just recently got all of these quilts back from the quilter!!!! 😍

SWIPE to see them all and tell me which one is your favorite in the comments! 💕 👇

#quiltpattern #quiltinspiration #modernquilting #finishedquilt
I think as quilters, we sometimes get really wrapp I think as quilters, we sometimes get really wrapped up in a project or wanting to finish by a certain deadline, that we forget to just play. 🙌

Triangle blocks are especially fun for playing with! 

Because the same exact blocks can look completely different depending on how you arrange them.

All of a sudden, you’re not just following a pattern anymore, you’re creating something unique. 🪄

And I think that’s where a lot of the joy in quilting lives.

Not in getting it “right” or making it perfect, but in letting yourself be curious. 

Letting yourself try something, change it, try something else, and be a little playful instead of precise.

Some of my favorite quilts didn’t come from a perfectly planned layout… 👇

They came from standing at the wall, thinking, “Wait… what if I try it like this instead?” 👀

So if you have a few triangle blocks sitting nearby, take a little time to play with them and see what kind of pattern they end up in. 

Comment ‘TRIANGLE’ if you want to take my free class where I teach you how to make a modern triangle, and give you a block pattern to start sewing. 💕

#modernquilting #quiltingtechnique #quiltingforbeginners #beginnerquilter
This time of year in the sewing room is always so This time of year in the sewing room is always so lovely. 

We FINALLY get to have the windows open, the world outside is getting colorful again, and the extra daylight is a big bonus. 

This is my recipe for a PERFECT April sewing day...

✨ Self care: plan meals/snacks for eating right & getting your exercise (booooooo! I know, I know.) Maybe a fun wee treat tho!?

✨ Entertainment: if it’s just you, get your show/ sporting event/ audible, etc. Or if you’re with your quilty buds, you know what to do! Sew, gab, laugh!

✨ Something you’re excited to sew: latest bingeable project at the ready!? Latest fabric stack that arrived in the post? Or...finally get that WIP d.u.n!

✨ Essential responsibilities taken care of: feed the dog, respond to that time-sensitive email, dinner for the fam? Take care of what you must get done so you can check out more completely.

Finally, set a timer for your hard stop time.

I set my alarm for when I need to pick up my kiddos from school. That way, I can get carried away by my creativity and indulge in “me” time!

Shut the laptop, check out, it’s sew time! 🧵 Everything else on your to-do list can wait. It is time for you!

What are you working on for a perfect April sewing day? ⬇️

#quiltingprogress #quiltinginspiration #quiltpattern #springsewing
If my WIP pile was getting out of control… here’s If my WIP pile was getting out of control… here’s exactly what I’d do: ⬇️

👉 Find a community of quilters to connect with, learn from, and grow with. People who cheer you on, celebrate your blocks, and make you want to keep going!!! 

👉 Make it easier on yourself with freezer paper piecing. This technique completely changed my life. I wanted to give up on quilting altogether at one point before I found freezer paper piecing. 

It’s not that you don’t finish quilts…

It’s that you don’t have the right support or the right process yet. 🧵✨ Comment ‘FREE’ to take my free class, learn the freezer paper piecing technique, and get invited to join an amazing community. 💕

#quiltingcommunity #quiltingclass #quiltingtechnique #quiltinginspiration
One stitch at a time!!! 🪡 Sometimes, a few hours One stitch at a time!!! 🪡

Sometimes, a few hours (or days) in the sewing room just makes it all alright. 🙌

Who agrees? ⬇️

#quiltingismytherapy #quiltinglife #quiltingismybliss #quiltersgonnaquilt
Comment ‘FREE’ to sign up for the class! 🫶 One th Comment ‘FREE’ to sign up for the class! 🫶

One thing that will NEVER get old with freezer paper piecing... ⬇️

The number of blocks I can sew from just ONE foundation! 🙌

It always amazes me, and it’s one of my favorite things about the technique. 

I save so much time not having to make a new foundation for every single block, and that’s not to mention the time saved from not having to rip the paper bits of those foundations out of the seams. ✨

I’m hosting a free class where I teach you this technique, and give you a modern triangle block pattern to start sewing! 

Comment ‘FREE’ if you want to sign up! 🫶
.
.
.
#quiltingclass #quiltingforbeginners #foundationpaperpiecing #paperpiecing
Follow on Instagram

Browse by Category

Archives

  • Instagram
  • Facebook
  • Pinterest
  • email
I’ve just recently got all of these quilts back fr I’ve just recently got all of these quilts back from the quilter!!!! 😍

SWIPE to see them all and tell me which one is your favorite in the comments! 💕 👇

#quiltpattern #quiltinspiration #modernquilting #finishedquilt
I think as quilters, we sometimes get really wrapp I think as quilters, we sometimes get really wrapped up in a project or wanting to finish by a certain deadline, that we forget to just play. 🙌

Triangle blocks are especially fun for playing with! 

Because the same exact blocks can look completely different depending on how you arrange them.

All of a sudden, you’re not just following a pattern anymore, you’re creating something unique. 🪄

And I think that’s where a lot of the joy in quilting lives.

Not in getting it “right” or making it perfect, but in letting yourself be curious. 

Letting yourself try something, change it, try something else, and be a little playful instead of precise.

Some of my favorite quilts didn’t come from a perfectly planned layout… 👇

They came from standing at the wall, thinking, “Wait… what if I try it like this instead?” 👀

So if you have a few triangle blocks sitting nearby, take a little time to play with them and see what kind of pattern they end up in. 

Comment ‘TRIANGLE’ if you want to take my free class where I teach you how to make a modern triangle, and give you a block pattern to start sewing. 💕

#modernquilting #quiltingtechnique #quiltingforbeginners #beginnerquilter
This time of year in the sewing room is always so This time of year in the sewing room is always so lovely. 

We FINALLY get to have the windows open, the world outside is getting colorful again, and the extra daylight is a big bonus. 

This is my recipe for a PERFECT April sewing day...

✨ Self care: plan meals/snacks for eating right & getting your exercise (booooooo! I know, I know.) Maybe a fun wee treat tho!?

✨ Entertainment: if it’s just you, get your show/ sporting event/ audible, etc. Or if you’re with your quilty buds, you know what to do! Sew, gab, laugh!

✨ Something you’re excited to sew: latest bingeable project at the ready!? Latest fabric stack that arrived in the post? Or...finally get that WIP d.u.n!

✨ Essential responsibilities taken care of: feed the dog, respond to that time-sensitive email, dinner for the fam? Take care of what you must get done so you can check out more completely.

Finally, set a timer for your hard stop time.

I set my alarm for when I need to pick up my kiddos from school. That way, I can get carried away by my creativity and indulge in “me” time!

Shut the laptop, check out, it’s sew time! 🧵 Everything else on your to-do list can wait. It is time for you!

What are you working on for a perfect April sewing day? ⬇️

#quiltingprogress #quiltinginspiration #quiltpattern #springsewing
If my WIP pile was getting out of control… here’s If my WIP pile was getting out of control… here’s exactly what I’d do: ⬇️

👉 Find a community of quilters to connect with, learn from, and grow with. People who cheer you on, celebrate your blocks, and make you want to keep going!!! 

👉 Make it easier on yourself with freezer paper piecing. This technique completely changed my life. I wanted to give up on quilting altogether at one point before I found freezer paper piecing. 

It’s not that you don’t finish quilts…

It’s that you don’t have the right support or the right process yet. 🧵✨ Comment ‘FREE’ to take my free class, learn the freezer paper piecing technique, and get invited to join an amazing community. 💕

#quiltingcommunity #quiltingclass #quiltingtechnique #quiltinginspiration
Follow on Instagram
© 2026 Bryan House Quilts