Key Highlights
- Make a free candy corn Halloween quilt pattern with a triangle tutorial.
- Form quilt blocks by sewing strips, then cutting them into triangles.
- Many modern quilters like to make triangle quilt projects. They are easy and versatile.
- Use my tips to sew perfect points like a pro.
- See how to join triangles without stretching their bias edges.
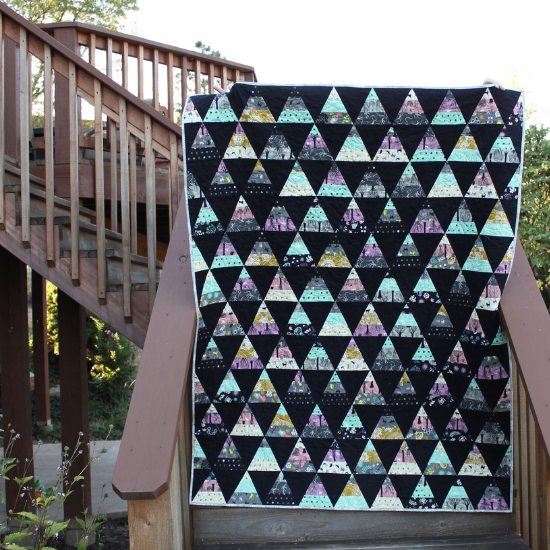
Free Halloween Quilt Pattern – Candy Corn
This triangle quilt shows everything I love about this holiday – gobling, ghosts and black cats – but especially CANDY CORN! When I spy them on grocery store shelves in August, I stock up!
Anyway…this free quilt pattern and tutorial looks more complicated than it is. I used a collection of Halloween novelty prints that I COULD NOT resist.
Tutorial: Halloween Quilt Pattern with Easy Triangles
Triangles are versatile blocks for Halloween quilts. You can make a good spider web quilt or any large hexagon quilt design. Each is a great example of triangle quilt designs to play with. Make small projects with leftover triangle blocks such a Halloween bunting quilt, table runner, or a ghost mug rug in fun Halloween prints.
If you’re new to sewing triangles, you’re triangle skills will be awesome when you’re done with this one. I’m sharing my pro tips for sewing with triangles in the post.
1. CHOOSING FABRICS
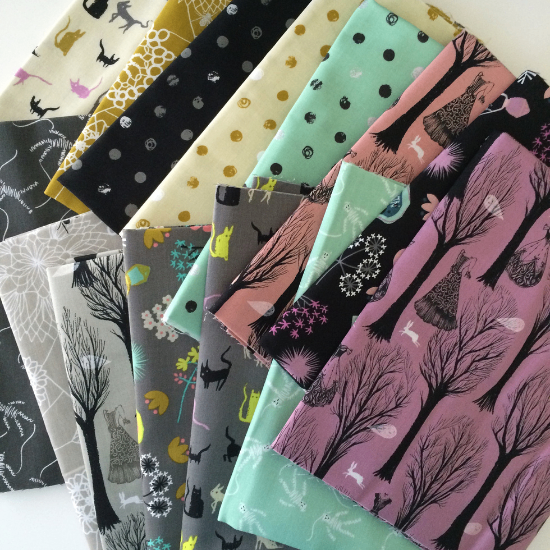
My palette includes shades of mint green, gold, gray, violet and black with light, medium and dark fabrics to create contrast with the background fabric.
Choosing a theme helps you pull an assortment of novelty prints together in Halloween colors, such as witches, haunted houses or skeletons. Your Halloween sewing can do double duty by choosing fall colors. Display the quilt throughout autumn for more snuggle time in November.
FABRIC REQUIREMENTS
Finished size is 54 x 72 inches.
- Fat quarters in novelty prints: 14 or 3 ½ yards assorted prints, cut into 2 ½-inch strips along the width of fold (crosswise/weft grain).
- Background fabric: 2 ½ yards fabric, strong contrast solid or blender
- Backing fabric: 4 yards
- Binding fabric: ½ yard
- Batting: 60 x 90 twin size piece
SUPPLIES
- Rotary cutter and straight ruler
- EZ Quilting Tri-Recs acrylic ruler
- Cutting mat
- 50 weight thread for piecing
- 80/12 size needle, Quilting or Microtex, for piecing
- Iron and pressing mat
- Best Press starch
Preparing Fabric
PRESS FABRIC AND CUTTING
Before cutting press the fat quarters and yardage with Best Press starch with a hot, dry iron.
PRO TIP: Use a rotary cutter and a straight ruler to cut 2 ½ inch strips along the straight grain. Uneven, wonky strips make scary Halloween quilt blocks, right?
PRO TIP: After you cut your strips, sort them by color and value. Spend less time looking through piles for the perfect strip when sewing. Ask me how I know.
Then create sets of 3 strips each, arranging them from light to dark values. You might use more of some fabrics than others. You will need 22 strip sets to get 5 triangles per set. A minimum of 108 print triangles are needed and extra for designing is always nice.
BACKGROUND FABRIC TRIANGLES:
Cut the yardage into ½ yards. Subcut each half yard into 6.5 inch pieces x 18 inches. Cut a mnimum of 108 triangles using the same method for the strip-pieced triangles.
Sewing
SEWING STRIPS
Place two strips right sides together. Clip or pin the long edges which prevents uneven strips. Start by sewing strips together with a 1/4 seam allowance. Keep the seam allowances consistent.
PRO TIP: Alternate seam direction when stitching each strip.
PRO TIP: Press, press, press! After you sew the strips, press the seams open or to one side, whichever you prefer. Then flip over and press the right side of the fabric. Lightly spritz the fabric with Best Press starch and press again using an up-and-down motion. A back-and-forth sliding motion will stretch the bias edges.
CUTTING TRIANGLES FROM STRIPS
I used my Sizzix Big Shot die cutting machine and a Bigz Pro 6 ½-inch Right and Isosceles Triangle Die (no longer available). A 6 ½-inch Tri Recs ruler will easily do the job (see link in Supplies).


For the first cuts in the row, line up the bottom edge of the 6.5 inch Tri-Recs ruler along the bottom edge of the strip (1). Cut off both sides with a rotary cutter.
Next, turn the ruler so the bottom edge is aligned with the top edge of the strip and the side of the ruler is lined up with the last diagonal cut on the strip. Cut on the uncut side of the triangle. Repeat on the entire strip. Each 3-piece strip set cuts into 5 triangles if using fat quarters.
Group your triangles again by strips sets (2).
Assembling The TriangleS – Halloween Quilt Pattern
LAYOUT
Lay the triangles out in 12 rows, alternating the strip triangles with the background triangles (3). Mix the colors, evenly distributing throughout the quilt. Lay out 10 print triangles alternating with 10 background triangles. Make 12 rows.
PIECING
Lay the longer edges of the triangles right sides together and clip to hold (3).
PRO TIP: Gently handle triangle edges when piecing. Allow the fabric to feed under the presser food without pulling or pushing it.
Prepare your quilt for finishing by making a quilt sandwich. (Link to blog post)
7. JOINING ROWS
Arrange the rows on your design wall. Start by stitching the top two rows together. Place it back on the design wall and sew the next two rows together. When all the rows are paired, sew the pairs together to form the quilt top.

PRO TIP: Put a pin in it! When matching the point, sew the seam allowance just a hair to the right of the intersection of points. Place a pin in that spot through all of the layers. It’s really okay to move the seam allowance a smidge so the points aren’t blunted.
8. FINISHING
Square up the quilt by trimming off the outer half of the triangles on each side.
I like fluffy, poofy quilts with allover, edge-to-edge designs that aren’t too dense.

You don’t have to make the entire Halloween quilt pattern here – pillows, trick or treat bags, coasters and table toppers are a great way to decorate for Halloween if you’re short on time. Either way, break out the candy corn.
xo Rebecca
What are the best Halloween quilt patterns for beginners?
Halloween-themed panel quilts are popular for their quick and easy sewing and decorating. Add a strip-pieced triangle border using this tutorial. Some panels only need batting, backing and binding to complete. A simple patchwork quilt made out of squares is easy with my Boos and Ghouls quilt pattern.
More Quilt Patterns for Halloween and Halloween Quilt Projects
Boos and Ghouls – Halloween Quilt Squares
A simple Halloween quilt for beginners and ghost lovers:
Halloween Themed Quilt Patterns / Halloween Quilt Designs
Here are a few Halloween theme patterns to check out for the perfect quilt for beginners to intermediate quilters:
- Elizabeth Hartman sampler quilt: Features a cat, bat, witch, star, pumpkin, owl, spider, candy corn and ghost. I would make it an all ghost quilt!
- Jedi Craft Girl offers a free pumpkin quick mini quilt that uses lots of scraps, fat quarters or 10-inch squares to make the quilt blocks for the Pumpkin Mini Quilt.
- Scrappy Table Runner
- Front Runner 4 Ghosts Table Runner

I tried to see if there was a download to print out this pattern..
not at this time, thanks!