• About
    • Privacy Policy
  • Teaching
    • Member/Student Login
    • Online Programs
  • Shop
  • Member/Student Login
  • Blog
    • Free Quilt Patterns – Scrappy Whirligig Quilt

Bryan House Quilts

Quilt Photography Link-Up {August}

Tutorial

25 Aug

So, I’m no professional photographer and for years I let a bad grade in a high school photography class intimidate me and keep me from enjoying the art of taking pictures. But within the past couple of years, I made a committment to improve my photo taking skill set. I’m glad I got over my fears and happy to share a bit of what I’ve learned with you and with Beth’s Quilt Photography Workshop  Link Up.

Plum and June

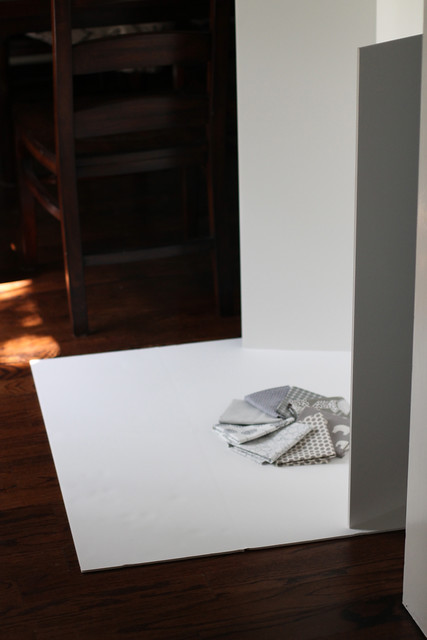
 This month, Beth’s call was to blog about how we photograph our stash. First, I’ll share my set up. In the picture below, you can see the two white trifold poster boards on my dining room floor in media-res. This set up works well for me in that I let you, the viewer, see only what I want you to see. You can’t see the mess or the toys, or in some cases little arms and feet of the little ones in the background. Sometimes, they like to help. 🙂

Also, the white boards are functional in that they take the light from the window and reflect it back upon the fabric. My dining room is fairly dark even on bright days (boo!) but the white backdrops help make the most of the natural light coming from the window.


IMG_6956

Next up, before I take pictures of my fabric I make sure the fabrics looks nice. I tend to like the look of uniformity so I make sure to fold it all the same way. For this shoot (look at me with the lingo!), I had to refold some fabrics and even press them (gasp and boo, so much work!). And then I arrange my fabrics so they look pretty – in this case a swirl and a stack.

Depending on if I’m in a rush I will shoot in Manual or Aperture priority. Those are my favorite modes. I’ve only recently been confident in the Manual setting, so I feel cooler than I actually am. 🙂 For these photos I must have been in a rush because I shot in Aperture priority, so the shutter speeds are a bit fast, which works for me because I sometimes prefer to under-expose my shots.

Next I will show you how I process my photos. I usually process them in the computer program on my computer – iPhoto.

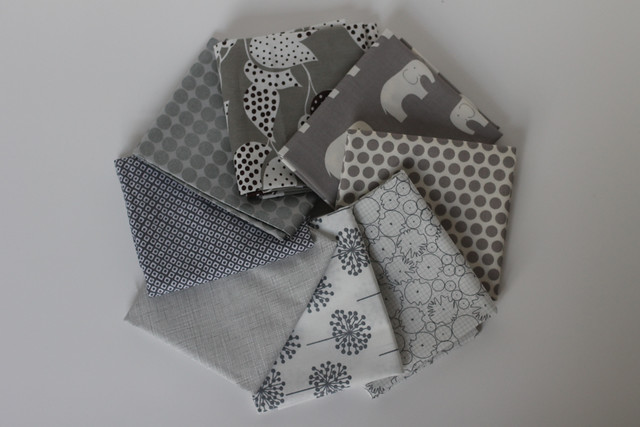
Here’s the image of the swirl of gray fabrics before processing. A swirl array lets the viewer see what each fabric looks like. This shot is kind of gray and there’s a lot of background. But it’s a good shot because I can work with it – everything’s in the frame and it’s all in focus.

 IMG_6961

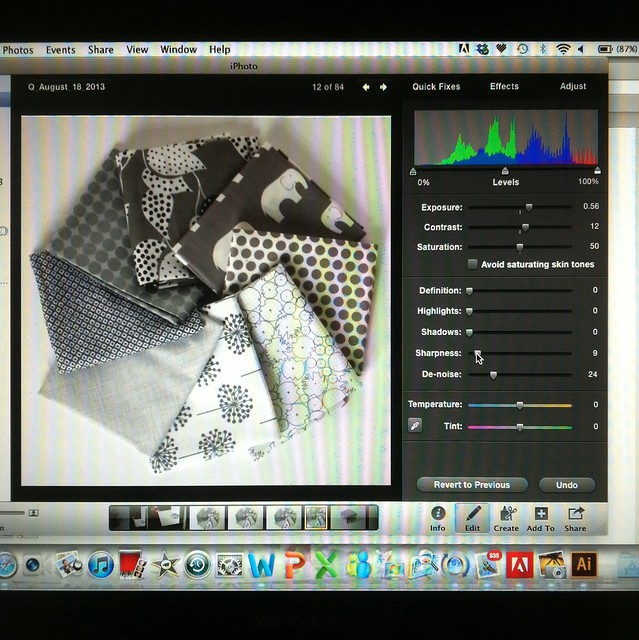
Here’s an iPhone shot of how processed this image. As I was saying sometimes I like to underexpose my shots just a bit. The reason being that I like to make sure I don’t loose any details in the white fabrics by over exposing them. Then I bump up my exposure during processing.  So here’s what I did: bumped up my exposure, and the sharpness, and then de-noised the shot a bit. I also cropped the picture too.

Untitled

Here’s the final image of the gray swirl post processing.

IMG_6961
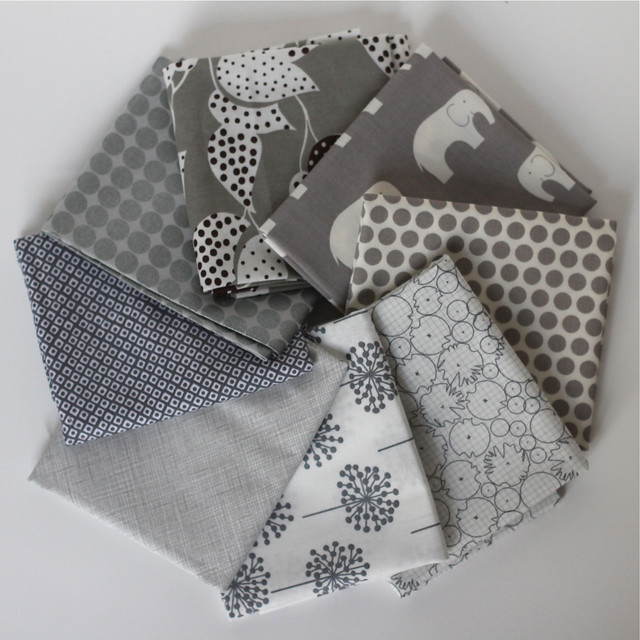
f/2.5, ISO 800, 50 mm, 1/320 

Here’s the image of the gray stack before processing. I like the stacks because they look so pretty and you can get a nice blur while still seeing the fabric. This shot is again kinda gray – but it’s workable in that what I want is in focus and everything’s in the frame. IMG_6969

Here’s an iPhone shot of how I processed this photo. I bumped up the exposure, contrast and the saturation. I also cropped the sucker.

Untitled

Here’s the final image of the gray stack post processing.

IMG_6969
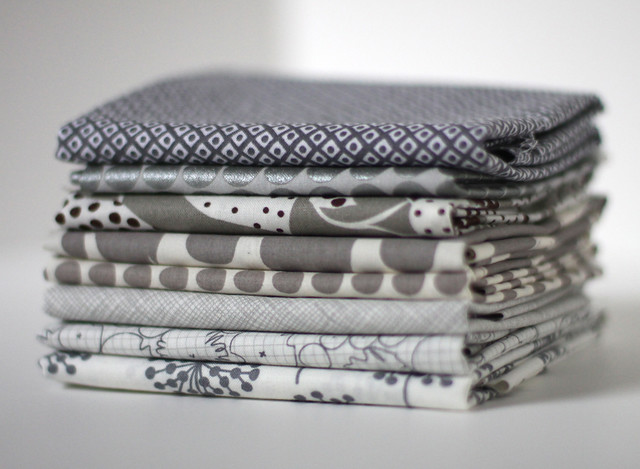
f 1.4, ISO 800, 50 mm, 1/1600

That’s all for now. The thing about my experience with photography and what works for me is that I find I am learning so much that this will likely change. It will be fun to see how I take pictures next year. And maybe after I go read all the other contributors’ posts.

Thanks for visiting!

Previous Post: « Staple Dress {Finish}
Next Post: Fresh Sewing Day {What the September!} »

Reader Interactions

Comments

  1. Amira Ameruddin says

    August 25, 2013 at 10:07 pm

    Love the photos! Thanks for sharing the process. Need to try soon

    • rebeccabryan says

      August 26, 2013 at 1:06 am

      Thank you! And thanks for commenting.

  2. niniandthesea says

    August 25, 2013 at 11:45 pm

    Those white boards are life savers aren't they? You don't have to tidy up or get the kids out of their jammies before a shoot!!!

    Thanx for sharing the pointers!

    Nini~

  3. Kelly Young says

    August 26, 2013 at 12:07 am

    What a great idea to use white boards. I would never have thought to do that!

    🙂 Kelly @ My Quilt Infatuation

  4. Kassi McKey says

    August 26, 2013 at 1:29 am

    Great Tutorial Becca! I definitely need to work on taking better pictures of my projects!

    • rebeccabryan says

      August 26, 2013 at 2:54 am

      Thanks Kassi!

  5. akainik says

    August 26, 2013 at 2:24 am

    Love your pictures!!! I will try the iPhoto software – thanks for the tips!!!

  6. Adrianne says

    August 26, 2013 at 2:46 am

    Yay – another iPhoto user. I do a lot of the same things as you – definitely a fan of the white board to hide any mess in the background!

  7. Beth says

    August 26, 2013 at 4:37 pm

    Great tips! I could really use that white board idea to hide the mess in my house. Thanks for joining in.

  8. ChristaQuilts says

    August 26, 2013 at 8:52 pm

    This is great – I am such a novice so it's helpful to see your in-progress process. Thanks!

  9. hydeeannsews says

    August 26, 2013 at 9:18 pm

    your set up is fantastic! thanks so much for sharing such detailed info about where & how you shoot, as well as your editing. very informative.

  10. Laura C @ littleandlots says

    August 28, 2013 at 1:55 am

    I tried using Aperture mode today for the first time–what a difference it made! The white board seems like a really cheap light box solution, so that's a great tip. Thank you for sharing how you process your photos, too. I am always curious how much gets done to photos at everyone else's blogs. (LOVE that fabric combo, too.)

  11. Casey York says

    August 28, 2013 at 9:02 pm

    Great post, Becca! I've been avoiding buying white boards, but seeing how you use them has changed my mind (imagine, no more rearranging the house just to take a photo!).

  12. Ella and Nesta says

    August 31, 2013 at 11:36 pm

    Great idea for the set up. I totally agree the fabric has to look good which can mean ironing it, sigh! Great photos!

  13. Dasha says

    September 3, 2013 at 4:38 am

    Nice photos Becca. Thanks for sharing the tips. I am always exasperated with my lack of photographic skill. Guess I have never concentrated on learning how to do it properly.

Primary Sidebar

New 2026 Block of the Month!

Graphic of Alchemy Quilt

Join the 2026 Block of the Month Program

Get my Modern Triangles Quilt Book

Get my Modern Rainbow Quilts Book

Image shows cover of the book "Modern Rainbow Quilts"

Make the Solstice Quilt!

Solstice Block of the Month by Bryan House Quilts

Get Your Invite!

Make Modern Triangles Logo

Make the Sparkler Quilt!

Image Shows Sparkler Quilt Top by Rebecca Bryan

Make the Echo (Echo!) Quilt

Echo BOM now open to join

Make the Wildflower Quilt!

Wildflower Block of the Month by Bryan House Quilts

Make the Stargazer Quilt!

Anne's Stargazer BOM

Make the Rainbow Triangles Quilt!

Rainbow Triangle BOM, modern triangle quilt, Rebecca Bryan

About

Hey there! I’m Rebecca, an author and teacher and freezer paper piecing evangelist. I’m also the founder of the Make Modern Triangles Quilt Club.

Disclosure

Just so you know, my site includes affiliate links from which I (it’s me! Rebecca!) receive payment or compensation. Something to consider as you peruse my website. Thanks!

Latest on Instagram

You can’t just go buy fabric like this. 👀 Because You can’t just go buy fabric like this. 👀

Because we live in a time where it’s becoming harder and harder to tell what was made by a person and what was created by a computer.

This is something worth talking about. 👇

For people who aren’t quilters, it’s easy to see any beautiful quilt in today’s world and think that the pattern must have been made by AI, or that the fabrics just come that way. 

These triangles weren’t generated in seconds. The fabrics don’t just come that way. 

They were cut one piece at a time, sewn one seam at a time, pressed, trimmed, arranged, rearranged, and stitched together over hours and hours spent in the sewing room, one day at a time. 

Each and every quilt represents DAYS spent in the sewing room, taking time for myself, creating instead of scrolling on the internet. 

And that’s one reason why I fell so deeply in love with the process. Because it’s not something you can just go buy. Quilting encourages us to slow down, learn something new, take time for ourselves, and use our hands. and create something that didn’t exist before. 

Take this as your nudge to get offline and go do something that you love today. Tell me what you’re doing in the comments. ✨ ⬇️

#modernquilting #quiltingtechnique #quiltpattern #quiltdesign #quiltersofig
👉 I refuse to spend hours ripping paper bits from 👉 I refuse to spend hours ripping paper bits from my seams from foundation paper piecing. 
👉 I ALWAYS attach the binding to the BACK first. 
👉 MAKE A TEST BLOCK... every single time. 
👉 I make notes on my foundations. 
👉 I make time for myself to be in my sewing room. 
👉 I buy pretty fabrics that make me go “Oooohhh, Aahhh!” 
👉 I don’t do Y seams. 

What would you add to the list? Tell us your quilting secrets in the comments. ⬇️

#quiltteacher #quiltingtutorial #quiltingtips #modernquilting
Comment ‘FREEZER’ for my free class to learn this Comment ‘FREEZER’ for my free class to learn this amazing paper piecing technique! 🌟

If your freezer paper is not sticking to your fabric, your iron might not be hot enough. 🔥

But be warned... 👇

You don’t want it to be TOO hot either. 

Use a HOT dry iron, and that should help your freezer paper stick to your fabric! 

The freezer paper needs enough heat to grip the fabric properly.

I also love using a wool pressing mat because it helps hold heat longer and makes the freezer paper stick even better.

When it comes to the quilting techniques, sometimes even a tiny adjustment can make a huge difference. 🙌

Quilters, do you ever struggle with this? Let me know in the comments and drop a ‘FREEZER’ below if you want to take my free class! 💌
Which personality type are you in the quilting gro Which personality type are you in the quilting group? 👀

That’s a part of what makes the Make Modern Triangles Club so much fun. 

We have ALL types of quilters. All ages, all skill levels, some brand-new, and some who have been in the club for years. 🙌

There are always new members joining, new projects started, and plenty of projects being finished and celebrated, too. 

It’s a community full of people who just get all the quirks of being a quilter. ✨

We’d love to have you join us and bring your personlity to the club. Comment ‘CLUB’ for details to join and I’ll send them your way. 💌

#quiltteacher #quiltingtutorial #quiltingtips #modernquilting
Comment ‘SUMMIT’ for your free ticket for the Quil Comment ‘SUMMIT’ for your free ticket for the Quilter’s Paradise Summit June 8th - 15th! ✨

One of my favorite things about quilting is how there’s always something new to try.

✨ A new technique.
✨ A new color combination.
✨ A new project that makes you think, “Okay, wait… that’s actually adorable.”

That’s the energy of the Fast-N-Easy Quilters Paradise Summit.

For an entire week, you’ll get to learn from 30 quilting experts sharing projects that are fun, practical, beginner-friendly, and completely inspiring.

Think quilted bookmarks, fabric boxes, mini quilts, coaster sets, bags, placemats, appliqué, freezer paper piecing, and so much more.

Basically… a very good excuse to spend the week sewing! 🪡

And it’s FREE. I’d love for you to join us. Comment ‘SUMMIT’ and I’ll Dm you the link to register. 💌 

#quiltteacher #quiltpattern #quilttop #quiltingtips #quiltingtutorial
Freezer Paper Piecing Tip number ONE! ⬇️ We’re st Freezer Paper Piecing Tip number ONE! ⬇️

We’re starting off strong with one of my absolute favorite things about the freezer paper piecing technique. 

And it’s that you can reuse your foundations!! I’ve had a foundation that I used 20 or more times... 😅

I know it doesn’t seem possible, but this is proof that it is! 

Why make a new foundation for every single block when you just reuse ONE for them all? 

That’s the magic of freezer paper piecing. ✨

Follow along for the rest of my tips that make paper piecing way easier, and comment ‘FREE’ if you want to sign up for my free class! 💌

#modernquilting #paperpiecing #foundationpaperpiecing #quiltingtechnique #quiltteacher
Follow on Instagram

Browse by Category

Archives

  • Instagram
  • Facebook
  • Pinterest
  • email
You can’t just go buy fabric like this. 👀 Because You can’t just go buy fabric like this. 👀

Because we live in a time where it’s becoming harder and harder to tell what was made by a person and what was created by a computer.

This is something worth talking about. 👇

For people who aren’t quilters, it’s easy to see any beautiful quilt in today’s world and think that the pattern must have been made by AI, or that the fabrics just come that way. 

These triangles weren’t generated in seconds. The fabrics don’t just come that way. 

They were cut one piece at a time, sewn one seam at a time, pressed, trimmed, arranged, rearranged, and stitched together over hours and hours spent in the sewing room, one day at a time. 

Each and every quilt represents DAYS spent in the sewing room, taking time for myself, creating instead of scrolling on the internet. 

And that’s one reason why I fell so deeply in love with the process. Because it’s not something you can just go buy. Quilting encourages us to slow down, learn something new, take time for ourselves, and use our hands. and create something that didn’t exist before. 

Take this as your nudge to get offline and go do something that you love today. Tell me what you’re doing in the comments. ✨ ⬇️

#modernquilting #quiltingtechnique #quiltpattern #quiltdesign #quiltersofig
👉 I refuse to spend hours ripping paper bits from 👉 I refuse to spend hours ripping paper bits from my seams from foundation paper piecing. 
👉 I ALWAYS attach the binding to the BACK first. 
👉 MAKE A TEST BLOCK... every single time. 
👉 I make notes on my foundations. 
👉 I make time for myself to be in my sewing room. 
👉 I buy pretty fabrics that make me go “Oooohhh, Aahhh!” 
👉 I don’t do Y seams. 

What would you add to the list? Tell us your quilting secrets in the comments. ⬇️

#quiltteacher #quiltingtutorial #quiltingtips #modernquilting
Comment ‘FREEZER’ for my free class to learn this Comment ‘FREEZER’ for my free class to learn this amazing paper piecing technique! 🌟

If your freezer paper is not sticking to your fabric, your iron might not be hot enough. 🔥

But be warned... 👇

You don’t want it to be TOO hot either. 

Use a HOT dry iron, and that should help your freezer paper stick to your fabric! 

The freezer paper needs enough heat to grip the fabric properly.

I also love using a wool pressing mat because it helps hold heat longer and makes the freezer paper stick even better.

When it comes to the quilting techniques, sometimes even a tiny adjustment can make a huge difference. 🙌

Quilters, do you ever struggle with this? Let me know in the comments and drop a ‘FREEZER’ below if you want to take my free class! 💌
Which personality type are you in the quilting gro Which personality type are you in the quilting group? 👀

That’s a part of what makes the Make Modern Triangles Club so much fun. 

We have ALL types of quilters. All ages, all skill levels, some brand-new, and some who have been in the club for years. 🙌

There are always new members joining, new projects started, and plenty of projects being finished and celebrated, too. 

It’s a community full of people who just get all the quirks of being a quilter. ✨

We’d love to have you join us and bring your personlity to the club. Comment ‘CLUB’ for details to join and I’ll send them your way. 💌

#quiltteacher #quiltingtutorial #quiltingtips #modernquilting
Follow on Instagram
© 2026 Bryan House Quilts