• About
    • Privacy Policy
  • Teaching
    • Member/Student Login
    • Online Programs
  • Shop
  • Member/Student Login
  • Blog
    • Free Quilt Patterns – Scrappy Whirligig Quilt

Bryan House Quilts

Mini-Christmas tree skirt redo

Uncategorized

28 Nov
   I’d like to share an update of a tutorial I published way back in 2009 (!) for a mini-Christmas tree skirt. The tutorial will also be posted on the Houston Modern Quilt Guild’ blog as well. The HMQG is featuring a different holiday tutorial every Tuesday (ish) until before Christmas.

The great thing about this project is that it is fast. I was able to make a new one to reflect my changing tastes.

IMG_2889
2012 Mini Christmas Tree Skirt

This year, I used fabrics to match my daughters’s aqua and red bedroom. I also tried to glam it up with a lace edge. I finished it with some loopy quilting. 

And now, to the tutorial… 

***

Is your mini-tree naked? Are its feet cold?

Well add some modesty to your tree and wrap it up in a wee quilted tree skirt. This is a fairly easy and quick project. It took me 2-3 hours to complete. I like getting things done, don’t you?
To start, you will need a pattern. I used a large pot lid to trace a half circle on a piece of paper. (Newspaper or tissue paper work better than plain white paper, but I worked with what I had.) Since, I wanted my skirt a couple inches bigger than the lid I measured two inches longer. I made tick marks every few inches around the lid.
Once you have your half-circle cut out, you will need a smaller half-circle in the center. I used my coffee cup to trace a smaller half-circle. See picture below. Once you’ve done that, cut it out.
Once you’ve got your half circle cut out, fold in half twice. You will get something like the pattern pictured below. I stapled it to keep it from slipping, but you can use a pin.
Using your pattern, cut out 8 pieces of fabric. In the picture below (hey! I found some newspaper!) you will see that I added 1/4 seam allowances. I guesstimated these as opposed to tracing. Also, you don’t have to add seam allowances. Not adding seam allowances will make your final product smaller. So you decide. I made one each way. If I had to do it over again, I would add seam allowances.
Once you’ve cut your 8 pieces of fabric, arrange them how you want. Here’s what I did. I used 3 different reds and 2 greens.
Next line up your pieces as shown below. You will have four pairs of fabric. Once they are lined up, machine sew on the right side. Press to the right.
You will now have four pieces (hey look my mom’s calling!):
Line your pieces as shown below – you will now have two pairs. Machine sew right side. Press seams to the right.
Now you should have two half-circles.
Lay the two halves right sides together as shown. (Again mom?) Stitch the halves together. Press. (Pressing the seams to the right or so they are pointing clockwise will make sewing the next few steps easier. See picture below.)
Now you will have a completed circle with a hole in the middle. I see mine didn’t come out the way I lined it up, but that’s probably because I wasn’t consistent with which side I sewed. I told you to sew on the right hand side, but I probably did left one time. Whoopsie daisy. No matter. We live with mistakes in this house.
Now, if you would like to add a trim to the edge of the skirt, here’s what you need to do:

With trim facing in (the opposite of the way it will lay when finished), baste your trim to the outside edge of the tree skirt top with an 1/8 inch seam allowance. The key is to make the basting seam allowance smaller than the sewing allowance so that when you sew with your 1/4 inch allowance, your basting stitches will be hidden.

See below tips for adding trim. 
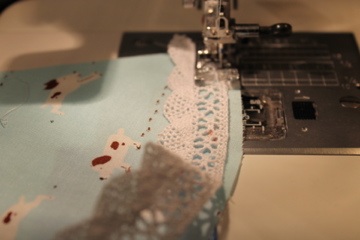
(note: I constructed my new mini-tree skirt a bit differently
because of the addition of trim.)

More trim tips: if you are going to add a trim, cut your side slit before basting. See the picture above for what I did. This will help ensure the trim is not caught in the corner seams at the side slit.

Even more trim tips: When basting your trim you want to leave a tail on each edge of the opening slit. With the tailsease the trim onto the edge. Like so: 

See how the lace trim creeps of the edge? This way the trim shouldn’t
get caught is the two seams that make up the corner. 

Ok, we are ready to quilt!
Now, you will make your quilt sandwich. We are going to do a pillowcase binding. You want to lay your batting down first. Then your backing goes second, or in the middle. (If you were making a cheese sandwich, the backing would be the cheese.) Lay your backing so the right side is facing up. Finally, lay your pieced-top right side down. So, you will be sewing the right sides together, with your batting underneath that. Pin together, all the way around the circle.
Please note the following quilt sandwhich is wrong (so wrong!) and if you do it this way you will be disappointed and frustrated, like I was! Note how the backing and batting are in the WRONG places.
You’ve been warned.

This is the right way!

Batting first, then place the back and the top right sides together. 
Before we start sewing you will cut your quilt sandwich, if you haven’t already done so. This will be the opening for the tree skirt. You will cut on one side, a radius if you will. It should look like this. A round of cheese (hmm must be hungry).

Now, we are going to sew our sandwich together. So exciting! You are going to sew all around the inner and outer edges of your circle and on the edge of one of the cut, using a 1/4 seam, but your tree skirt isn’t picky. You will want to put your machine in the needle down position. This will make it easier to pivot on the corners.
You will want to leave an opening so you can turn your quilt right-side out. So start here:
Then continue sewing the outer edge. Sew up the other side of the cut to the inner circle back the the edge you started and …
Finish sewing here:
If you’ve added trim the the outside edge, be sure to sew to the left of your basting stitches. Like sew:

Ok, I’ll wait. Go sew all the way around the edges, leaving an opening. Your sewing might look something like this.

Ok! Now that you’ve sewn all the way around your quilt, trim off the extra fabric like so:
Trim the corners
Don’t forget to trim the corners. This will help you get a sharp corner once you turn it right-side out. Also, you may want to clip around the edges of the circle as shown in the picture below. I thought this would help it lay flat, but I forgot to do it on one and it didn’t seem to matter. So you decide. I would do it (if I remembered!). But do do the corners (hehehe do do).
Clip the round edges.
Ok! Reach your hand into your quilt, in between the fabric pieces. As opposed to between the batting and fabric. Grab the far corner and pull your quilt right-side out. Once you’ve done that, put your fingers in to each corner, or blunt pencil, to pop out sharp corners. Press. (Put iron away! your almost done!)
Now, you will close up the opening. Pin the opening as shown in the first picture below. Using a small seam allowance, like 1/8th inch, machine stitch (can be done by hand) the opening closed and then continue top stitching allllll the way around the quilt, shown below in the second picture.
Here’s a picture of top-stitching close to the edges all the way around the quilt.
This is the last step of pillowcase binding.
Now, you can quilt it. You could stitch in the ditch. Or if you are really good you can free hand some holiday themed things like a bell or a word. I just sewed from corner to corner. It turned out nice and ended up looking like an eight pointed.
Here’s the back:
The back on the other one.
Here’s the top.
Now you are done!
And here it is warming the feet of my dear daughter’s mini-Christmas tree. Cute!


And my new one. I’ve confiscated it to the dining room. IT’S MINES!

ahem.

I will answer questions in the comments.
Enjoy!
Previous Post: « Thankful for you! {Winner!}
Next Post: sew, mama, sew! {give-until it hurts-away} »

Reader Interactions

Comments

  1. Kelly says

    November 28, 2012 at 7:49 pm

    Cool tute!

  2. Heidi Staples says

    November 29, 2012 at 5:37 am

    This is such a great idea, Becca! Looks adorable!

  3. Nat at Made in Home says

    November 29, 2012 at 10:00 pm

    Great tutorial, and looks great on the little tree! Thanks for sharing!

Primary Sidebar

New Block of the Month!

Join the 2026 Block of the Month Program

Get my Modern Triangles Quilt Book

Get my Modern Rainbow Quilts Book

Image shows cover of the book "Modern Rainbow Quilts"

Make the Solstice Quilt!

Solstice Block of the Month by Bryan House Quilts

Get Your Invite!

Make Modern Triangles Logo

Make the Sparkler Quilt!

Image Shows Sparkler Quilt Top by Rebecca Bryan

Make the Echo (Echo!) Quilt

Echo BOM now open to join

Make the Wildflower Quilt!

Wildflower Block of the Month by Bryan House Quilts

Make the Stargazer Quilt!

Anne's Stargazer BOM

Make the Rainbow Triangles Quilt!

Rainbow Triangle BOM, modern triangle quilt, Rebecca Bryan

About

Hey there! I’m Rebecca, an author and teacher and freezer paper piecing evangelist. I’m also the founder of the Make Modern Triangles Quilt Club.

Disclosure

Just so you know, my site includes affiliate links from which I (it’s me! Rebecca!) receive payment or compensation. Something to consider as you peruse my website. Thanks!

Latest on Instagram

Mark your calendars... I am revealing a BRAND-NEW Mark your calendars... I am revealing a BRAND-NEW block of the month design on May 1st! 🗓️ ✨

Yes, you read that right! 🙌

I have been working behind the scenes on ANOTHER block of the month pattern, and you’ll finally be able to see it on May 1st! 

And get excited, because this one is completely new and unlike any I have ever released before. I think you’re going to love it. 🤭

👉 Turn on post notifications so you don’t miss the reveal! ✨

#modernquilting #quiltpattern #quiltingdesign #quiltinginspiration
I’ve just recently got all of these quilts back fr I’ve just recently got all of these quilts back from the quilter!!!! 😍

SWIPE to see them all and tell me which one is your favorite in the comments! 💕 👇

#quiltpattern #quiltinspiration #modernquilting #finishedquilt
I think as quilters, we sometimes get really wrapp I think as quilters, we sometimes get really wrapped up in a project or wanting to finish by a certain deadline, that we forget to just play. 🙌

Triangle blocks are especially fun for playing with! 

Because the same exact blocks can look completely different depending on how you arrange them.

All of a sudden, you’re not just following a pattern anymore, you’re creating something unique. 🪄

And I think that’s where a lot of the joy in quilting lives.

Not in getting it “right” or making it perfect, but in letting yourself be curious. 

Letting yourself try something, change it, try something else, and be a little playful instead of precise.

Some of my favorite quilts didn’t come from a perfectly planned layout… 👇

They came from standing at the wall, thinking, “Wait… what if I try it like this instead?” 👀

So if you have a few triangle blocks sitting nearby, take a little time to play with them and see what kind of pattern they end up in. 

Comment ‘TRIANGLE’ if you want to take my free class where I teach you how to make a modern triangle, and give you a block pattern to start sewing. 💕

#modernquilting #quiltingtechnique #quiltingforbeginners #beginnerquilter
This time of year in the sewing room is always so This time of year in the sewing room is always so lovely. 

We FINALLY get to have the windows open, the world outside is getting colorful again, and the extra daylight is a big bonus. 

This is my recipe for a PERFECT April sewing day...

✨ Self care: plan meals/snacks for eating right & getting your exercise (booooooo! I know, I know.) Maybe a fun wee treat tho!?

✨ Entertainment: if it’s just you, get your show/ sporting event/ audible, etc. Or if you’re with your quilty buds, you know what to do! Sew, gab, laugh!

✨ Something you’re excited to sew: latest bingeable project at the ready!? Latest fabric stack that arrived in the post? Or...finally get that WIP d.u.n!

✨ Essential responsibilities taken care of: feed the dog, respond to that time-sensitive email, dinner for the fam? Take care of what you must get done so you can check out more completely.

Finally, set a timer for your hard stop time.

I set my alarm for when I need to pick up my kiddos from school. That way, I can get carried away by my creativity and indulge in “me” time!

Shut the laptop, check out, it’s sew time! 🧵 Everything else on your to-do list can wait. It is time for you!

What are you working on for a perfect April sewing day? ⬇️

#quiltingprogress #quiltinginspiration #quiltpattern #springsewing
If my WIP pile was getting out of control… here’s If my WIP pile was getting out of control… here’s exactly what I’d do: ⬇️

👉 Find a community of quilters to connect with, learn from, and grow with. People who cheer you on, celebrate your blocks, and make you want to keep going!!! 

👉 Make it easier on yourself with freezer paper piecing. This technique completely changed my life. I wanted to give up on quilting altogether at one point before I found freezer paper piecing. 

It’s not that you don’t finish quilts…

It’s that you don’t have the right support or the right process yet. 🧵✨ Comment ‘FREE’ to take my free class, learn the freezer paper piecing technique, and get invited to join an amazing community. 💕

#quiltingcommunity #quiltingclass #quiltingtechnique #quiltinginspiration
One stitch at a time!!! 🪡 Sometimes, a few hours One stitch at a time!!! 🪡

Sometimes, a few hours (or days) in the sewing room just makes it all alright. 🙌

Who agrees? ⬇️

#quiltingismytherapy #quiltinglife #quiltingismybliss #quiltersgonnaquilt
Follow on Instagram

Browse by Category

Archives

  • Instagram
  • Facebook
  • Pinterest
  • email
Mark your calendars... I am revealing a BRAND-NEW Mark your calendars... I am revealing a BRAND-NEW block of the month design on May 1st! 🗓️ ✨

Yes, you read that right! 🙌

I have been working behind the scenes on ANOTHER block of the month pattern, and you’ll finally be able to see it on May 1st! 

And get excited, because this one is completely new and unlike any I have ever released before. I think you’re going to love it. 🤭

👉 Turn on post notifications so you don’t miss the reveal! ✨

#modernquilting #quiltpattern #quiltingdesign #quiltinginspiration
I’ve just recently got all of these quilts back fr I’ve just recently got all of these quilts back from the quilter!!!! 😍

SWIPE to see them all and tell me which one is your favorite in the comments! 💕 👇

#quiltpattern #quiltinspiration #modernquilting #finishedquilt
I think as quilters, we sometimes get really wrapp I think as quilters, we sometimes get really wrapped up in a project or wanting to finish by a certain deadline, that we forget to just play. 🙌

Triangle blocks are especially fun for playing with! 

Because the same exact blocks can look completely different depending on how you arrange them.

All of a sudden, you’re not just following a pattern anymore, you’re creating something unique. 🪄

And I think that’s where a lot of the joy in quilting lives.

Not in getting it “right” or making it perfect, but in letting yourself be curious. 

Letting yourself try something, change it, try something else, and be a little playful instead of precise.

Some of my favorite quilts didn’t come from a perfectly planned layout… 👇

They came from standing at the wall, thinking, “Wait… what if I try it like this instead?” 👀

So if you have a few triangle blocks sitting nearby, take a little time to play with them and see what kind of pattern they end up in. 

Comment ‘TRIANGLE’ if you want to take my free class where I teach you how to make a modern triangle, and give you a block pattern to start sewing. 💕

#modernquilting #quiltingtechnique #quiltingforbeginners #beginnerquilter
This time of year in the sewing room is always so This time of year in the sewing room is always so lovely. 

We FINALLY get to have the windows open, the world outside is getting colorful again, and the extra daylight is a big bonus. 

This is my recipe for a PERFECT April sewing day...

✨ Self care: plan meals/snacks for eating right & getting your exercise (booooooo! I know, I know.) Maybe a fun wee treat tho!?

✨ Entertainment: if it’s just you, get your show/ sporting event/ audible, etc. Or if you’re with your quilty buds, you know what to do! Sew, gab, laugh!

✨ Something you’re excited to sew: latest bingeable project at the ready!? Latest fabric stack that arrived in the post? Or...finally get that WIP d.u.n!

✨ Essential responsibilities taken care of: feed the dog, respond to that time-sensitive email, dinner for the fam? Take care of what you must get done so you can check out more completely.

Finally, set a timer for your hard stop time.

I set my alarm for when I need to pick up my kiddos from school. That way, I can get carried away by my creativity and indulge in “me” time!

Shut the laptop, check out, it’s sew time! 🧵 Everything else on your to-do list can wait. It is time for you!

What are you working on for a perfect April sewing day? ⬇️

#quiltingprogress #quiltinginspiration #quiltpattern #springsewing
Follow on Instagram
© 2026 Bryan House Quilts