Sewing strips together well is an essential skill for quiltmaking. I’ve sew so many strip sets that I’ve got tips!

Quilters sew long pieces of fabrics into rows then cut them into smaller shapes or blocks. These stitched strips are called strip sets. A strip set is typically made with three or four strips. They are a common building block in quilt designs.
But quilter beware: Longer strips of fabric like are easily distorted while cutting and stitching due to the crosswise width of the fabric (WOF). Strip sets can curve and pucker so taming the crosswave grain is the name of the game!
I’m sharing 5 expert tips on sewing strip sets together using my Pathways quilt as an example.

MY 5 Best Tips for Sewing Strip Together
- Discover expert tips for sewing fabric strips together
- Learn how to precisely align, pin and sew fabrics into strip sets.
- Take special care to align strips and correctly press seams open.
- Avoid common beginner mistakes that can lead to curvy, wavy and puckered seams.
- Master the art of strip piecing to improve your essential quilting skills and create quality quilts.
Strip Piecing is Essential for Quilting
Sewing fabric strips together is a fundamental technique in quilting. It’s helpful to know how the properties of fabrics and grainlines affect seams.

The Pathways quilt is a good example of a quilt made entirely from strip sets. It looks complicated right? But it isn’t! Because strip sets are easier when you know how to manage them. And look what you can make!
Here’s why…
Most long strips are cut along the crosswise grain which is a bit stretchy, also known as the width of fabric (WOF). It runs perpendicular to the selvedge edges, which have almost no stretch. Essentially, you and your sewing machine are attaching two stretchy strips together along their stretchier edges. Your job is to tame the stretch.
Beginner’s Guide to Sewing Strips
How to Sew Strips Together Tutorial
Read the post below or watch my video tutorial to learn how.
Tip 1: Take time to prepare fabric for cutting and use the best tools to make accurate cuts.
Press fabric with a hot dry iron before cutting. Press with an up and down motion. (Yes, it takes time!)
Use Best Press to add a bit of stiffness.
Handle the fabric gently while cutting the strips.
Always use a sharp rotary blade on a clean cutting mat. A dull blade snags and drags the fabric out of alignment. Oh, no!
Place fabric weights or washers to the left of the acrylic ruler if cutting on the right edge, to hold the fabric in place.
Place silicone anti-slide grips along the ruler’s underside near the cutting edge.
Tip #2: Align, Pin or Clip
Take two strips and place right sides together – align the long edges carefully on a flat surface. Pin or clip the strips together perpendicular to the long edge to prevent the fabric from shifting.
How to Sew a Quarter Inch Seam
Use painter’s tape or a magnetic seam guide to line up with the quarter-inch seam allowance marking on the needle plate. Run the tape on the machine bed all the way to the front of the machine. Learn more about sewing accurate seam allowances and helpful tools on my blog.
Set the stitch length to 1.5 to 2.0 mm. Starting at one end, stitch the first two pieces together. Use an automatic fix stitch or backstitch at the beginning and end of each seam to secure the stitches.
Pull the pins and clips out just before the needle reaches them.
Avoid pulling or pushing the strips while sewing – let the feed dogs do the work.
Tip 3: Press the seams open with two methods
First, lay your strip set on a flat surface, then gently finger press the seams open without sliding your fingers over the stitching. Or lay a long ruler on top.
Next, press along the seam line on the wrong side to avoid creating bulk on the right side. Use an ironing board with a hot, dry iron in an up-and-down motion. No sliding! Lay aside to cool before handling again or use a clapper to set the seam.
Sewing Quilt Strips Together: Change the Sewing Direction
Tip 4: Change the sewing direction every other strip

Remember the stretchy crosswise grain? Changing the sewing direction distributes fabric more evenly over the length of fabrics without puckering and curving. That little bit of stretch makes longer seams wonky when sewn in the same direction. The stitches will gradually pull the fabric to one side or pucker.
Tip 5: Starting at the opposite end
Start sewing the next fabric strip (the third strip) where you finished the previous strip, which is the opposite end of where you started the first seam. I usually place a clip at the end where I stopped before pressing the seam open to mark my starting point. It’s easy to get mixed up!
As a result, your finished project will have smoother seams, straight edges and the ends of the strips will match up better.
Overall, you’ll achieve a more professional-looking quilt, whiie improving your skills.
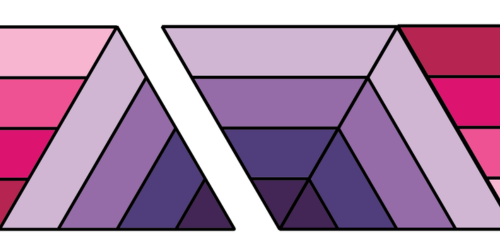
See the example below of using a strip set to cut out triangles.

Quick Tip Review: Sewing Strips Together for a Quilt

Tip 1: Take time to prepare fabric for cutting. Use the best tools to make accurate cuts.
Tip 2: Align and pin the long fabric edges together evenly. Plastic quilting clips also work well.
Tip 3: Press seams open, first with a finger press and then with a hot dry iron. Press after stitching each time.
Tip 4: Change the sewing direction every other strip.
Tip 5: Starting at the opposite end
THE BIG TAKEAWAY
By practicing these techniques for sewing strips together, you will see your quilts improve with a more precise and smooth finish each time. Happy quilting!
Frequently Asked Questions
What are some common mistakes that beginners make when sewing strips together?
Beginners often struggle with maintaining a consistent quarter inch seam allowance, resulting in mismatched blocks. Sewing all the pieces in a strip set in the same direction, especially long pieces, causes curvy, wavy and puckered fabric. It’s tempting to use a duller blade in a rotary cutter because it cuts well enough. When cutting long fabric strips, use a new sharp blade that won’t snag or pull the fabric out of alignment.
How Should I cut long straight strips for sewing strips together into straight even seams?
It’s tempting to use a duller blade in a rotary cutter because it cuts well enough. When cutting long fabric strips, use a new sharp blade that won’t snag or pull the fabric out of alignment. To ensure straight and even seams when sewing strips together, press the fabric before cutting. Use Best Press quilting starch to add stiffness.

Leave a Reply