• About
    • Privacy Policy
  • Teaching
    • Member/Student Login
    • Online Programs
  • Shop
  • Member/Student Login
  • Blog
    • Free Quilt Patterns – Scrappy Whirligig Quilt

Bryan House Quilts

Best Storage Containers for Organizing Color Chips

Uncategorized

16 Apr

Storage containers are a quilter’s catnip. Do you thrill over the PERFECT CONTAINER for quilty things?! YES!

Using the best storage container for your color chips makes it easier to use them. Like a custom closet for clothing, you’re more likely to wear something if you can find it.

I’m sharing some easy ideas for storing and organizing your color chips that work for your storage personality. Yes, you have a storage personality – more on that below.

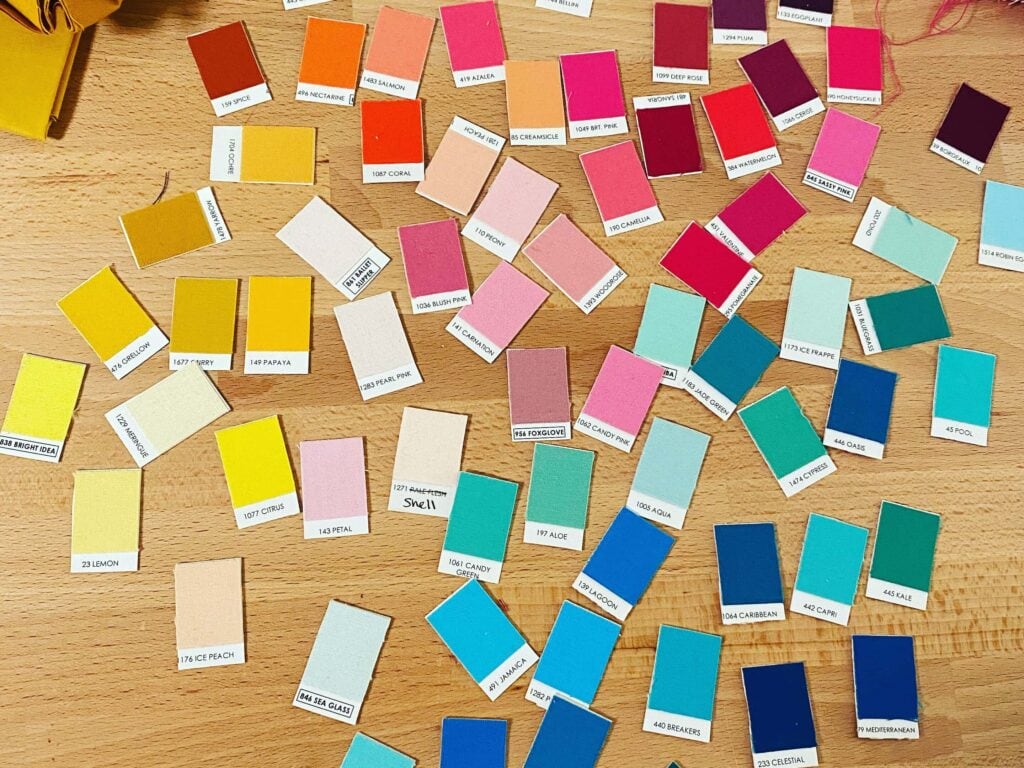
I’m the loudest cheerleader for learning how to master color for quilts. The more you play with your color chips, the more your color confidence grows.

The little things matter – like how you store them – because you’re more likely to use them when they’re handy and organized.

Watch how I organize my color chips

Your Storage Personality: Are YOU AN INNIE OR OUTIE?

Do you like everything in sight so you know where it is? Remember you own it?

You’re an Outie.

Or do you put everything in containers and drawers? No piles and clean surfaces?

You’re an Innie.

First, let’s start with the best storage containers for color chips for Outies.

Typically, Outies like to see all of their fabric and thread. They also like colorful walls, memorabilia and bookshelves for patterns and quilting books.

Their challenge: Find a system and a place to display their color chips to show off colors.

Best Storage IDEAS FOR OUTIES’ COLOR CHIPS

Here are their best storage ideas:

  • White metal peg board with magnetic strips (courtesy of Modern Handcraft) with a nifty tute). These little cards stay put with an adhesive magnetic strip on their backsides. Display your cards and move them around to audition colors. Use one gigantic board or smaller boards for color families, and keep a blank board handy to play on.
  • 3-inch metal binder rings (shop here). A pack of 12 rings is enough to get your started. Sort the colors onto rings and you’re ready to mix it up. The chips stay in order and can fit in your purse when you visit the fabric store. Store them on hooks or slide the rings onto an embroidery hoop.
  • Glass jars. Stash your color chips in jars and make a pretty display on a shelf or nook.
  • Clear boxes with lids. I’m partial to The Container Store, especially the small clear accessory box found in the shoebox section. Perfectiion for a color chip collection!
  • Outies beware: Keep them away from direct sunlight and fluorescent lights. They will fade.

Best storage IDEAS for INNIES

Innies feel content when their stuff is contained! The best storage containers for Innies have lids. Innies like to shop for containers and have a designated place for everything.

  • Clear boxes with lids and lots of them. Innies like to fill storage containers like nesting dolls. One big container is good; one big container filled with smaller containers is GREAT. (Hello again, Container Store).
  • Drawer dividers. Adding dividers gives you a pretty tray of color chips. You can see everything at once, and then not see them when you close the drawer.
  • Embroidery thread organizer. As if made for storing color chips, this hinged container is the right size for color chips. Add another container if you branch out into other brands’ color chip collections. And they stack nicely.

Lid it and Label it

Not sure about your Innie or Outie storage personality?

According to me, you’re leaning more in one direction so maybe embrace that. Review the lists above. Or use the easy solution below – baggies.

Sort and put your color chips in baggies in a small storage container with a lid. You won’t be tempted to put anything else in there and it won’t fit anyway.

Last, keep your color chips close by. They’re a daily reminder that says ‘Hey, color chips are creative catnip!’ So go ahead – bat ’em around and see the magic happen!

Learn more about the tiny-but-mighty color chips and other color tools in my post on the must-have-list of color tools for color mastery.

Previous Post: « Color Tools for Color Mastery: The Must-Have List
Next Post: What Are Color Harmonies? »

Primary Sidebar

New 2026 Block of the Month!

Graphic of Alchemy Quilt

Join the 2026 Block of the Month Program

Get my Modern Triangles Quilt Book

Get my Modern Rainbow Quilts Book

Image shows cover of the book "Modern Rainbow Quilts"

Make the Solstice Quilt!

Solstice Block of the Month by Bryan House Quilts

Get Your Invite!

Make Modern Triangles Logo

Make the Sparkler Quilt!

Image Shows Sparkler Quilt Top by Rebecca Bryan

Make the Echo (Echo!) Quilt

Echo BOM now open to join

Make the Wildflower Quilt!

Wildflower Block of the Month by Bryan House Quilts

Make the Stargazer Quilt!

Anne's Stargazer BOM

Make the Rainbow Triangles Quilt!

Rainbow Triangle BOM, modern triangle quilt, Rebecca Bryan

About

Hey there! I’m Rebecca, an author and teacher and freezer paper piecing evangelist. I’m also the founder of the Make Modern Triangles Quilt Club.

Disclosure

Just so you know, my site includes affiliate links from which I (it’s me! Rebecca!) receive payment or compensation. Something to consider as you peruse my website. Thanks!

Latest on Instagram

FREEZER PAPER PIECING TIP NUMBER 3 ⬇️ Always prin FREEZER PAPER PIECING TIP NUMBER 3 ⬇️

Always print your templates at 100% scale. Most printers are accurate, however, the template size may be off by a smidge with some printers.

Make a test print on printer paper. Measure the 1-inch scale box to check accuracy. Run a test when this happens by changing the scale setting a percent at a time, then remeasure the scale box until it’s the same size as the original template. Like I said, it happens, but not often!

Some quilters find that freezer paper shrinks after it runs through a printer. Another reason to check the scale box! You can’t turn down the printer’s temperature, but you can pre-shrink it by pressing it onto parchment paper. Peel it off, and you’re ready to try again.

Even being slightly off can affect the accuracy of your blocks later on.

This is one of those tiny steps that saves a LOT of frustration later. 😅

Follow along @bryanhousequilts for freezer paper piecing tip number four coming next week! 💕

#modernquilting #paperpiecing #foundationpaperpiecing #quiltingtechnique #quiltinggma quiltteacher
You can’t just go buy fabric like this. 👀 Because You can’t just go buy fabric like this. 👀

Because we live in a time where it’s becoming harder and harder to tell what was made by a person and what was created by a computer.

This is something worth talking about. 👇

For people who aren’t quilters, it’s easy to see any beautiful quilt in today’s world and think that the pattern must have been made by AI, or that the fabrics just come that way. 

These triangles weren’t generated in seconds. The fabrics don’t just come that way. 

They were cut one piece at a time, sewn one seam at a time, pressed, trimmed, arranged, rearranged, and stitched together over hours and hours spent in the sewing room, one day at a time. 

Each and every quilt represents DAYS spent in the sewing room, taking time for myself, creating instead of scrolling on the internet. 

And that’s one reason why I fell so deeply in love with the process. Because it’s not something you can just go buy. Quilting encourages us to slow down, learn something new, take time for ourselves, and use our hands. and create something that didn’t exist before. 

Take this as your nudge to get offline and go do something that you love today. Tell me what you’re doing in the comments. ✨ ⬇️

#modernquilting #quiltingtechnique #quiltpattern #quiltdesign #quiltersofig
👉 I refuse to spend hours ripping paper bits from 👉 I refuse to spend hours ripping paper bits from my seams from foundation paper piecing. 
👉 I ALWAYS attach the binding to the BACK first. 
👉 MAKE A TEST BLOCK... every single time. 
👉 I make notes on my foundations. 
👉 I make time for myself to be in my sewing room. 
👉 I buy pretty fabrics that make me go “Oooohhh, Aahhh!” 
👉 I don’t do Y seams. 

What would you add to the list? Tell us your quilting secrets in the comments. ⬇️

#quiltteacher #quiltingtutorial #quiltingtips #modernquilting
Comment ‘FREEZER’ for my free class to learn this Comment ‘FREEZER’ for my free class to learn this amazing paper piecing technique! 🌟

If your freezer paper is not sticking to your fabric, your iron might not be hot enough. 🔥

But be warned... 👇

You don’t want it to be TOO hot either. 

Use a HOT dry iron, and that should help your freezer paper stick to your fabric! 

The freezer paper needs enough heat to grip the fabric properly.

I also love using a wool pressing mat because it helps hold heat longer and makes the freezer paper stick even better.

When it comes to the quilting techniques, sometimes even a tiny adjustment can make a huge difference. 🙌

Quilters, do you ever struggle with this? Let me know in the comments and drop a ‘FREEZER’ below if you want to take my free class! 💌
Which personality type are you in the quilting gro Which personality type are you in the quilting group? 👀

That’s a part of what makes the Make Modern Triangles Club so much fun. 

We have ALL types of quilters. All ages, all skill levels, some brand-new, and some who have been in the club for years. 🙌

There are always new members joining, new projects started, and plenty of projects being finished and celebrated, too. 

It’s a community full of people who just get all the quirks of being a quilter. ✨

We’d love to have you join us and bring your personlity to the club. Comment ‘CLUB’ for details to join and I’ll send them your way. 💌

#quiltteacher #quiltingtutorial #quiltingtips #modernquilting
Comment ‘SUMMIT’ for your free ticket for the Quil Comment ‘SUMMIT’ for your free ticket for the Quilter’s Paradise Summit June 8th - 15th! ✨

One of my favorite things about quilting is how there’s always something new to try.

✨ A new technique.
✨ A new color combination.
✨ A new project that makes you think, “Okay, wait… that’s actually adorable.”

That’s the energy of the Fast-N-Easy Quilters Paradise Summit.

For an entire week, you’ll get to learn from 30 quilting experts sharing projects that are fun, practical, beginner-friendly, and completely inspiring.

Think quilted bookmarks, fabric boxes, mini quilts, coaster sets, bags, placemats, appliqué, freezer paper piecing, and so much more.

Basically… a very good excuse to spend the week sewing! 🪡

And it’s FREE. I’d love for you to join us. Comment ‘SUMMIT’ and I’ll Dm you the link to register. 💌 

#quiltteacher #quiltpattern #quilttop #quiltingtips #quiltingtutorial
Follow on Instagram

Browse by Category

Archives

  • Instagram
  • Facebook
  • Pinterest
  • email
FREEZER PAPER PIECING TIP NUMBER 3 ⬇️ Always prin FREEZER PAPER PIECING TIP NUMBER 3 ⬇️

Always print your templates at 100% scale. Most printers are accurate, however, the template size may be off by a smidge with some printers.

Make a test print on printer paper. Measure the 1-inch scale box to check accuracy. Run a test when this happens by changing the scale setting a percent at a time, then remeasure the scale box until it’s the same size as the original template. Like I said, it happens, but not often!

Some quilters find that freezer paper shrinks after it runs through a printer. Another reason to check the scale box! You can’t turn down the printer’s temperature, but you can pre-shrink it by pressing it onto parchment paper. Peel it off, and you’re ready to try again.

Even being slightly off can affect the accuracy of your blocks later on.

This is one of those tiny steps that saves a LOT of frustration later. 😅

Follow along @bryanhousequilts for freezer paper piecing tip number four coming next week! 💕

#modernquilting #paperpiecing #foundationpaperpiecing #quiltingtechnique #quiltinggma quiltteacher
You can’t just go buy fabric like this. 👀 Because You can’t just go buy fabric like this. 👀

Because we live in a time where it’s becoming harder and harder to tell what was made by a person and what was created by a computer.

This is something worth talking about. 👇

For people who aren’t quilters, it’s easy to see any beautiful quilt in today’s world and think that the pattern must have been made by AI, or that the fabrics just come that way. 

These triangles weren’t generated in seconds. The fabrics don’t just come that way. 

They were cut one piece at a time, sewn one seam at a time, pressed, trimmed, arranged, rearranged, and stitched together over hours and hours spent in the sewing room, one day at a time. 

Each and every quilt represents DAYS spent in the sewing room, taking time for myself, creating instead of scrolling on the internet. 

And that’s one reason why I fell so deeply in love with the process. Because it’s not something you can just go buy. Quilting encourages us to slow down, learn something new, take time for ourselves, and use our hands. and create something that didn’t exist before. 

Take this as your nudge to get offline and go do something that you love today. Tell me what you’re doing in the comments. ✨ ⬇️

#modernquilting #quiltingtechnique #quiltpattern #quiltdesign #quiltersofig
👉 I refuse to spend hours ripping paper bits from 👉 I refuse to spend hours ripping paper bits from my seams from foundation paper piecing. 
👉 I ALWAYS attach the binding to the BACK first. 
👉 MAKE A TEST BLOCK... every single time. 
👉 I make notes on my foundations. 
👉 I make time for myself to be in my sewing room. 
👉 I buy pretty fabrics that make me go “Oooohhh, Aahhh!” 
👉 I don’t do Y seams. 

What would you add to the list? Tell us your quilting secrets in the comments. ⬇️

#quiltteacher #quiltingtutorial #quiltingtips #modernquilting
Comment ‘FREEZER’ for my free class to learn this Comment ‘FREEZER’ for my free class to learn this amazing paper piecing technique! 🌟

If your freezer paper is not sticking to your fabric, your iron might not be hot enough. 🔥

But be warned... 👇

You don’t want it to be TOO hot either. 

Use a HOT dry iron, and that should help your freezer paper stick to your fabric! 

The freezer paper needs enough heat to grip the fabric properly.

I also love using a wool pressing mat because it helps hold heat longer and makes the freezer paper stick even better.

When it comes to the quilting techniques, sometimes even a tiny adjustment can make a huge difference. 🙌

Quilters, do you ever struggle with this? Let me know in the comments and drop a ‘FREEZER’ below if you want to take my free class! 💌
Follow on Instagram
© 2026 Bryan House Quilts